Introduction
When you think of exploring astronomy, you probably
think of using a telescope to view the moon, planets or other
objects in the night sky, and many great discoveries have
been made since the invention of the telescope. One of
the first astronomers to use a telescope to study the heavens
was the great scientist, Galileo. His work led to the
discovery of the true nature of planets. However, before
the telescope, people observed the night sky with just the
naked eye, and their observations laid the groundwork for the
discoveries that would later be made with the telescope.
For many centuries before
Galileo, people who studied the stars observed that most of
them seemed to move through the sky in a fixed pattern, almost
as though they had been painted on the inside of a giant ball
surrounding the earth. This pattern of stars appeared to
rise in the east and set in the west every night. As the
nights progressed throughout the year, the pattern would
appear to gradually shift, but it was always the same
pattern.
A few of the stars, however,
seemed to slowly move around the sky in paths of their
own. These stars were called "wandering stars."
The ancient observers identified five such wanderers and named
them Mercury, Venus, Mars, Jupiter and Saturn. Still, as
far as everyone knew, they were just stars, like all the
others, except that they just somehow managed to move around
on their own and would sometimes be brighter than at other
times.
But when Galileo pointed one
of his first telescopes at a couple of these planets, he made
some amazing discoveries. Venus was not just a bright
star - it was actually round and looked very much like the
moon. In fact, over time it would actually go through
phases just like the moon, which explained why it looked
brighter at some times than at others. And when Galileo first
looked at Jupiter, he saw that it was round as well. But
even more amazing, Galileo saw that Jupiter had moons of its
own circling the planet. These wandering stars were not
stars at all. Galileo realized that he was actually
seeing other worlds!
Telescopes kept improving and
many more discoveries have been made ever since. Today,
we have modern observatories on earth with giant reflector
telescopes, and space telescopes such as Hubble
orbiting the earth. Yet as important as the discoveries
made by telescopes are, they never could had been made without
many centuries of careful observations of the sky without
telescopes.
In the activities that follow,
you will learn how to observe and identify some of the stars
and constellation (or patterns of stars) in the night sky
using only your eyes, and you will also learn how to locate
them on any given night from where you live. You will also learn how to locate
the planets and observe the moon's phases. You will do
this by using a free computer program called Stellarium, a
planisphere, and a simple homemade instrument called an
astrolabe.
You may have already studied some of what is presented
here in your school work, but if you have never actually gone
outside and seen the things you have studied, you have missed
much of what astronomy is all about, but if you are willing to
take the time to work through these activities, you can become
a competent observer of the skies without a telescope!
These activities assume that
you don't have someone with you that can help you locate the
stars. If you do have someone who can help you, so much the
better. Also, if you work together with a group of
friends, this will be a lot more fun.
Some of the outdoor activities
cannot be done where there is a lot of artificial light.
If you live in the city, much of what you might want to see
will be made invisible by bright outdoor lights.
However, using Stellarium, you can at least see what you are
missing, and you can see it just as it would appear in the
night sky.
Finally, because The
Science Notebook staff is
located in the Northern Hemisphere, some of the outdoor
activities are based on constellations visible only in
the Northern Hemisphere, but the same principles can be
applied to the Southern Hemisphere as well.
So let's get started!
Installing
Stellarium
 Stellarium Screenshot
Until you learn your way
around the night sky, you have to have some way of knowing
where to look for what you want to see. You also have to
know how to find the point in the sky where you want to
look. Star charts and star finders can help you see what
the sky above you looks like at any given time, and they
are either very inexpensive, or free. (We'll tell you
how to get the free stuff later on.) But these won't do
you much good until you learn to recognize a few stars, and
the patterns of stars you see in the night sky.
The best way to do this is to have someone to show you how to
find these things in the night sky, but the next best thing is
to use a good computer program that shows you what is in the
sky and where to find it. So, to begin your study of the
night sky, you should download a copy of an excellent and free
program called Stellarium.
Stellarium will let you view the
night sky on your computer as it appears outside no matter where
you are. This can be very useful if you live in a city
where bright lights keep you from getting a good look at the
night sky, or if the weather happens to be bad. In
addition, Stellarium will let you view the sky at some past or
future time, or from a completely different location, and it
will allow you to slow down or speed up time. It will also
let you turn on labels that will help you identify stars,
planets, constellations, and other objects.
Stellarium will also show you the patterns of the various
constellations, and it even has a function that will zoom in on
the moon, planets and other objects to view them close
up.
Interested? Well, to get a copy of Stellarium, go to the
Stellarium website at:
http://stellarium.org/
From there, you will find a link that will let you download the
program for Linux, Mac or Windows. You should also download the
PDF Stellarium User's Guide. Once you have downloaded both
the install program and the User's Guide, install Stellarium on
your computer.
NOTE: If you are not sure how to
download and install programs on your computer, get someone to
help you! You need to follow the instructions for your
operating system in the User's Guide. Unfortunately, we
can't give you step by step instructions here because they are
different for each system, and because the program is
constantly being updated.
Once the program is installed, you'll need to configure it for
your home location. You'll also need to set the date and
time and specify whether you live in an area that uses Daylight
Savings Time. In addition, you'll need to pick a city
near where you live, or else enter your latitude and longitude
and make it the default location where Stellarium will "go to"
when it is started. For the activities that follow, a
nearby city will be close enough, but if you are not near one of
the listed cities, you can enter your latitude and
longitude. You can locate your latitude and longitude
online or get it from a GPS unit.
There are several other settings that you can change once you
become familiar with the program, but for now, all you need to
do is get your default location and time right.
When the program is properly installed, you should be able to
see what constellations and other objects are visible outside on
the Stellarium dispay on your computer screen. If it is
day, you will see the daytime sky. If night, you will see
the stars.
There is so much you can do with Stellarium, but for right now,
let's just look at some of the basics.
Stellarium
Basics
It is probably better (but not absolutely necessary)
to do these activities after dark so that Stellarium will
start with the nightime sky.
Materials Needed:
Stellarium installed and configured for your location; the
Stellarium User's Guide.
Procedure: Start
Stellarium. If it is day time, press [CTRL] and [=]
together. Each time you press them, time will advance one
hour. Press until the time is night and you can see the
stars.
Now, hold the left mouse button down and drag your mouse to look
around the sky. Take some time to explore.
Next, if you have not found them already, you should locate the
usually invisible toolbars at the left and bottom of the
screen. If you move your mouse down near the bottom left
of the screen, the bottom toolbar will appear, and if you move
your mouse to the lower left hand side, the left toolbar should
become visible.
Let's start with the left toolbar and explore a bit.
When you move your mouse to the lower left edge of the screen,
the left toolbar will become visible with six icon
buttons. From top to bottom, they are:
- Location
- Date and Time
- Sky and Viewing Options
- Search
- Configuration
- Help
As you mouse over each button,
it will identify itself. Clicking on any button will open
a new window that will allow you to change settings. Let's
see what they do...
Location
Click on the Location button to open the Location window.
This window will allow you to set your default location (which
you should have already done), either by entering your latitude
and longitude or by selecting a nearby city. You can also
select another location to view by (1) entering another latitude
and longitude, (2) choosing another country or city, or (3)
clicking on the map. Try using each of these methods to
move around the world to other locations. You can always
return to your default location. Even if you get
stuck, the next time you reopen the program, you will be back to
your default location.
Date and Time
The Date and Time window will let you move ahead or backward to
any date or time. As you change the date or time, you can
see the changes in the night sky on the screen. Try
it. (Don't worry about resetting the time before you close
the program. The next time you open the program, it will
reset to today's date and time.
Sky and Viewing Options
The Sky and Viewing Options window allows you to adjust a number
of different viewing options including changing the
landscape. If you want to change the default landscape,
feel free. Otherwise, you probably shouldn't change any
settings here until you get to know the program a little better.
Search
The Search window allows you to look for any object. Type
in "moon" and see what happens. (If you click on any
object in Stellarium, including some below the horizon that are
not visible, it will be surrounded and identified in the upper
left hand corner of the screen. To make this information
go away, just right click once.)
Configuration
The Configuration window has a lot of settings that you don't
need to worry about until you become more familiar with
Stellarium. These are described in the User's Guide.
Help
The Help window has a lot of really useful information. It
lists many keyboard shortcuts that are very useful. These are
also listed in the User's Guide, and you might want to print
them out for handy reference, but you can see them at any time
just by clicking the Help icon.
Bottom Toolbar
Now let's take a look at the bottom tool bar. When you
move your mouse down to the bottom of the screen near the left
hand side, the bottom toolbar appears with nineteen buttons that
turn various features on or off, or toggle between two different
functions. We'll cover these from left to right.
Constellation Lines
Constellation Labels
Constellation Art
The first three buttons show or hide the imaginary lines
representing constellations, labels for the constellations, and
some neat artwork that shows what each constellation is named
for. Try turning each one on and off. You can have
more than one on at the same time.
Move around a bit to explore the sky with each of these buttons
turned on.
Equatorial Grid
Azimuthal Grid
These buttons will turn two different imaginary line grids on or
off. These grids are used to locate objects in the sky,
and you can display one or both at the same time. In the
explorations on this site, we will be using the azimuthal grid,
although we won't need to turn it on right now.
But go ahead and try each of them. What happens to
these grids when you move around around the night sky?
Ground
This button will show or hide the landscape. Hiding the
landscape will allow you to see objects that are actually below
the horizon. Try it.
Cardinal Points
This button will turn the cardinal directions - north, south,
east or west - on or off. These directions will help you
get your bearings when you start studying the sky.
Atmosphere
This button simulates the haze near the horizon. You can
turn this off so you can see the stars near the horizon much
better, but in many cases, showing the haze of the atmosphere
near the horizon is more realistic. Even during periods of
fair weather, it is often hazy near the horizon.
Try turning this function on or off to see what it does.
Nebulas
This button will label the location of nebulas when turned
on. Nebulas are huge clouds of dust and gases. They
are often not visible without a telescope, and the ones that are
will appear as somewhat fuzzy stars.
Click this button on and look for the labels. What you see
displayed will depend on your local time and location, as well
as the time of year.
Planet Labels
This button will label the planets. Toggle it on and move
around the sky to see whether you can find any planet in the
sky. (Hint: More planets are usually seen around
sunset or sunrise than late at night.)
Equatorial/Azimuthal Mount
This button is used for one of Stellarium's advanced functions -
automatic telescope control. Click this one on and off to
see the effect, but for our work, we're not going to need it, so
we'll leave it off.
Center
If you click on any star or other object, it will be identified
and labeled. If you then click on this button, that object
will be centered in the screen. Try it with several
stars. As mentioned above, you can remove the label by
right clicking.
Night Mode
If you click on this icon, it will turn on a dull red background
on the ground. This is useful if you have Stellarium on a
laptop you can take outside with you. Try it.
Full Screen/Window
This toggles between a full screen view and a window.
Again, try it.
Quit
Clicking the big red "X" will close Stellarium. Try it now
if you want, or just try it once you are ready to quit.
Decrease Time Speed
Normal Time Rate
Set Time to Now
Increase Time Speed
These four buttons will really let you have fun with
Stellarium. Each time you hit the Decrease Time Speed
button, time begins to run backwards! Each time you hit
the Increase Time Speed, time speeds up ten times faster than
before. Normal Time Rate will show the movement of the sky
at normal time, whatever that time is when you click the
button. Clicking Set Time to Now will take you back to the
current date and time, just in case you have gotten ahead of
yourself. Take some time to play with these buttons while
you watch the sky.
Here are some things to try on your own or with the help of
others:
- Go ahead or backwards in time using the time setting. or the
bottom toolbar buttons
- Speed up time so that you can see the stars move through the
night sky in their fixed pattern.
- Select one of the planets in the sky by clicking on
it. Then, use the zoom function (mouse scroll wheel or
page up/page down to zoom to it. (Press "/" if you are
in a real hurry to get there, and "\" to return to where you
started from.
- Do the same for the moon.
- Go outside and see whether the pattern you see in Stellarium
looks like what you see on your screen in a particular
direction.
Going
Further: Now that you have seen some of what
Stellarium can do, take some time to play with Stellarium.
Be sure to keep the User's Guide handy, and feel free to explore
with Stellarium. You really can't break anything!
Observing How Stars Move In The
Sky
OK, playtime's over!
Well, not really, but your
first step in learning the night sky is to get familiar with
how stars move through the sky. In this activity, you
will use Stellarium to see how the stars move over time, and
then observe the same thing outside.
Materials Needed:
A computer with Stellarium installed and set up for your
location, a clear dark night, paper and pencil, flashlight.
Procedure: Start
Stellarium. Make the following adjustments:
- Make sure the "Cardinal Points" button is enabled.
When this function is turned on, the four major compass
directions will be displayed (N, S, E, W).
- Make sure that "Azimuth" button is enabled and that the
"Equatorial" button is disabled.
- If you are doing this during the day, press the [CTRL] plus
[=] keys together to advance time until sunset one hour at the
time. Each press of this combination advances time by
one solar hour.
- Use your mouse to drag the horizon until you are looking
north if you are in the Northern Hemisphere and south if you
are in the Southern Hemisphere.
When you are ready, face east
and watch the star pattern and advance time one hour at a time
through the night. What do you notice about the
pattern? Are there any objects that don't fit the
pattern? If so, click on them to see what they are. Use
the [CTRL] plus [-] key combination to return to around
sunset. Now increase time by pressing the icon (see above)
or the [L] key a couple of times. Watch what
happens. Press the "Set Time to Now" icon on the lower
keyboard to get everything back to normal.
Repeat the above while looking north, west and south. and note
what you see each time
Now lets see this outside.
On a dark clear night, preferably when the moon is not out, pick
a location outside, to the east if possible, that is easy
to remember and where you have a good view of the stars near the
horizon. (We'll do much more with directions later, but
east is in the general area where the sun comes up. OK, if
you already knew that, sorry!) From that spot, choose a
landmark that is easy to see such as a tower, power pole, or
tall tree. You want to be able to return to that same spot
and face that same direction each time.
On a piece of paper. make a note of where you are standing and
which direction you are looking by the landmark you have
chosen. Pick out a shape within the pattern near the
horizon that is made of bright stars and and sketch it by making
dots on the paper. Include your landmark in the
sketch. This will make it much easier to see any movement
in the pattern. Work carefully and study this spot until
you are certain you can remember the pattern.
Go back to that same spot and look in the same direction after
one hour, and again after two hours. Compare the position
of the stars with where they were when you started. What
do you see? Can you see this same pattern on Stellarium?
Does the pattern appear in the same place in the sky on
Stellarium as it did when you observed it outside?
What You Saw: When
looking
toward the north or south while using Stellarium, depending on
which hemisphere you live in, you should have observed that the
entire pattern of stars seemed to move in a semicircle, and
moving from east to west. In the Northern Hemisphere,
these stars seem to rotate around the star Polaris, also known
as the "North Star." In the Southern Hemisphere, there is
no bright star that the rest appear to rotate around. In
other words, there is no visible "South Star," but the stars do
seem to rotate around an invisible point in the south.
You should have noticed that the entire sky appeared to rotate
as a single pattern of stars that does not change. The
reason they all appeared to move, however, was that the earth is
actually turning on its axis once every twenty four hours, so
when the sun goes down and the stars become visible, it looks
like they are slowly spinning in a circle above either the north
or south pole, depending on where you are. As the night
passes, some stars appear to rise over the eastern horizon as
others appear to set in the west, just as the sun and moon do.
However, even though all the stars appear to move in a fixed
pattern, in reality, it is not the sky spinning, but the earth
spinning underneath the sky.
If you made your first trip outside to observe the stars, what
you saw should have been very similar to what you saw using
Stellarium. However, the stars might have appeared
slightly different due to your location. If you were near
bright lights, many of the fainter stars werel
not visible. Also, it is not possible to represent
the sky on a flat surface such as your computer screen without
some distortion. However, once you get used to matching
what you see outside to Stellarium, it will become much easier
to find your way around the night sky.
If the sky outside did not look similar, you should go back to
Stellarium and verify that your date and location are both
correct for the time you are observing and try again.
Going Further: You
can change your location in Stellarium and see how this pattern
appears in different locations. For example, if you were
at either of the poles, the stars would seem to trace this
pattern in a circle with the center directly above your head
because you would be standing on one end of the earth's
axis. You can actually see this if you change your
location to near one of the poles by clicking on the location
map.
Also try running through several days of time around the first
day of each season - the 20th of March, June, September and
December should be close enough. Depending on which pole
you choose. What do you notice about the lengths of day
and night at each of these times of the year? Do you know
why?
Next, change your location to the opposite pole. Do you
see the same star pattern? You may recognize a small part
of the star pattern on the horizon, but otherwise you should see
mostly a different pattern. The reason for this is that
the earth itself blocks our view of most stars visible in the
opposite hemisphere.
Time Out
Although all the stars seem to be in a fixed pattern,
in reality, all the stars are moving, and in different
directions. However, it would take hundreds of years to notice
this change with just our eyes. That's because all the
stars we see are very far away. The absolute nearest
star to us is almost thirty trillion miles away, and most are
many times farther away than that. (A trillion is a 1
followed by 12 zeros!) Even if a star moves several
million miles a year, it would take many years for it to move
enough so that we could see its change in the sky on
earth. Therefore, the pattern we see is changing, but it
is changing so very slowly that we would not notice any change
in our lifetime.
The first astronomers spent
many nights watching the movement of the stars, and they
noticed a couple of things about this pattern that would later
prove to be very important to our understanding of
astronomy. First, while the pattern never changed, the
pattern would appear to rise a little later each night.
This would later be an important clue in helping us to
understand that the earth orbits around the sun. Second,
they noticed that there were a few star-like objects that
seemed to move by themselves over time and not with the
pattern. These were the "wanderers" that we now know to
be planets. (See Introduction above.) As
people tried to explain these motions, they would ultimately
also show that these were also bodies in orbit around the
sun. Finally, people also noticed that the moon moved
independently of the pattern as well. Explaining the
motions of the moon through the night (and daytime) sky also
helped to further our understanding of astronomy.
NOTE: Many of the following
activities are based on observations from the Northern
Hemisphere. This is not meant to leave out half the
world. Rather, The
Science Notebook is writing based on the experience
of its staff. We could write about some of the stars in
the Southern Hemisphere, but it would not be from experience,
and so would not be accurate. If you live in the
Southern Hemisphere, you should try to find someone to assist
you.
Tools to Explore the
Night Sky
You can play with Stellarium for hours without
venturing outside to see the real thing. However, the
object of these activities is to get you to watch the sky
itself. In order to do that, you have got to know how to
find your way around on the ground. In these next few
exercises, we're going help you locate a good place to
stargaze. We'll also see how to identify the different
directions and how to locate those directions on the ground
outside, first using a compass, and later using the sky
itself.
Picking a
Location to Observe the Sky
Procedure:
If
you live in or near a city where there are lots of lights at
night, it may not be easy for you to do much stargazing, since
night lights can obscure all but the brightest stars. If
this is your situation, you may have to just use Stellarium for
now, but be ready to stargaze the next time you find yourself in
a good dark location.
However, if you are lucky enough to live in an area where there
are not that many lights, the number of stars you can see will
greatly increase, and you should get ready to learn the night
sky. If you do live near such an area, the first thing you
should do is identify a good possible area for stargazing during
the daytime. This area should be easy to get to and have
the best view possible of the sky all around the horizon.
You don't want a lot of tall trees or
buildings around if you can help it. Above all,
pick a location where it is safe to get to and be at night, and
always let an adult know where you are going before you
leave. Never compromise your safety!
Once you have picked what appears to be a good spot, visit it
well after sunset to see how it looks at night. If the
view of the sky is good, get ready to do some observing.
Finding the
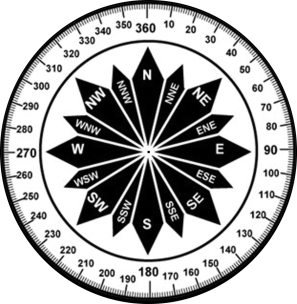
"Cardinal Points" with a Compass
Materials
Needed: A magnetic compass; a good place to
observe stars outside; flashlight, four rocks, plastic bottles;
or some other objects to mark the directions on the
ground.
Procedure: Take a
look at the compass below. You'll notice that it is marked
with the cardinal points - North, South, East and West.
The one you have is probably also marked the same way.
Also notice that other points are also marked, such as
North East (NE), South East (SE) and so on. We'll deal
with those later.
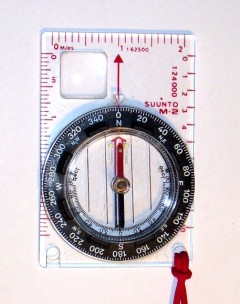
Your compass may also be marked
off in degrees from 0 to 360. We'll go into more detail
about those later as well, but for right now, notice that North
is 0 degrees, East is 90 degrees, South is 180 degrees, and West
is 270 degrees.
The compass has a magnetic needle inside that lines up in a
generally north and south direction. It is important to
know which end is supposed to point north, and which is supposed
to point south. Most compasses will have a little dot or
letter to let you know which end points north. (You can
learn much more about how and why a compass works on our
Electricity and Magnetism pages!)
There is one slight problem with a compass. Depending on
where you live, the compass probably doesn't point exactly north
or south. That's because the Earth's magnetic north and
south poles are not exactly lined up with the Earth's axis, so
the compass is a little off in most areas. However, the
compass will still give you a pretty good idea about where the
cardinal directions are, and that's enough for now. We'll
fine tune things a bit later.
For right now, stand in the spot where you expect to do your
stargazing. From this spot, line up the end of the compass
needle that points north with the N on the compass and face in
that direction. This direction is north. Have a
friend place one of the plastic bottles or other markers in that
direction from where you are standing. Keep the needle
lined up with North on the compass as you turn to your
right. You should now be facing east, and the E should be
in front of you. Place another marker in this
direction. Keeping the compass needle lined up with the N,
face right again. You should now be looking south, and the
south end of the needle should be pointed away from you.
Place a third marker in this direction. Finally, keeping
the compass lined up with north, face right again, and you
should see the W in front of you, which means you are now facing
west. Place a marker in this direction as well.
Finally, mark the spot where you are standing. If you have
a marking pen, it would be a good idea to mark the four items
you used as markers N, S, E and W. The markers
should be placed so that they will be easy to find with a
flashlight at night from where you were standing when the
markers were placed.
What you have done is marked the cardinal directions from
exactly where you were standing. This will help you
quickly determine your direction at night when looking at the
sky. However, if you move from that spot, you will have to
identify the directions again. After you get familiar with
the compass, you should be able to quickly determine the four
directions without any markers. Just line up the N with
the north end of the needle. When you face north, east is
to your right, west is to your left, and south is directly
behind you.
Going Further:
Because the Earth's magnetic poles are not exactly in line with
the geographic poles, your compass could be off by several
degrees. This is known as magnetic declination, and it has
to be taken into account when knowing the right direction is
critical. The direction the compass points is known as
magnetic north, while the actual north is known as true
north. The magnetic declination measures how many degrees
east or west of "true" north the compass needle is pointing. You
can find the magnetic declination for your area by visiting:
For example, if the magnetic
declination at your location is "10° W", magnetic north lies 10
degrees west or counter-clockwise from true north. ("°" is
the symbol for degrees.) Therefore, true north is 10
degrees clockwise from the north point of the compass
needle.
If the magnetic declination is 10° E, magnetic north is 10
degrees clockwise from true north, so true north would be
counterclockwise from the north point of the compass needle.
If you were relying on the compass for exact directions, you
would need to make this correction, but if you live in the
Northern Hemisphere, there is a much easier way than having to
depend on the compass! But before we get to it, we need to
learn a little bit about measuring directions.
Finding
an Azimuth
There are a couple of ways to zero in on stars and
planets in the night sky. The simplest way to go
directly to a spot in the sky is to know the direction you
need to look, or the azimuth, and from that direction, how
high you need to look, or the altitude. In this activity, you will
learn how to determine the direction or azimuth, and in the
next, you'll see how to determine the altitude. Both are
really very easy.
Materials Needed:
Compass card illustration shown here:
Procedure:
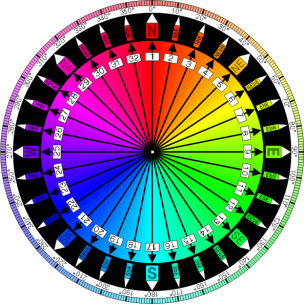
A
compass card is a circle-shaped card that is either attached to
a compass needle and swings or rotates with that needle, or is
underneath the compass needle, with the compass needle able to
swing over it. The compass card image shown above shows
directions in two different ways. The traditional way of
indicating direction measures it with reference to the four
cardinal directions - north, south, east and west.
Locate the letter N for "North" at the top of the circle.
When the "N" or north on this card is actually pointing north,
you can determine the direction of an object from where you are
by using one of thirty two points. Starting at North, the
next point to the right is "North by East" (NbE), then "North
North East" (NNE), "North East by North" (NEbN), "North East"
(NE) and so on.
For many centuries, people who sailed the oceans used these
points to determine their direction. Once a sailor learned
the points well, it was fairly easy to use them, but they can be
a little confusing to learn.
The good news is you don't have to learn them!
Notice that right above the N, there is also a zero and a degree
symbol (0º). If you move your finger around the circle,
you will notice that the circle is divided into 360 equal
parts. Each part is called a degree and is represented by
the number and the symbol for degrees, "º". Also notice
that every ten degrees is marked by a number showing the number
of degrees from north. Using the degree scale,
instead of having 32 possibly confusing reference points with
different names, you now have 360 divisions you can identify by
just a number.
Why 360º? Well, that is really a math question, but for
right now, you should know (if you don't already) that if we
divide a circle like a pie, it is useful to divide it into 360
equal slices, and each of these slices measures one degree. (Not
much good if you are hungry, but great for directions!) We also
use the degree as a unit to measure the size of an angle, and we
will do that in the next activity.
For right now, though, you just need to know that you can
indicate any azimuth or direction by so many degrees.
Again, look at the circle. You will see that north is 0º.
east is 90º. south is 180º and west is 270º. For the
points in between, you can indicate north by east as 11º, and so
on. You should see that you can identify directions much
more accurately using 360 degrees than the 32 compass points
because you can accurately identify directions between any of
these points. In fact, by using degrees, you can go from
32 possible directions to 360.
If you can line up north on this card with true north, the
direction from your location to any other location can be
measured as so many degrees from north. The direction of
an object from your position is known as its azimuth.
A little later on, we'll actually line up a similar circle with
north and start locating some azimuths.
Determining
Altitude
Are you with us so far? If you are, you are
half way to being able to locate any object in the sky.
Once you know the direction you need to face (the azimuth),
you then need to know how high up in the sky to look. In
other words, you have to be able to find the altitude, and
that requires us to look at degrees again.
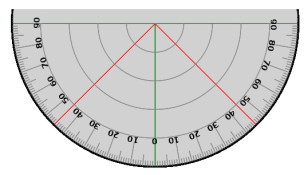
Materials Needed:
Protractor.
Procedure: In the
last exercise, you saw that a circle can be divided into 360
degrees. when two lines meet at a single point, they form
an angle. Shown below are three kinds of angles.
Any angle can be measured in
degrees using a protractor. You have probably seen one of
these before, and they are very simple to use.
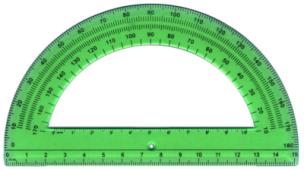
All you have to do is to place
the hole at the center of the protractor over the point at which
the two lines meet, and place one line along the bottom
edge. If the gap between the two lines along the scale is
less that one half of the circular scale, the angle is an acute
angle and it is less than 90º. If the gap fills more that
half, the angle is greater than 90º, and the angle is an obtuse
angle. You have two scales so that you can measure the
angle whether the opening is to the left or the right, but you
have to know whether it is acute or obtuse in order to use the
right scale.
The protractor shown below is slightly different from the one
above. You will notice that instead of having to line the
angle up at the circle, this protractor allows you to line up
one line of the angle with the bottom of the protractor.
(If you don't know how to measure an angle with the type
of protractor you have on hand, by all means get someone to show
you! A math teacher would be a good place to start.)
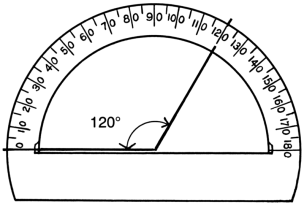
The important thing to remember
is that to measure altitude, your angle will always be an acute
angle or less than 90º.
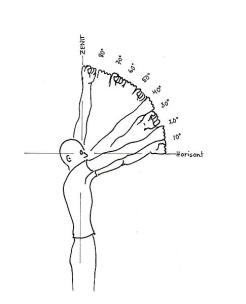
Take a look at the diagram below. The man is looking at a
star that is above the horizon. Just how far above the
horizon? If we imagine a flat line going to the edge of
the horizon from the man's eye, and another imaginary line going
from his eye to the star, we have an angle. If we have
some way of measuring that angle, we can tell how far up from
the horizon we have to look to find that particular star.
The measurement of that angle is called the altitude, and we can
find it in a couple of different ways.
 In this illustration, the man
is using a device called an "astrolabe" to measure the
altitude angle.
In this illustration, the man
is using a device called an "astrolabe" to measure the
altitude angle.
The first way is only
approximate, but it will give a rough estimate in many
cases. The man below is holding his arms outstretched with
his hands balled up into fists. Straight to the horizon is
0º. If the bottom of the man's fist touches the horizon,
an imaginary line running to the top of the fist is about
10º. When he places the fist of his other hand on top of
the first, an imaginary line to that fist is about 20º. He
can do this all the way up to straight overhead which is 90º and
which should be about nine fists. By counting the number of
fists it takes to go from the horizon to the star or other point
in the sky, the altitude can be estimated.
Of course this is only an
estimate because nobody has the same size hands and arm lengths,
but it should be fairly close for most people. Try it for
yourself and see how close you are to stacking 9 fists when you
reach straight up or 90º.
There is a much more accurate way of doing this, and we'll see
it in the next activity.
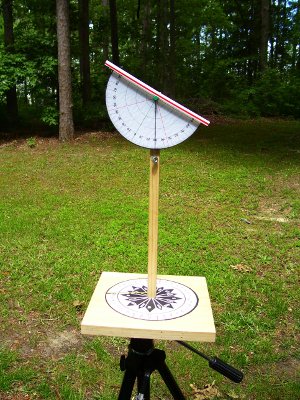
Making
an Astrolabe
Now you have most of what you need to know to locate
any object in the sky if you are given its azimuth and
altitude. What's missing is some sort of instrument to
measure the azimuth and altitude of an object. The
ancient astronomers used a very simple device called an
astrolabe to locate objects in the sky, and we can too.
We just have to make one, but fortunately, it is very easy to
do!
Materials Needed:
Compass like the one shown below (available as a larger
image
HERE); semi-circular scale like the one
shown below (available as a larger image
HERE);
wooden base, upright stick; string; small weight such as a nut;
clean drinking straw; nails.
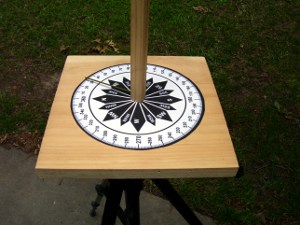
 Compass rose for azimuth
circle and protractor scale for altitude indicator.
Compass rose for azimuth
circle and protractor scale for altitude indicator.
Larger versions used for making the astrolabe and suitable for
printing are available by
clicking on the links in "Materials
Needed" above.
Procedure:
Print out the compass rose and circular scale. Cut out the
compass rose and put it aside.
Drive a nail from the underside of the exact center of the
square board all the way through the board. (If you have a
drill to pre-drill all holes, that might make things a little
easier.) Take the compass rose and push the point of the
nail through the exact center, and push the rose all the way
down to the base. The exact size of the board is not
important so long as the compass rose fits. Line up the N
with the middle of one side of the board and glue or tape the
compass rose to the board. This will become the azimuth
scale for your astrolabe.
Next, print out the semicircular scale on heavy card stock and
cut it out. If you don't have heavy card stock, glue the
paper with the scale to a piece of cardboard and let it
dry. When the glue is dry, cut the scale and glue or tape
a length of the drinking straw to the top edge and put it
aside. This will become the altitude scale.
Next, use a small nail to make a hole near the bottom of the
straight stick about half way through the stick. Remove
the nail and find a piece of wire, coffee stirrer, or some other
straight object that will fit snugly into the hole. It
should be about half the diameter of the compass rose, and it
will serve as a pointer. (The one in the illustration used
a length of coat hanger wire.) Remove it for now.
Now take the same end of the
stick that will have the pointer attached. Carefully place
the center of that end of the stick on the point of the nail
coming from the base and tap the top of the stick to drive it
into the nail. When driven in, it should be straight.
Place the pointer back into the hole on the side. If the
pointer is loose, you can use some glue to secure it
better. Now twist the stick around so that the pointer
sweeps through all 360 degrees of the azimuth scale. The
stick should be just loose enough to turn freely.
Use a push pin or small nail to mount the altitude scale at the
top of the stick by punching it through the hole and the into
the wood. It should be lined up in the same direction as
the azimuth pointer. The altitude scale should be loose
enough so that you can rock it up or down, but tight enough so
that it will stay in place once you move it.
Finally, tie a small nut or other weight to one end of a string,
and tie the other end of the string to the nail holding the
circular scale as shown.
If your finished astrolabe looks
something like these pictures, you are ready to learn how to use
it!
Using
the Astrolabe
Materials
Needed: Astrolabe; magnetic compass.
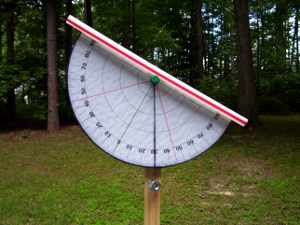
Procedure: Go
outside and locate magnetic north with your compass. Place
your astrolabe on a flat level surface such as a table or
box. Next, line up north on the azimuth scale with
magnetic north. With the azimuth scale lined up with
north, you can determine the direction (azimuth) of any object
from you by turning the stick and noting the direction of the
pointer.
Next, pick out several objects such trees, water tower, power
lines, a distant radio or cell tower, or roof tops. Now
level the scale so that the straw is horizontal. It is
exactly horizontal when the string with the weight hanging down
crosses the zero mark on the altitude scale.
Turn your pointer to one of the objects selected. What is
its azimuth in degrees? Next, look through the end of the
straw opposite the pointer and move the scale so that you see
the top of the selected object through the straw. Note
where the string is on the scale. This is the altitude of
the top of the object in degrees.
Now determine the azimuth and altitude for all of the objects
you have selected. Have someone to check behind you to
make sure you are doing it right.
OK, you can put this aside for
a bit and we'll get back to some star gazing. Once we
learn how to find north in the night sky without a compass and
observe a few constellations and stars, we'll come back and
learn how to really use this very useful instrument!
Finding
True North
As you can probably see, to find your way around the
night sky, you absolutely need to be able to find true
north. You can use a compass, but if you do, you may
have to deal with magnetic declinations or else not be
exact. However, there is a much easier way if you live
in the Northern Hemisphere. By learning to locate
Polaris, or the North Star, you will be able to instantly
determine exactly where true north lies. Once you know
where true north is, you can find any other point in the
sky. These next two activities will show you how to find
Polaris.
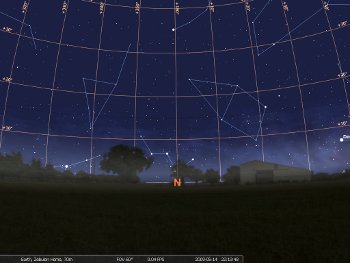
Observing
the constellation "Ursa Major" (or "The Big Dipper")
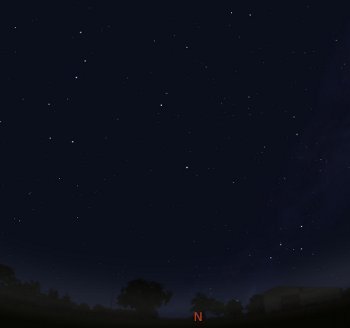 An unmarked view of Ursa Major
and Polaris from Stellarium.
An unmarked view of Ursa Major
and Polaris from Stellarium.
Materials
Needed: Stellarium set for your location; paper
and pencil; an outdoor location facing north; magnetic compass.
Procedure: Start
Stellarium, and if it is daylight, advance time to about
sunset. Make sure the cardinal points are turned on and
use the mouse to drag the display around to the north, as
indicated by the red "N." Turn the constellation names and
lines on.
Starting at the horizon, begin looking for a constellation
called "Ursa Major." If you don't see the name
immediately, look up by using the mouse to drag the sky straight
down. Depending on your location, and the time of year,
Ursa Major could be partially under the horizon or high in the
sky at sunset. If you don't have a good view of Ursa
Major, speed up time until you can see the sky begin to
move. As soon as all of Ursa Major is clearly visible,
slow down to normal time. Notice the shape formed by the
imaginary lines. Also notice the time.
NOTE: The illustrations here
were taken from a Stellarium screenshot taken in June near
Raleigh, North Carolina near midnight. The position of
Ursa Major in your area will be different depending on the
time of year, time of day, and your location.
Make a sketch of the stars and lines and how they are positioned
in relation to the horizon.
 The same view as above except
that the constellation Ursa Major is now marked.
The same view as above except
that the constellation Ursa Major is now marked.
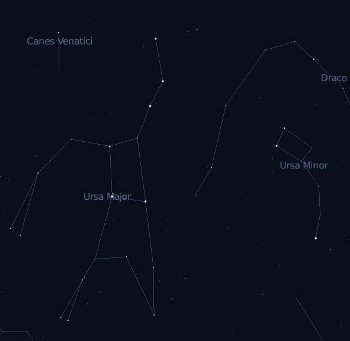 A closer view of Ursa Major
with Ursa Minor to the right.
A closer view of Ursa Major
with Ursa Minor to the right.
Although the "official name" for
this constellation is Ursa Major, it is also sometimes called
"The Big Dipper." This name comes from a series of seven
stars within Ursa Major that take on the shape of a
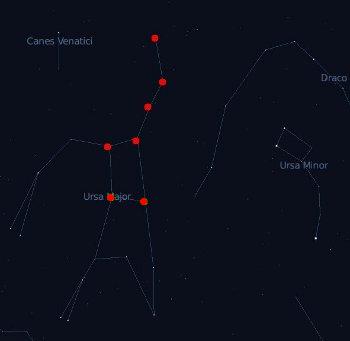
dipper. The screenshot below shows Ursa Major with the
stars making up the dipper shape indicated by red dots.
Two of these stars will become very important in the next
activity.
You should also mark this dipper pattern on your drawing as
well.
 The same view as above except
that the stars of the "Big Dipper" within Ursa Major are now
shown.
The same view as above except
that the stars of the "Big Dipper" within Ursa Major are now
shown.
These seven stars are very easy to spot.
Now it's time to go outside and
find the real Ursa Major! Starting at the time showing on
Stellarium when the sketch was made, go outside and face
north. Using the sketch you made, can you see the stars
that make up Ursa Major? How about the ones that make up
the Big Dipper? Remember how the dipper looks. This
is very important to finding Polaris!
Finding
Polaris
The Big Dipper is usually very easy to spot once you
know where to look, even when some of it is below the
horizon. Once you are able to identify the Big Dipper,
Polaris is very easy to find using two stars in the Big
Dipper, and Polaris is the most useful star to know in the
Northern Hemisphere. because it lies in the direction of true
north!
Materials Needed:
Stellarium set for your location; an outdoor location facing
north.
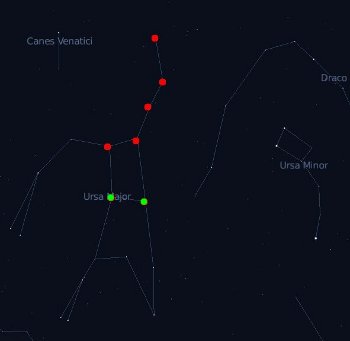
Procedure: Locate
Ursa Major for the date and time you plan to observe on
Stellarium as you did in the last activity. Note the
position of the stars in the Big Dipper, and sketch them as they
appear above the horizon if you need to. Pay particular
attention to the two stars that are opposite of the dipper's
"handle." In the screenshot below, they are marked as
green dots. These two stars are used to locate Polaris,
and they are called "pointer stars."
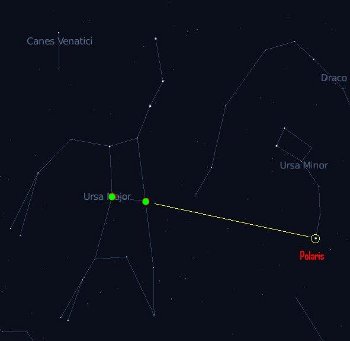
 The two "pointer stars are
colored green in this illustration and are located on the side
of the dipper opposite the handle.
The two "pointer stars are
colored green in this illustration and are located on the side
of the dipper opposite the handle.If you imagine a line from these
two stars going in the direction of the open part of the dipper,
and about five times the distance between these two stars, the
next star you will see is Polaris. The common name for
this star is the "North Star."
 The pointer stars "point" in
the direction away from the dipper's opening.
The pointer stars "point" in
the direction away from the dipper's opening.
Polaris is located about five times the distance between the
two pointer stars.
It is the only bright star in that general area.
The neat thing about Polaris is
that the direction of this star in the sky is always exactly
north. (Polaris is not exactly north, but it is so close
for all practical purposes that we can assume it to be exactly
so.)
No matter where you are, if you can locate Polaris, you can tell
which direction is north. Unlike the magnetic compass, it
always shows true north, and there is never any question of
magnetic declination. Its direction in the sky never
changes.
Why is this?
The position of Polaris as viewed from Earth is directly over
the geographic north pole. The Earth's axis, or point
around which the Earth rotates, runs from the geographic north
pole to the geographic south pole. When the sky is viewed
from anywhere within the Northern Hemisphere, the stars
appear to rotate, while we appear (to ourselves) to be standing
still. What is actually happening is that the earth is
rotating on its axis, and what we see as the stars moving in
circles around Polaris is actually the earth turning on its
axis.
You may be wondering about now whether there is a "South
Star." Unfortunately for our friends in the Southern
Hemisphere, there is one that is close, but it is too faint to
be visible in many locations. The name of the star is
Sigma Octantis. There are several others that are fairly
close as well, but not nearly as close to true south as Polaris
is to true north.
Going Further: Go
back to Stellarium and find Polaris. Next, speed time up
so that you can see the stars move, and you will clearly see
that they actually do appear to trace circles around Polaris.
Also, to show that Polaris is directly over the North Pole, set
the time in Stellarium for around December 20 of the current
year, and use the map to pick a location at or near the North
Pole by clicking as near to the top of the map as
possible. Locate Polaris and speed time up enough to see
the stars move. Two things you should notice are:
- Polaris will be almost directly overhead in the center of
the sky and
- Even if you speed up the time, it will stay dark all the
time.
You may remember from school
that the north pole is in constant darkness in winter and
constant sunlight in the summer due to the fact that the Earth's
axis is tilted. The same is true of the South Pole, except
that the seasons are reversed. (So what would you see if
you ventured down to the South Pole on Stellarium around
December 20? How about six months later? Go ahead
and try both.)
Locating "Ursa
Minor" (or the "Little Dipper")
Materials
Needed: Stellarium set for your location; an
outdoor location facing north.
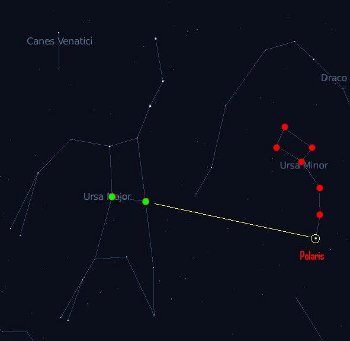
Procedure: Again
locate Polaris on Celestia for your location at a convenient
time to observe it outside. With the constellation lines
and labels turned on, notice that Polaris is one star in a
constellation called "Ursa Minor." This constellation is
also commonly known as the "Little Dipper." From the
screenshot above, you can see that the pattern looks a little
like a miniature version of the Big Dipper.
Now observe the Little Dipper at night. Several of the
stars in this constellation are not particularly bright, so you
may have to look hard to see all of them, particularly in an
area that is not ideal for observing.
There are actually a couple of other star patterns that feature
a dipper shape and are sometimes confused with the Little
Dipper. The first is found in the constellation Orion and
the second is a star cluster known as the Pleiades near the
constellation Taurus. Both are wintertime constellations
in the Northern Hemisphere, but neither are near Polaris or the
Big Dipper.
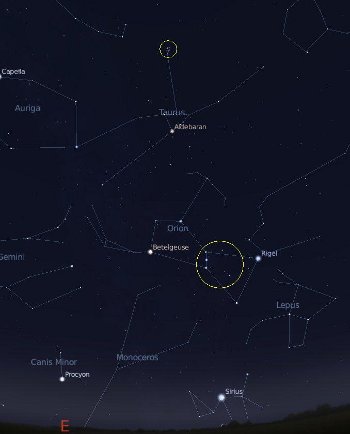 Many people mistake the
circled portion of Orion for the Little Dipper because of the
shape, and because the stars appear relatively more bright
than those of the Little Dipper.
Many people mistake the
circled portion of Orion for the Little Dipper because of the
shape, and because the stars appear relatively more bright
than those of the Little Dipper.
The above is a screenshot
showing both patterns circled. It represents December 20
of the current year near Raleigh, North Carolina.
The the pattern in Orion indicated by the red dots in the
screenshot below looks very much like a pot with a handle at
night and is very often mistaken for the Little Dipper. It
is sometimes also mistaken for the Big Dipper.
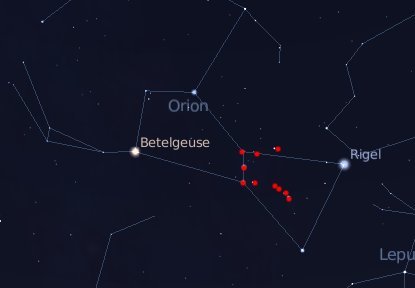 This is a closeup of the
constellation Orion. The stars within Orion that are
sometimes mistaken for the one of the dippers are marked in
red.
This is a closeup of the
constellation Orion. The stars within Orion that are
sometimes mistaken for the one of the dippers are marked in
red.
The Pleiades is a star cluster
that features several bright spots of light indicated by the red
dots. When viewed with the naked eye, this pattern is very
faint and very small, but it does look very much like a tiny
dipper as well. This group is sometimes called "The Seven
Sisters" from Greek mythology. You can read an interesting
article on the Pleiades
HERE.
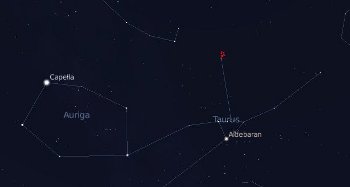 The Pliedes, sometimes called
"The Seven Sisters" are located in the constellation Taurus,
The Pliedes, sometimes called
"The Seven Sisters" are located in the constellation Taurus,
and although the appear to be small and fairly faint,
they do form what looks something like a miniature version of
the Big Dipper.
Be sure not to confuse the
patterns in Orion or the Pleiades with these two with the "real"
dippers. (You won't once you learn where the "real" ones
are found.) Again, remember that the real Little Dipper
(Ursa Minor) will be found near the Big Dipper (Ursa Major) and
both are always in the northern sky.
Going Further:
Locate the pattern in Orion and the Pleiades where you live
using Stellarium. They are visible in the winter months in
the Northern Hemisphere and in the summer months in the Southern
Hemisphere. (Going to about December 20 will work in the
Northern Hemisphere.) Next, if it is the right time of
year, see if you can locate these objects outside.
Constellations
You should now already know two constellations on
sight - Ursa Major and Ursa Minor, as well as the very
important Polaris. However, by working with
Stellarium, you have almost certainly also noticed
that there are a lot more constellations shown. But why
these patterns and not others?
The stars are where they are,
and the overall sky pattern is the same wherever it is viewed.
However, just about every culture that has taken
time to look into the sky has identified certain stars with
some part of their culture. The Greeks, for example,
imagined many of the characters from the stories of their gods
and goddesses in these patterns. Other cultures saw
other objects. By turning on Constellation Art in
Stellarium's bottom toolbar, you can see how some
cultures have matched the patterns to the names.
For example, Ursa Major means
"great bear" and Ursa Minor means "little bear." Now
we'll admit that The Science Notebook staff does not see bears in
either constellation, but according to Wikipedia, several
different cultures have. Regardless, both are recognized
constellations. (We do see the dippers, though...)
You can also view
constellation art from other cultures by changing the
art. You do this by clicking on the "Sky and Viewing
Options" button on the left toolbar and then "Starlore" in the
window that opens.
Identifying
Several Major Constellations
So far, we have seen that the stars move in one
continuous pattern. Because the pattern shifts a little
bit each night, after a year, we would have seen all the stars
visible to us with the naked eye. As the star pattern
advanced through the night sky, ancient star observers began
picking out patterns of stars within the big pattern that
reminded them of animals, ancient characters in mythology, or
other familiar objects. They could use these parts of
the sky pattern that were easy to remember to help them follow
the movements of the night sky. It also helped them to
track the passing of the seasons each year. We call
these patterns constellations, and just like the ancients, we
can use them to help us find our way around the night sky.
Now it is time for you to
begin exploring on your own. As usual, we will begin
with Stellarium, but you are encouraged to get outside and
view as many of these constellations as possible on your
own. You won't be able to see all of them at any one
time of the year, so plan on observing several times a year.
Here we go...
Materials Needed:
Stellarium set for your location; an outdoor location for
viewing.
Procedure: Set up
Stellarium for your current location and date. Move ahead
in time to night time and then slow down to normal speed.
Turn on Constellation Lines, Constellation Labels, and
Constellation Art from the bottom toolbar.
Now start scanning the horizon for the constellations listed
below
- Ursa Major
- Lyra
- Hercules
- Pegasus
- Scorpius
- Cygnus
- Bootes
- Cassiopeia
- Ursa Minor
How many are visible at this
time?
Advance about two hours at a time and continue searching.
Can you see any more?
How many could you view overnight on the day you are doing this?
Now, for those you cannot find, open the search window and type
in the name of the constellation. When you press enter,
Stellarium will take you to where that constellation is
located. It may take you up in the sky, and if so, that
means you missed it when you did your eyeball search.
However, it may point you down to the ground. If so, that
means that this constellation is actually below the
horizon.
While you are locked on to that constellation, speed up time
until the constellation becomes visible. You will see it
rise at some point (assuming that it is visible in your
hemisphere), but it might rise and set during the day. If
it does, then you should try to go ahead six months, and you
should be able to see it at night.
If the constellation is always below the ground where you are,
it is never visible from your hemisphere.
Do you see how you can use Stellarium to help you plan your
stargazing?
Finally, as time permits, start paying attention to what is
visible at night at your location, and begin learning to
recognize these important constellations in the sky at different
times of the year.
Other Tools for Finding Things in
the Night Sky
Once you can locate Polaris and a few of the
constellations on your own, you can begin to identify other
constellations. If you are lucky enough to have a laptop
you can take outside, you can use Stellarium in "Night Mode."
But if you don't have a laptop, there are several other
free or inexpensive tools you can make or use.
Planisphere
A planisphere is a simple chart you can adjust for your date and
time so as to be able to see things in the night sky. If
you live between 28 and 48 degrees North latitude, you can visit
this website to download and print a do-it-yourself
planisphere:
There are full instructions on
how to make and use the planisphere. (There are also a
number of other sites offering planisphere kits for different
latitudes free for downloading. Try searching "planisphere
download."
(You can also purchase a ready-made planisphere at many museum
shops or school supply stores, as well as online, but why not
save your money?)
Star Charts
There are a number of sites that will produce star charts
customized for your location, date and time, all for free.
Many of these may be printed out and taken outside with
you. Here are a couple of links:
This one is updated every month, is good for beginners, and is
excellent for outdoor use:
Sky and Telescope magazine lists a number
of sources for star charts, including their own charts.
Your Local Library
In the Internet age we tend to forget about all that is
available at the local library. Take a look in both the
adult and juvenile sections for good books on observing the
night sky. You may find that some are much more
complicated than you need, but you should be able to find at
least one or two that you can use. Armed with these
resources you can take outside, you should be able to begin to
locate things in the sky without having to rely so much on
Stellarium.
But we're not through with Stellarium just yet.
Putting
it all Together
If you have done the outside portion of these
activities, you should now have a pretty good feel for how to
find your way around the night sky. In this final series
of activities, we will put everything we have learned so far
together so that you can become an expert stargazer.
When you finish these exercises, you should be able to
pinpoint individual stars, planets, and other objects in the
night sky.
Identifying
Individual Stars in Their Constellations
There are far too many stars to learn all their
names, but there are a few that it would be well to learn and
to associate with their constellations. Let's take a
look at them...
Materials Needed:
Stellarium set for your location; an outdoor location for
viewing.
Procedure: Repeat the method you used with Stellarium to locate
the constellations to locate the indivdual stars listed
below. For each one, if it is a part of a constellation,
identify the constellation to which it belongs and make a note
of when it could be seen at night where you live. You will
use this information in the next activity.
- Polaris
- Mizar
- Sirus
- Rigel
- Betelgeuse
- Aldebaran
- Antares
- Altair
- Deneb
- Vega
- Spica
- Arcturus
Try to observe as many of these
stars as possible in the night sky.
Identifying
Individual Stars by Altitude and Azimuth
Materials
Needed: Stellarium; astrolabe with support (see
Procedure); flashlight; red cellophane (optional); planisphere
or star chart (optional); outdoor location for stargazing;
information on the stars from the last activity.
Procedure: First,
we'll take care of a couple of odds and ends...
You will need some sort of support for your astrolabe at your
chosen location. If there is a picnic table, wall, or
other suitable support, you can use that, or you can mount your
astrolabe on a camera tripod. If you don't have a
tripod, you can mount the astrolabe on top of a long stick
sharpened at the other end. If you use the stick, once you
are at your site, you can push the point of the stick into the
ground. (You can use a small stake to make the hole if the
ground for the larger support if you need to. You can also
use small stakes to brace the support.) Regardless of what
you use, it is important that the base of the astrolabe
be level so that your altitude angles will be correct.
Since you will be using the astrolabe at night, you will need a
flashlight to help you read the numbers. However, a bright
light will make it more difficult for you to see the sky, even
after you turn it off. This is because different cells are
used by your eyes to see in bright and dim light. To
minimize the effect of a bright flashlight on your ability to
see at night, you can fasten a piece of red cellophane over the
front of the flashlight. The red light will still be
enough for you to read the scale on the astrolabe, but it won't
affect your night vision as much as white light.
(HINT: Some military surplus and hiker's flashlights come
with a red filter.)
Now we're ready to get down to business.
Pick a date and time you can go outside to watch the stars, and
set Stellarium for the date and time you have chosen.
Next, locate several of the stars from the list in the previous
activity that are visible at the date and time you have
selected. For each one you select, click on the star and
notice the information in the upper left had corner of the
screen for that object. Notice that the azimuth and
altitude are both included in that information. (Look
for Az/Alt:...) These measurements are given in
degrees, minutes(') and seconds("), and are very precise.
(Just so you'll know, a degree can be divided into 60 minutes,
and a minute can be divided into 60 seconds. This is
important to navigators and others who need this much accuracy,
but we can do with just degrees.)
You may notice that the seconds portion for each star is
changing as you watch. This is because the azimuth and
altitude is changing over time as the star moves through the sky
(or more properly, as the earth turns underneath). Watch
long enough, and the minutes and degrees will also change.
The only exception to this is Polaris since it is directly over
the north end of the Earth's axis and so appears to be
completely stationary. But even Polaris moves a little
bit, so its position does change very slightly over the course
of the night - just not enough for it to matter to us.
For our purposes, just write down the azimuth and altitude in
degrees only for each star you plan to locate. Your
astrolabe is probably only accurate to nearest degree, so you
will not need to worry about minutes and seconds here.
Also record the time of the reading.
If you need to sketch out the surrounding stars and horizon so
that you can find these stars as you did in the last activity,
go ahead and do so. Or, if you have begun using a star
chart or planisphere, you can use them to locate the stars.
On the date you have chosen, go to your stargazing site with
your notes, astrolabe, and flashlight (and charts or planisphere
if you have them). Allow just a little time before the
time you plan to begin viewing to set everything up.
Set up your astrolabe and locate Polaris using the pointer stars
on the Big Dipper. Move the azimuth scale so that it is lined up
with Polaris. It is now oriented to true north.
Next, make sure that the weight on your altitude scale is
hanging freely, and that when the straw is horizontal, the
altitude scale reads zero degrees. Now sight Polaris
through the soda straw and note the angle on the scale. It
should match the altitude angle for your location, and it should
not change over time. In fact, the altitude of Polaris is
a measure of the latitude at your location, no matter where you
are in the Northern Hemisphere. Neat, huh?
Now, at the time you have chosen, locate each of the stars on
you list. Use the astrolabe to determine the azimuth and
altitude of each. How closely does it match the altitude
and azimuth predicted by Stellarium? If you have worked
carefully, it should be very close in each case - within a
couple of degrees. If it is off by a little bit more than that,
your time might be a little off, or your astrolabe might not be
completely accurate.
If you results are only a little off, check the following:
- Verify that north (0 degrees) on your astrolabe azimuth
scale is pointed directly at true north as determined by
Polaris.
- Verify that the weight and string on your altitude scale are
able to move freely, and that the altitude scale reads zero
when the straw is level (horizontal).
- Verify that the time you observed each object was the same
time you recorded the altitude and azimuth on Stellarium.
If all of these are OK, you may need to go back and check to
make sure that your location on Stellarium is correct and try
again on another night. Be patient, and get help if you
need it. This may be a little challenging to figure out at
first, but it will work, and once you "get it", it will seem
positively easy!
Locating
Planets by Altitude and Azimuth
Materials
Needed: Stellarium; astrolabe with support (see
previous activity); flashlight; red cellophane (optional);
planisphere or star chart (optional); outdoor location for
stargazing.
Procedure: Pick a
date and time you want to go outside and locate a planet.
Set Stellarium for that date and time. Move around the
horizon and see whether you spot Venus, Mars, Jupiter or
Saturn. If so, click on that planet (or planets) and note
the azimuth and altitude (just in degrees), as well as the
time. You might want to sketch where the planet is
supposed to be in relation to other stars, or note it on a
printed star chart.
On the date you selected, go to your location just a little
before time to observe. Set up your astrolabe as you did
before and orient the azimuth scale to true north using
Polaris.
Use the astrolabe to go to the predicted azimuth and altitude
for the planet at the time you have chosen. Is it where you
expected it to be, or at least close enough so you can see that
it is where it is supposed to be in relation to the stars?
If so, excellent! If not, check for the same errors in the
last activity. Also, don't be afraid to ask for help from
someone who is familiar with the sky. This will work once
you get the hang of it, and it is well worth the effort.
And once you have learned out to find objects using the
altitude and azimuth, you can locate anything that is visible to
you.
More
Stuff to Try
If you made it this far, you should now be able to
find anything that is visible with the naked eye in the night
sky. Here are some other things to observe:
Nebulas - These are the massive
gas and dust clouds, many of which are thought to be the
remnants of exploded stars. Stellarium will label them for
you, and you can see whether they are visible outside. If
so, they will appear to be stars to the naked eye, except that
they might appear to be a little fuzzier.
Galaxies - Stellarium will also
label these for you as well. These are collections of
millions of stars much like the Milky Way galaxy in which we
live.
Comets - These are massive
clumps of frozen gases and ice that orbit around the sun.
They become visible when they get near to the sun may usually be
seen to have a long wispy tail. Many of these are visible
with the naked eye, but you have to know where to look.
The
Sky
and Telescope and
Space.com websites will provide
information on when and where comets are visible.
The Milky Way - The Milky Way
is our home galaxy. We are inside a massive collection of
millions of stars, even though we can only see several thousand
of them. But on a clear, dark, and moonless night, it is
possible to see many millions more in the form of what looks
like a wispy cloud going across the sky, or a vapor trail from a
jet that is just about gone. In reality, this cloud is one
arm of the Milky Way galaxy in which we live. However,
this arm contains many millions of stars. It is barely
visible on Stellarium, but you can see it, and once you do, head
outside and see if it is visible in your location.
The Moon - You can observe the
phases of the moon, as well as times of moonrise and moonset on
Stellarium, as well as outside almost anywhere. Follow the
moon through its changing phases and times of rising and
setting.
And
After This?
These pages have attempted to
tell you how and where to find things in the night sky with just
your two eyes. We have mentioned the stars,
constellations, planets, galaxies, nebulas, and comets, but have
really said very little about what these things are. By
all means use your local library, follow the links found here,
or do your own online searches to learn more about these
magnificent objects. This will make the things you see far
more meaningful.
You should also learn what a light year is so that you can get
an appreciation for just how big our universe is.
You can extend the reach of your eyes with a good pair of
binoculars, or a good telescope. With either, you can see
the planets as what they really are, the individual stars of the
Milky Way, and of course, the surface of the moon, but having
spent the time to learn the night sky like the ancient
astronomers, you will know just when and where to look.
Celestia
 Screenshot of Celestia showing
one of Mars' two moons, Phobos, with Mars in the background.
Screenshot of Celestia showing
one of Mars' two moons, Phobos, with Mars in the background.
Finally, if you enjoy
Stellarium, there is another great free and open source program
out there called Celestia. You can get it at:
Unlike Stellarium, Celestia is
really not so much of a planetarium program as it is a space
simulator. Celestia allows you to take a grand tour of the
universe using great photographs and graphics, and because it is
open source, there are many add-ons available that will let you
view various real and fictional spacecraft in orbit. There
are also educational scripts that are great learning (or
teaching) tools. A tour of the solar system is included,
but there are many others available as add-ons, and all are
free. There are also many educational activities
available.
The sky is truly the limit!
And there's lots more to see and do on our
Experiment Pages or you can
visit
The Science Notebook Home
 The
Science Notebook
The
Science Notebook