The
Science Notebook
Gilbert Chemistry - Part 10
The
Science Notebook
Gilbert Chemistry - Part 10
NOTE: This book was published in 1936 as a manual
to accompany several Gilbert Chemistry sets of the time.
While some of the experiments and activities here
may be safely done as written, a number of them use chemicals
and methods no longer considered safe. In
addition, much of the information contained in this book about
chemistry and other subjects is outdated and inaccurate.
Therefore, this book is probably best appreciated for
its historical value rather than as a source for current
information and good experiments. If you try
anything here, please understand that you do so at
your own risk. See our Terms
of
Use.
Pages 181 - End
GILBERT
CHEMISTRY 181
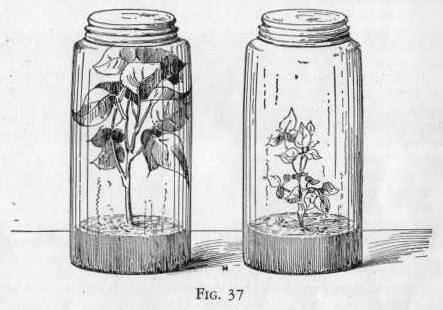
from this jar into one of the other two jars, being careful not to
allow any of the liquid to get into this jar. Figure 37.
Now seal the two iars containing the sprouted beans or peas and
allow them to stand for several days in the sunlight. Label
the one containing the carbon dioxide. Examine the jars from
time to time and notice that the plants in the jar containing the
carbon dioxide grow faster than those in the other jar. This
proves that carbon dioxide is essential to plant growth.
A
SIMPLE PHOTOCHEMICAL EXPERIMENT TO DETERMINE THE ACTIVITY OF THE
ENERGY OF THE SUN'S RAYS
EXPERIMENT 619 (Sodium
nitroprusside and thiourea purchased separately)
Four test tubes are numbered and placed in a rack so that equal
exposure to light may be secured.
In tube one is placed one-quarter of a test tube each of the three
solutions sodium nitroprusside, sodium bicarbonate, and
thiourea. In tube two is placed one-quarter of a test
tube each of the sodium nitroprusside and sodium bicarbonate
solutions only. In tube three is placed one-quarter of a
test tube each of the thiourea and sodium bicarbonate solutions
only. In the last tube one-quarter of a test tube of sodium
nitroprusside and one-quarter of a test tube of thiourea solution
are mixed.
the four tubes are then placed in the sunlight for from four to six
minutes. A blue color will form quickly in tube one and slowly
in tube four, number two will darken slightly, and tube three will
remain unchanged. The reaction will proceed in ordinary light,
but at a much slower rate.
The tubes are removed from the sunlight as soon as one and four are
distinctly blue, and one-quarter test tube of thiourea solution is
added to tube two. A blue coloration will take place quickly without
the aid of further exposure to light. One-quarter test tube of
nitroprusside solution is then added to tube three. The blue color
will not be formed in this case, showing that the sunlight does not
cause any change with thiourea in sodium bicarbonate solution.
182
GILBERT CHEMISTRY
The tubes are now placed in total darkness for a period of three to
six hours or more. Upon removal it will be noted that tubes
one two have changed to a deep crimson, tube four will be blue and
practically unchanged, while tube three will be colorless, although
all the necessary reagents for the reaction have been present for
several hours.
If one-quarter of a test tube of sodium bicarbonate solution is
added to tube four, the blue color immediately takes on a purplish
tint and if kept in the dark the color will be decidedly red after
about one-half hour, showing that the tube "stored darkness" even
though it was not apparent, as in tubes one and two, until the
sodium bicarbonate addition.
All the tubes are then re-exposed to sunlight and the blue
coloration will immediately form in each, since all the reactants
are now present in each tube. Another period of darkness will
bring the red, etc., until finally the active ingredients are
decomposed, due to side reactions. If too long exposures to
sunlight are avoided after the blue color is produced, the reaction
may be reversed 12 to 20 times. If the solution is placed in a
completely filled, sealed container, the change blue to red will
fail to take place after several times, showing that the presence of
air is necessary, probably for the spontaneous re-oxidation of the
iron previously reduced by the action of the sunlight.
The solutions required are: one-half oz. of freshly prepared 0.5%
sodium nitroprusside (to be kept in an opaque bottle;) one-half oz.
of saturated sodium bicarbonate; and one-half oz. of 0.5% thiourea.
"COLD
LIGHT," OR LIGHT BY CHEMICAL ACTION
EXPERIMENT 620-A demonstration of
"chemiluminescence"
One of the most beautiful and striking demonstrations for laboratory
or lecture work is that of chemiluminescence or “cold light."
Certain chemical reactions, usually ones involving the oxidation of
an organic compound, result in the development of light without
other visible reaction. Even heat, which is usually associated
with light of any kind, is noticeably absent.
This phenomenon of chemiluminescence
has long been known, but has not previously been employed
extensively because of difficulties encountered in the available
reactions. These were complex and dangerous, produced only a
limited luminescence, or required reagents not readily obtainable.
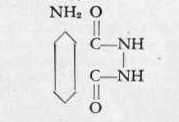
But now three-aminophthalhydrazide has been made available which
overcomes all of these objections. The reaction is simple,
safe, and develops light of intense brilliancy.
LUMINOL
The name "luminol" has recently been applied to this compound in
place of its chemical name for convenience, to associate with it the
property of luminescence.
The demonstration requires only the oxidation of luminol in dilute
alkaline solution with three per cent alkaline hydrogen peroxide and
a second oxidizing agent. All four compounds are necessary in
the solution to obtain the strongest radiation. Almost
GILBERT
CHEMISTRY 183
innumerable variations can be used in the actual procedure, from the
mere mixing of the required chemicals to very elaborate
displays. A few of the simpler methods are given to serve as guides.
For small audiences or laboratory demonstration, the flask method is
the most satisfactory. In a two-liter long-necked flask, a
small quantity of luminol on the point of a knife blade is dissolved
in a test tube full of five per cent sodium hydroxide and diluted to
two quarts with water. In a similar flask, two knife blade
portions of potassium ferrocyanide is dissolved in water, a test
tube full of three per cent hydrogen peroxide added and diluted to
two quarts with water. When both solutions are ready and the
room is darkened, one flask is grasped in each hand and the contents
of them poured simultaneously through a funnel into a six-liter
flask. The reaction starts as soon as the liquids mix in the
funnel. After the initial development of the light has begun,
the flask is swirled and a small quantity of solid potassium
ferricyanide added. The brilliance is increased and can be
still further intensified by the gradual addition of five percent
sodium hydroxide. At the concentrations given, the original
light intensity is small, but the increased brilliance obtained by
the addition of further reagents is very beautiful.
For demonstration to larger audiences, it is more convenient to use
a large jar containing about 14 quarts of water. In a small
flask is dissolved one spoon measure of luminol in five test tubes
full of five per cent sodium hydroxide, and in a second flask, 25
spoon measures of potassium ferricyanide in five test tubes full of
three per cent hydrogen peroxide. To indicate more clearly the
lack of heat in the reaction, the solution may be poured
simultaneously over a cake of ice which has been floated in the
water. The solutions should be allowed to mix in concentrated
form on the ice before being diluted with the surrounding
water. After the reaction mixture has diffused throughout the
water, the solution is stirred vigorously with a glass rod and
further potassium ferricyanide or alkali or both added as desired.
A very beautiful display may be prepared by means of two fine sprays
which are made to interact some distance above the lecture
table. Each spray of humidifier is connected to a compressed
air source and to one of the stock solutions previously
mentioned. Care should be taken that the spray guns are
operating at the same rate. By variation of the stock solutions, the
resulting mist can be changed from a hardly visible cloud to a
brilliant fountain resembling a display of fireworks.[*]
[*] The reagent "luminol" may be purchased' from the Eastman Kodak
Company. Rochester, N. Y.
[184]
PART IV
Electro-Chemistry
Before we discuss the part electricity takes in chemistry we must
first know a little something about electricity. Electricity, like
heat, is a form of energy. About 100 years ago very little was known
about the role that electricity played in chemical reactions.
Today matters are quite different. Electricity and chemistry
are very closely related, many large and important industrial
concerns are engaged in manufacturing materials involving the use of
electro-chemical reactions.
Today chlorine gas and caustic soda are manufactured by passing an
electric current through salt water. From the chlorine gas we
obtain bleaching powder. Metals are extracted from their ores
by passing a current through their molten or fused salts.
Nickel-plating, copper-plating and gold-plating are done by passing
a current through a solution containing salts of these metals.
The success of these important industries and many others is based
on the fact that electricity possesses the power of decomposing
chemical compounds.
On the other hand, we can show the relationship between chemistry
and electricity in another way. We have already said that
electricity is a form of energy. Now, in most chemical
reactions, heat is liberated as the form of energy. However,
under proper conditions, the energy of certain chemical reactions is
liberated in the form of electricity. For example, if we put a
copper plate and zinc plate in a solution containing an acid and
connect the two plates with copper wires we find that a current of
electricity is produced. A reaction takes place in which
electricity in the form of energy liberated. Use is made of
this fact in the manufacture of the different types of electric
cells and batteries. Batteries are simply cells connected
together in series in order to produce a stronger current.
There are several types of cells, all of which come under two
classes, namely, the primary cells, which include both the dry and
wet cells, and the secondary cell or storage battery, as it is
called.
Finally, we will mention a third relationship of electricity to
chemistry. That is, the part electricity plays in furnishing heat to
produce chemical change. A good example of this is the
manufacture of graphite from carbon by means of the electric
furnace. Also the manufacture of calcium carbide for the
production of fertilizers, of nitric acid from nitrogen in the air,
and many other important industries depend upon the heat generated
by the electric current for their success.
Before we discuss any of the different types of cells we will first
consider the parts that go to make up a primary cell. These are,
first, the jar which holds the solution and the elements; second,
the solution of electrolyte, as it is commonly called; third, the
cathode or negative electrode, which is usually made of the element
zinc; and, fourth, the anode, or positive electrode, which is
usually the element carbon.
THE
DRY CELL AND HOW IT IS MADE
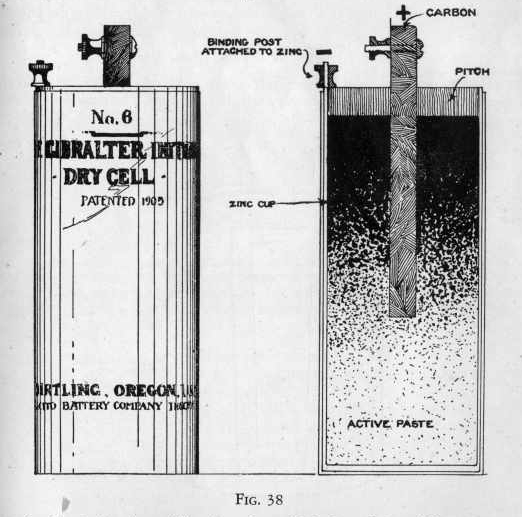
The dry cell is a very common type of cell and millions of them are
used for bell, telephone and other purposes. The jar of the dry cell
consists of a cup of sheet zinc which serves as the negative
electrode (Figure 38.) A binding post is fixed at the top of
this cup. The electrolyte in the dry cell consists of an
active paste which consists usually of one part of zinc chloride,
one part of zinc oxide, one part of ammonium chloride or sal
ammoniac, three parts of plaster of Paris, two parts of manganese
dioxide and one part of water, all by weight.
GILBERT
CHEMISTRY 185
The cell is prepared as follows: the zinc cup is filled to within
one~half inch of the top and a carbon rod containing a binding post
on the upper end is pushed down into the paste to within an inch of
the bottom. Melted pitch is then poured over the paste until
it is even with the top of the cup. The pitch is then allowed
to cool, and the cell is ready for use. It is only when you
close the circuit, that is, connect the two binding posts with a
wire, that you start chemical action within the cell. When the
circuit is open the chemical action stops.
HOW
THE DRY CELL WORKS
After the cell is made and copper wire is attached from the carbon
post to the zinc post a current of electricity passes through the
wire. This is due to action of the active paste upon the zinc
electrode. When the circuit is opened, that is, when the
carbon and zinc posts are disconnected, the action stops.
Now the chemical action which takes place within the cell is as
follows: The ammonium chloride and water react to form hydrochloric
acid which attacks the zinc. The zinc goes into solution in
the form of positive ions, which are atoms or groups charged
electricity. When this happens the zinc electrode assumes an
electro negative condition. The positive zinc ions unite with
the negative chlorine ions of the hydrochloric
186
GILBERT CHEMISTRY
acid to form zinc chloride with the formation of positive hydrogen
ions. Now, the positive hydrogen ions move to the carbon
electrode where they lose their charge and become gaseous
hydrogen. Therefore, when the circuit is closed the chemical
action, which takes place, keeps the zinc pole or cathode negatively
charged and the carbon pole or anode positively charged. The
flow of electricity is always from the negative zinc pole to the
positive carbon pole through the solution, and from the positive
carbon pole to the negative pole through the wire.
You might ask the question, What happens to the hydrogen gas when
chemical action takes place within the cell? The hydrogen gas
as fast as it is formed at the carbon electrode is oxidized to water
by oxygen from the manganese dioxide. This brings up the
phenomenon known as polarization. By polarization is meant the
cutting down of an electric current, due to the lowering of
potential between the carbon and zinc poles. Polarization in a
cell is caused by formation of bubbles of hydrogen gas clinging to
the carbon electrode, thereby producing less surface. To
prevent this, manganese dioxide is used, which, as already stated,
oxidizes the hydrogen gas to water.
THE
WET CELL
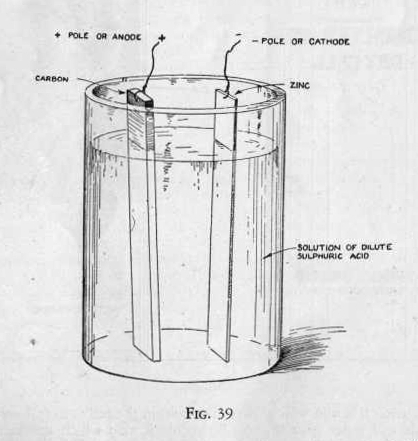
The wet cell or other type of primary cell is very similar to the
dry cell. The electrolyte instead of being a paste, as in the dry
cell, is a solution. The positive and negative electrodes are of
carbon and zinc or of copper and zinc. (Figure 39.) The
principles involved in the formation of a current due to chemical
action in the wet cell is the same as that in the dry cell although
there are several types of wet cells.
GILBERT
CHEMISTRY 187
THE
STORAGE BATTERY
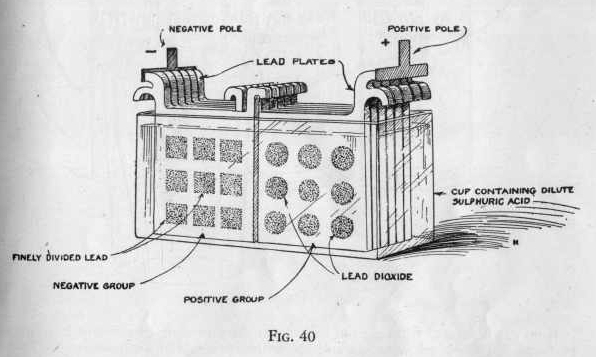
The second type of electric cell or storage battery is a little more
complicated than the dry or wet cell. The storage battery consists
of a number of secondary cells (Figure 40). It is used largely
for running electric power plants, electric automobiles, telephone
and telegraph work, etc.
The storage battery does not generate a current of electricity like
a primary cell by a direct chemical action. It is charged by a
current of electricity, after which it will deliver a current
until the cell is run down. The chemical action taking place
when the electricity is discharged is much more complex in this type
of cell, so that we will not go into a discussion of it.
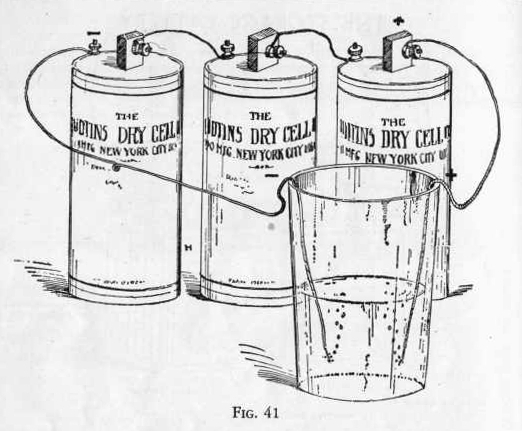
EXPERIMENT 621 - How to test a
battery of dry cells
if you have two or three dry cells around the house and wish to test
their strength, perform the following experiment with them:
Connect the cells together in series as shown in Figure 41 by
attaching small pieces of copper wire to the carbon binding post of
one cell and zinc binding post of the other cell. (Figure 41.)
Now connect a longer piece of wire to the free carbon post and
another long piece to the free zinc post. Clean the ends of
all the copper wires using with a knife blade.
Now dissolve two teaspoonfuls of sodium chloride (table salt) in a
tumbler two-thirds full of water and put the ends of the copper
wires, which should be clean, in the solution. Notice whether
bubbles of gas appear on the ends of the wires in the
solution. By setting up the same number of new cells in the
same manner and comparing the amount of gas produced with that
produced from the old cells you can tell whether the old cells are
of sufficient strength to be of value an performing the following
experiments.
188
GILBERT CHEMISTRY
If no gas is formed from the old cells when the preceding experiment
is accurately performed, the cells are worn out and you will have to
obtain some new cells. Two or three dry cells connected in series
will give you sufficient current for performing most of the
experiments as outlined.
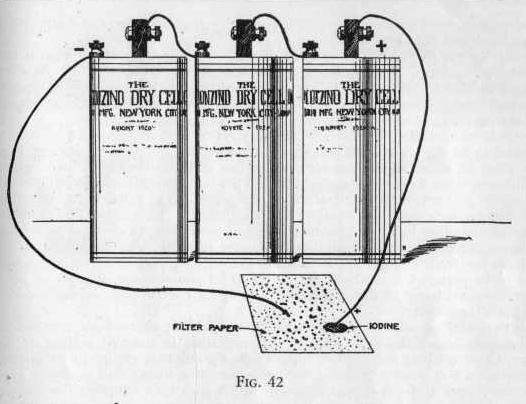
EXPERIMENT 622 - How to determine
the positive or negative wire
Connect two or three dry cells together in series as in Experiment
621. Now moisten a piece of filter paper with a little sodium
iodide solution and place the ends of the wires from the battery
about one-quarter inch apart on the paper (Figure 42). Notice
that the spot where one of the wires touches the paper becomes
brown. Also notice that this is the wire connected to
the positive or carbon pole.
What really happened was this: When you touched the ends of the
wires from the battery to the paper containing sodium iodide
solution you simply closed the circuit and a current of electricity
flowed from the positive carbon electrode to the negative zinc
electrode, at the same time decomposing the sodium iodide. The
iodine of sodium iodide being in the form of negative ions is
attracted to the positive wire, where they lose their charge and
become atomic iodine, thereby producing a reddish brown spot. This
is a very convenient way of telling what is the positive and
negative wire of any source of electricity.
EXPERIMENT 623 - Another way to
tell the positive and negative wires
Put two measures of potassium nitrate and two drops of
phenolphthalein in a test tube one-quarter full of water. Shake
thoroughly until all the solid is dissolved. Now moisten a piece of
filter paper about one inch square with some of this solution and
test the paper the same way you did in the preceding experiment.
Notice this
GILBERT
CHEMISTRY 189
time that the spot where one of the wires touches the paper becomes
red. Also notice that this wire is the wire connected to the
negative zinc binding post and is therefore the negative wire.
The potassium ions of the potassium nitrate being positively charged
are attracted to the negative copper wire, where they lose their
charges and become atomic potassium. Atomic potassium, being a
very active substance, instantly unites with the water to form a
base potassium hydroxide, which turns the phenolphthalein red.
EXPERIMENT 624 - How to show the
direction of a current
Dissolve eight measures of nickel ammonium sulphate in a tumbler
one-third full of water.
Now connect two or three dry cells in series as shown in Experiment
621 and put the ends of the wires leading from the positive and
negative poles of the battery into the nickel solution. Notice
that very soon the wire attached to the negative pole or electrode
is coated with metallic nickel or is being nickel-plated.
Now disconnect the two wires from the battery and attach the wire
which was plated with nickel to the positive carbon pole and the
other wire to the negative zinc pole. Put the ends of the
wires again in the solution. Notice that the nickel is soon
dissolved from the plated wire and is deposited on the other wire
which is attached to the negative pole.
This proves that the current always flows from the positive pole to
the negative pole and that the metal deposited always follows the
direction of the current.
ELECTROPLATING
The very simple process of transferring metal from one object to
another by chemical and electrical means is called electroplating.
All of the silverware in use is plated
190
GILBERT CHEMISTRY
by the same process you are going to use. By this method
objects are copper-plated, silver-plated and
gold-plated.
Besides its use in plating, the process is used in the purification
of certain metals. Copper, for example, is separated from its
impurities in this manner. At a recent chemical exhibit in New
York there was placed on exhibition a slab of copper five feet
square and six inches thick which had been purified not by removing
impurities from the copper, but by removing the copper from the
impurities.
In electroplating, the electrolyte or bath always consists of a
solution of the salt of the metal to be deposited or plated on the
object. Now, as to the action which takes place when an object
is electroplated, let us first consider the nature of solutions of
metallic salts when a current is passed through the solution.
Salts are made up of metallic elements and non-metallic elements or
groups. When in solution the metallic elements become ions and
have positive electric charges. The non-metallic elements or
groups on the other hand also become ions and have negative
charges. Now suppose we pass a current through a solution of
copper sulphate. The metallic copper ions which are positively
charged are attracted to the negative pole to which is attached the
object to be plated. On reaching the object to be plated the
copper ions lose their charge, become atomic or metallic copper and
as such are deposited in a smooth thin layer upon the object.
The non-metallic sulphate groups which are negatively charged are
attracted to the positive pole to which in the case of
copper-plating is attached a sheet or bar of copper. Upon
reaching the positive copper pole the sulphate groups lose their
charge, become molecular sulphate, having the properties of a strong
acid grouping and dissolve the copper to form copper sulphate which
goes into solution. The amount of copper which goes into solution in
this way is exactly equal to the amount of copper which is deposited
upon the object to be plated. You can see, therefore, that the
concentration of the copper sulphate solution is always the same as
long as there is any copper left at the positive pole.
The preceding action may be expressed a little more clearly in the
form of an equation, thus:
| Salt
|
electricity = |
metal (of salt)
goes to the object to be
plated (cathode -) |
non-metal (of salt)
goes to the metallic
plate (anode +)
|
By using different kinds of salts and plates of different metals we
can plate with almost any metal, although some metals plate easier
than others.
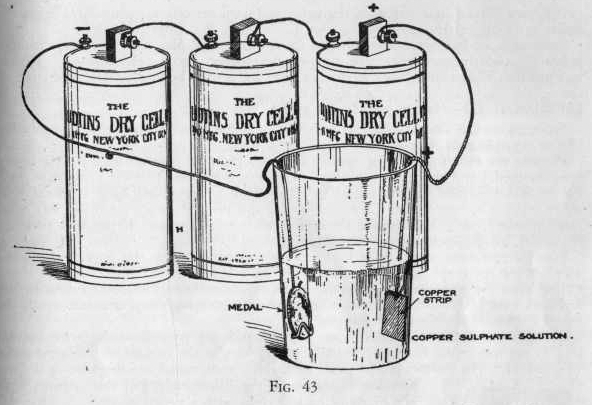
EXPERIMENT 625 - How to
copper-plate
If you have any medals which you wish to copper-plate, proceed as
outlined in this experiment. lf not, use a nail, or other iron
object.
The object to be plated must always be cleaned of oils, grease or
varnish. This can easily be done by boiling the object in vinegar or
a solution of sodium carbonate for several minutes. When
cleaned the object must never be touched with the fingers, for if it
is a film of grease will be left and the plating will not stick to
the surface.
Dissolve one spoonful of copper sulphate in a tumbler half full of
water. Now, using two or three dry cells connected up in
series as outlined in previous experiment, attach the medal or iron
object to be copper-plated to the wire from the zinc pole or
negative wire in the manner illustrated (Figure 43.) To the
wire from the carbon or positive pole of the battery attach the
copper strip.
Now immerse the copper strip and the medal in the copper sulphate
solution, being sure that the medal to plated is below the surface
of the solution. Do not allow the copper strip and medal to touch.
GILBERT
CHEMISTRY 191
In a few minutes you will note that the medal is covered with a
deposit of copper. leave the medal in the solution until an
even coat is deposited. This should take from 10 minutes to
one hour, depending upon the size of the object and the strength of
the solution.
To give the medal a bright finish, rub it lightly with an ordinary
pencil eraser.
EXPERIMENT 626-How to nickel-plate
The object to be nickel-plated must be free of oil, grease and
varnish. This can be done by boiling it in vinegar or a
solution of sodium carbonate.
Dissolve one spoonful of nickel ammonium sulphate in a tumbler half
full of water. Now attach the iron, copper or brass object to
be nickel-plated to the negative wire and an iron nail to the
positive wire. Immerse these in the solution and notice that soon
the object attached to the negative wire which goes to the zinc post
is covered with a coating of nickel.
ELECTROTYPING
Electroplating with copper has been taken advantage of in the
printing and publishing industry. Here it is called
electrotyping. This process consists in making a mold of wax or
plaster of Paris and the impression of the type of a book made by
pressing the mold against the type. The wax is then dusted
with graphite, which is a good conductor of electricity. It is
then connected to the negative pole of a battery and immersed in a
copper solution. The positive pole is a sheet
of copper.
When a suitable thickness of copper is deposited on the impression,
the thin sheet of metal is removed from the wax and "backed," that
is, the reversed side is filled with a low melting substance such as
solder or lead.
192
GILBERT CHEMISTRY
It is now affixed to a rotary, or flat press and used directly for
printing. Besides its use in printing, this process may be used for
making duplicates of medals. Practically all books are now
printed from electrotype plates. Without electrotype plates it would
be necessary to set up new type every time a new edition oi a
book was printed. This would take much more time and would be
much more expensive.
EXPERIMENT 627-How to reproduce a
medal
Secure a medal, one as small as possible, or some foreign coin which
you would like to reproduce in copper.
Prepare the molding wax by cutting a square piece of paraffin wax a
little larger than the medal and about one-eighth of an inch in
thickness. The wax may be molded flat by warming slightly and
kneading it with the fingers. Now hold it under cold water
until it becomes hard. Clean the medal and press it down upon
the wax with considerable force. Then remove the medal with a
knife point. If the wax sticks to the metal, oil the medal
very, very slightly.
Now scrape some graphite or lead from a soft pencil upon the
impression in the wax and rub the graphite to a fine finish with the
brush included in the set. lt is essential to give the
impression a compact and smooth surface, therefore, rub with the
brush as long as possible, even 15 minutes. Add more graphite if
necessary until the whole impression is black and shining.
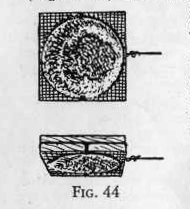
Set up two or three cells in series and attach the wire from the
negative zinc post to the wax mold, making contact from the wire to
the surface of the impression. (Figure 44.) The contact is
made by making a channel from the wire to the impression as shown in
the illustration. Fill this channel with graphite and pack it tight
with a pencil point.
To the other wire from the positive carbon post of the battery
attach the copper strip. Now place the wax mold and the copper
strip about one inch apart in a tumbler containing a solution of
copper sulphate. The solution of copper sulphate is made by
dissolving one spoonful of copper sulphate in a tumbler half full of
water.
Allow the current to pass through the solution for several hours -
over night, if necessary - and examine the wax mold carefully from
time to time and notice that the copper-plate gradually creeps
across the impression.
When the process is complete and you have a thin sheet of copper
deposited on the impression, remove the wax mold from the solution,
wash it with water and then remove the wax by melting it in a tin
cover. The copper-plate then produced is an exact reproduction of
the medal and can be preserved by pasting it on a piece Of
cardboard.
You may nickel-plate the copper reproduction by placing it in a
solution of nickel ammonium sulphate as explained in the experiment,
"How to nickel-plate."
EXPERIMENT 628 - How to make a
bronze statue from a plaster cast
This is a very interesting experiment in electroplating.
Obtain a small white unpainted plaster statuette or cast and be sure
that it is small enough to fit into a tumbler or pint jar.
Now paint the statuette with a little linseed oil or quick drying
varnish and allow the oil to dry thoroughly. This makes the
statuette waterproof and forms a skin upon which the powdered
graphite will stick. When the oil is dry brush the statuette
with
GILBERT
CHEMISTRY 193
powdered graphite from your lead pencil. Brush until the
surface is smooth and black.
Set up two or three dry cells in series and wind the end of the wire
from the negative zinc post around the statuette. Attach the
copper strip to the wire from the positive carbon post. Now
place the statuette and copper strip in a copper sulphate solution
made by dissolving one spoonful of copper sulphate in a glass full
of water. Allow the statuette to remain in the solution until
it is evenly coated with copper. This is best done by leaving it to
stand over night.
lf you wish to nickel-plate the bronze cast, simply place it in a
solution of nickel ammonium sulphate, as explained in the experiment
on nickel-plating.
ETCHING
BY MEANS OF ELECTRICITY
Pretty pattems or designs may be duplicated on sheet copper or steel
very easily by means of the electric current. The designs will
have the appearance of being etched.
EXPERIMENT 629 - How to etch
on copper.
Take the copper strip and dip it into hot paraffin. When it is cold,
trace the design you want and then with a toothpick remove the
paraffin along the tracings. Also scrape off the paraffin
where connection is to be made with the wire and copper strip.
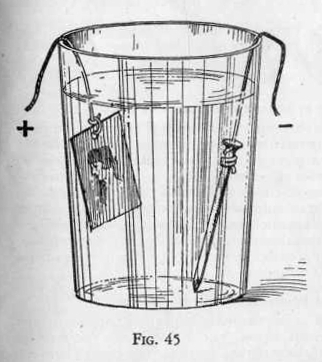
Now connect two or three dry cells in series and attach the wire
from the positive carbon post to the copper strip to be etched.
(Figure 45.) To the wire from the negative zinc post attach a
bright nail or other object of iron. Place the nail and copper
strip in a copper sulphate solution made by dissolving one spoonful
of copper sulphate in a tumbler half full of water.
While the iron nail is being plated with copper, the copper strip is
being corroded. Since only the bare spaces are affected, the
copper will be eaten along the lines of the tracing. After
several hours, remove the copper strip, melt off the paraffin and
notice that the etching is quite clear. It will look as though the
design were directly engraved upon the copper.
EXPERIMENT 630 - How to etch on
steel
Steel or iron can be etched the same way as the copper in the
preceding experiment. Procure a piece of sheet steel or iron
and after coating it with paraffin trace the design upon it.
Then connect it to the positive wire leading to the carbon post and
attach a bright nail to the negative wire leading to the zinc post
of the battery.
Now place the steel and the iron nail an a solution of nickel
ammonium sulphate made by dissolving one spoonful of the compound in
a tumbler half full of water. Allow the current to pass
through the solution for several hours and then remove the steel and
melt off the paraffin. Notice that the design is etched upon
the steel.
194
GILBERT CHEMISTRY
EXPERIMENT 631 - Copper-plating by
immersion
Dissolve two measures of copper sulphate in a test tube half full of
water and place into this solution a small strip of clean
steel. Allow the steel to remain in the solution for half an
hour and notice after this time that it is coated with copper.
The reason for this is as follows: Some metals, like iron, are more
easily dissolved by acids than others, like copper. Therefore, when
iron is placed in a copper sulphate solution some of the iron goes
into solution to form iron sulphate and an equal amount of copper
goes out of solution as metallic copper and is deposited on the
iron.
EXPERIMENT 632 - Tin-plating by
contact
Dissolve six or eight measures of tartaric acid in a tin cup half
full of water. Now place into this solution a penny which has
been cleaned by boiling for several moments in a little vinegar.
Put the tin cup on the stove and allow the water to boil off.
Notice that after several minutes the penny will gradually become
coated with a bright silvery plating of tin.
EXPERIMENT 633 - Nickel-plating by
contact
Heat a test tube two-thirds full of water to boiling and dissolve in
it five measures of nickel ammonium sulphate.
Put a clean penny in a small tumbler and pour the nickel solution
upon it. Then place the strip of zinc included in the set in
the tumbler so that it comes in contact with the penny. Allow
the solution to stand for several minutes and notice after some time
that the penny is gradually coated with nickel.
EXPERIMENT 634 - Formation of a
current by contact of copper with zinc
Dissolve four measures of sodium bisulphate in a test tube full of
water and pour this solution into a tumbler. Drop into the
tumbler a clean penny and notice that the penny is unaffected by the
solution. Then place in the solution the strip of zinc so that
it touches the penny. Notice that bubbles of gas are formed on
the copper penny.
The zinc went into the solution to form zinc ions and left the zinc
plate negative. The hydrogen ions of the sodium hydrogen
sulphate were attracted to the copper penny, where they lost their
charges and became gaseous hydrogen and formed gas bubbles on the
penny. Therefore, an electrical current was set up in the
solution in which the strip of zinc became the negative electrode
and the copper penny the positive electrode.
EXPERIMENT 635 - Formation of a
current by contact of silver with zinc
Using the same solution and zinc strip as in the preceding
experiment, see if you can produce a current by means of a clean
silver coin. Notice that in this case bubbles of gas are also
formed on the silver coin, thereby setting up an electric current
between the zinc and silver. The explanation is the same as in
the preceding experiment.
ELECTROLYSIS
By electrolysis is meant the decomposition or breaking down of a
chemical compound to form new substances by the aid of the electric
current. Many important commercial industries depend upon this
process for making and isolating different substances. For
example, some metals like aluminum are prepared on a large scale by
passing an electric current through a molten bath of certain
aluminum compounds. Again, sodium hydroxide (caustic soda) and
chlorine gas, used to a large degree in
GILBERT
CHEMISTRY 195
making bleaching powder, are made by passing an electric current
through a solution of sodium chloride.
In the electrolysis of a solution of a chemical compound the
positive ion of the compound is always attracted to the negative
pole where it loses its charge and becomes an atomic
substance. In this state it reacts with the water present to
form a new compound and usually a gas, or is deposited on the
negative pole as a metal.
The negative ion, on the other hand, is attracted to the positive
pole where it loses its charge and becomes atomic in nature.
In this form it goes off as a gas or reacts with the water present
to form a new compound and a gas.
EXPERIEMENT 636 - The electrolysis
of sodium chloride
Dissolve one teaspoonful of common table salt (sodium chloride) in a
tumbler one-third full of water and add two or three drops of
phenolphthalein solution. Stir the solution a few times.
Now connect two or three dry cells in series and place the ends of
the negative and positive wires in this solution about one~half inch
apart. Do not let the wires touch. Notice that almost
immediately bubbles of gas are formed at each wire in the
solution. At the positive wire chlorine gas is formed, while
at the negative wire hydrogen is formed. Notice also that the
solution turns red, showing that a base of alkali is being
formed. What really happened may be expressed a little more
clearly as follows:
Negative wire
Positive wire |
Sodium
Chlorine gas |
water = sodium hydroxide |
hydrogen. |
EXPERIMENT 637 - The lemon electric
cell
Procure a fresh, juicy lemon and cut two small slits, one on each
side, as shown in the illustration.
Now clean the copper and zinc plates by scrubbing them. Insert
the zinc and copper strips in the lemon as shown in the
illustration. (Figure 46.) To prove the passage of an electric
current, touch your tongue to the ends of the zinc and copper
strips. Notice the slightly tingling sensation produced on the
tongue. This proves that a current is passing from one metal
to the other. When the external circuit is closed, the citric
acid (lemon juice) attacks the zinc, forming citrate of zinc.
By the separation of positive zinc from the zinc strip, the zinc
strip is made negative.
The positively charged hydrogen ions of the citric acid, which is in
the lemon, being displaced by the zinc, deliver their positive
charge to the copper. Thus the copper is positively, and the
zinc negatively, charged when the copper is joined to the zinc or
when the circuit is closed. The flow of electricity externally
is from the copper to the zinc.
The lemon cell polarizes quickly; so lift out the plates frequently
to remove the hydrogen bubbles.
EXPERIMENT 638 - How to clean
silverware electrolytically
If you have any silverware which is stained dark by exposure to the
air you can easily remove this stain, which is silver sulphide, by
treating the silverware as follows:
0btain an old aluminum pan and place the silver to be cleaned in the
pan. Now cover the silver with a solution of common salt or
baking soda made by dissolving two spoonfuls of the salt in each
quart of water used. Now place the pan on the stove and
196
GILBERT CHEMISTRY
allow the solution to boil for two minutes. Remove the
silverware and wash it with fresh water. Notice that the black
stains are removed and the silver is bright and clean.
The black stain or silver sulphide was reduced by the chemical
action taking place in the solution. A feeble electric current was
formed in which the aluminum pan acted as the negative pole and the
silverware as the positive pole. The electrolyte in this case was
the solution of common salt or baking soda.
The metal silver cleaners which you probably have seen advertised on
the market are simply metals of aluminum or zinc. The process
of cleaning silverware with these cleaners is the same as that used
in this experiment.
EXPERIMENT 639 - How to galvanize
iron with zinc
Mix together on a sheet of paper four measures of powdered zinc, one
measure of aluminum sulphate, one-half measure of powdered magnesium
and three measures of calcium carbonate.
Now take a wet cloth and after touching it to the mixture rub the
clean iron to be galvanized with some of the mixture. After
thoroughly rubbing, wash the iron free of the paste with water and
notice that it is coated with zinc.
Galvanized ironware is iron which has been treated with zinc
compounds in a similar manner.
EXPERIMENT 640 - How to galvanize
iron with nickel
Mix together on a piece of paper three measures of calcium
carbonate, one-half measure of powdered magnesium and five measures
of nickel ammonium sulphate.
Now rub thoroughly by means of a wet cloth some of this mixture on
the clean iron to be galvanized. Then wash off the paste with
a little water and notice that the iron is now plated with nickel.
[197]
LIST OF CHEMICALS WITH THEIR
FORMULA
| 1 -
Aluminum Sulphate |
Al2(SO4)3 |
.10 |
| 2 - Ammonium Chloride |
NH4Cl |
.10 |
| 3 - Ammonium Nitrate |
NH4NO3 |
.10 |
| 4 - Borax |
Na2B4O7.10H2O |
.10 |
| 5 - Boric Acid |
H3BO3 |
.10 |
| 6 - Litmus Paper |
|
.05 |
| 7 - Calcium Hypochlorite |
CaOCl2 |
.10 |
| 8 - Calcium Chloride |
CaCl2.6H20 |
.10 |
| 9 - Calcium Carbonate |
CaCO3 |
.10 |
| 10 - Camphor Gum |
C20H16O |
.10 |
| 11 - Calcium Oxide |
CaO |
.10 |
| 12 - Calcium Monophosphate |
Ca(H2PO4)2H2O |
.10 |
| 13 -Calcium Sulphate |
CaSO4.2H20 |
.10 |
| 14 - Calcium Sulphide
Paper |
|
.10 |
| 15 - Carbon Tetrachloride |
CCl4 |
.10 |
| 16 - Cobalt Chloride |
CoCl2.6H2O |
.10 |
| 17 - Cochineal |
|
.10 |
| 18 - Congo Red Paper |
|
.05 |
| 19 - Copper Strip |
Cu |
.05 |
| 20 - Copper Sulphate |
CuS04.5H2O |
.10 |
| 21 - Ferrous Ammonium Sulphute |
(NH4)2SO4.FeSO4.6H2O |
.10 |
| 22 - Ferric Ammonium Sulphate |
(NH4)2SO4.Fe2(SO4)2.24H2O |
.10 |
| 23 - Gum Arabic |
|
.10 |
| 24 - Glycerine |
CH2OHCHOHCH2OH |
.15 |
| 26 - Nickel-Steel Wire |
|
.10 |
| 27 - Insulated Copper Wire
|
|
.10 |
| 28 - Logwood |
|
.10 |
| 29 - Magnesium Sulphate |
MgSO4.7H2O |
.10 |
| 30 - Manganese Dioxide |
MnO2 |
.10 |
| 31 - Manganese Sulphate |
MnSO4.4H20 |
.10 |
| 32 - Nickel Ammonium
Sulphate |
(NH4)2SO4.NiSO4.6H2O |
.15 |
| 33 - Phenolphhalein |
(C6H4OH)2COC6H4CO |
.20 |
| 34 - Potassium Nitrate |
KNO3 |
.15 |
| 35 - Potassium
Permanganate |
KMnO4 |
.10 |
| 36 - Powdered Iron
Sulphide |
FeS |
.10 |
| 37 - Powdered Charcoal |
C |
.10 |
| 38 - powdered Iron |
Fe |
.10 |
| 39 - Powdered Magnesium |
Mg |
.15 |
| 40 - Powdered Zinc |
Zn |
.10 |
| 42 - Sodium
Bicarbonate |
NaHCO3 |
.10 |
| 43 - Sodium Bisulphate |
NaHSO4 |
.20 |
| 44 - Sodium Bisulphite |
NaHSO3 |
.15 |
| 45 - Sodium Carbonate |
Na2C03 |
.10 |
| 46 - Sodium Ferrocyanide |
Na4Fe(CN)6.12H2O |
.10 |
| 47 - Sodium Iodide
Solution |
NaI |
.10 |
| 48 - Sodium Silicate |
Na4SiO4 |
.10 |
| 49 - Sodium Sulphocyanate |
NaCNS |
.15 |
| 50 - Sodium Thiosulphate |
Na2S2O3.5H2O |
.10 |
| 51 - Strontium Nitrate |
Sr(N03)2 |
.10 |
| 52 - Sulphide Test Paper |
|
.10 |
| 53 - Sulphur |
S |
.10 |
| 54 - Tannic Acid |
C14H10O9 |
.20 |
| 55 - Tartaric Acid |
COOH(CHOH)2COOH |
.20 |
[198]
| 56 -
Turmeric Paper
|
|
.05 |
| 57 - Zinc Strip |
|
.15 |
| 59 - Nigrosine |
|
.10 |
| 61 - Red Saunders |
|
.05 |
| 63 - Gum Benzoin |
|
.15 |
| 64 - Collodion |
|
.10 |
| 65 - Acetic Acid |
CH3COOH |
.10 |
| 68 - Denatured Alcohol
|
C2H5OH |
.05 |
| 69 - Ammonia |
NH4OH |
.05 |
| 73 - Strontium Chloride |
SrCl2.6H2O |
.10 |
| 74 - Acetone |
(CH3)2CO |
.10 |
| 75 - Chrome Alum |
Cr2(S04)3.K2S04.24H2O
|
.10 |
Minerals
| X1500-A |
Galena |
.10 |
| X1500-B |
Stibnite |
.10 |
| X1500-C |
Chalcopyrite |
.15 |
| X1500-D |
Pyrite |
.10 |
| X1500-E |
Magnetite |
.10 |
| X1500-F |
Pyrolusite |
.10 |
| X1500-G |
Sphalerite |
.10 |
| X1500-H |
Malachite |
.10 |
| X1500-I |
Calcite |
.10 |
| X1500-J |
Fluorite |
.05 |
| X1500-K |
Halite |
.10 |
| X1500-L |
Orthoclase |
.05 |
| X1500-M |
Talc |
.10 |
| X1500-N |
Apatite |
.10 |
| X1500-O |
Muscovite |
.10 |
| X1500-P |
Garnet |
.05 |
| X1500-Q |
Quartz |
.10 |
APPARATUS
AND EQUIPMENT
| X861-B |
Wand |
.05 |
| X1547 |
Thermometer |
.15 |
| X1551 |
Test Tube
Rack - Large |
.25 |
| X1555-A |
Scale - Complete |
.50 |
| X1557 |
Test Tube Rack - Medium |
.20 |
| X1570 |
Test Tube Rack - Small |
.15 |
| *X1584 |
Gas Generating Bottle - Glass |
.10 |
| X1584-A |
Alcohol Lamp |
.20 |
| X2085 |
Metal Alcohol Lamp |
.15 |
| X3327 |
Tank |
.30 |
| P-57-A |
Rod |
.02 |
| P859 |
Ring for Ink Trick |
.05 |
| P860 |
Black Cloth for Ink Trick |
.05 |
| P1502 |
4" Test Tubes |
.05 |
| P1503 |
Glass Rod |
.05 |
| *P1504 |
Glass Tubes 4 1/2 |
.05 |
| P1518 |
Spoon |
.05 |
| P1522 |
Filter Paper Disc |
6 for .05 |
| P1556 |
Test Tube Brush |
.10 |
| P1548 |
Flask |
.50 |
[199]
| P1544
|
Self Generating Torch with Swab
and Cleaning Wire |
.75 |
| P1549 |
Beaker |
.50 |
| *P1560 |
Right Angle Tube-Long |
.05 |
| P1563 |
Test Tube Holder |
.10 |
| P1574 |
Charcoal Block |
.20 |
| P1577 |
Short Right Angle Tube |
.05 |
| *P1578 |
Glass Funnel |
.15 |
| P1580 |
Small Shovel |
.02 |
| P1582 |
Metal Test Tube Rack |
.10 |
| P1583 |
Carbon Electrodes |
.10 |
| P1589 |
Porcelain Pestle |
.15 |
| P1593 |
Glass Mortar |
.10 |
| P1598-A |
Cork with Hole |
2 for .05 |
| P1599 |
Candle |
.03 |
| *P3308 |
Rubber Coupling |
.01 |
| P3309-A |
Rubber Tubing 2 ft |
.35 |
| *P3310 |
No. 2 Rubber Stopper - 2 holes |
.05 |
| P3311 |
No. 1 Solid Rubber Stopper |
.10 |
| P3312 |
No. 1 One Hole Rubber Stopper |
.05 |
| P3313 |
No. 0 Two Hole Rubber Stopper |
.10 |
| P3314 |
No. 0 One Hole Rubber
Stopper |
.05 |
| P3328 |
Cork-No. 5 Standard Taper |
.05 |
| P4727 |
Horseshoe Magnet |
.10 |
| P5607 |
Glass Blowers Pipe |
.25 |
| P8704 |
Quill Brush |
.03 |
| M1706 |
Small Chemical ManuaL |
.25 |
| M1710 |
Large Chemical Manual |
.35 |
| M1735 |
Medium Chemical ManuaL |
.35 |
|
Chemical Magic Manual |
.25 |
|
Mineralogy Manual |
.25 |
|
Glass Blowing Manual |
.25 |
The parts marked * are necessary to make the Gas Generating
Apparatus. Kindly enclose check, money-order or stamps with your
order.
THE A. C. GILBERT COMPANY
New Haven, Conn.
[Back
Cover]
"The Science Notebook"
Copyright 2008-2018 - Norman Young