The
Science Notebook
Gilbert Glass Blowing - Part
IV
The
Science Notebook
Gilbert Glass Blowing - Part
IV
NOTE: This book was published in as a manual
to accompany the Gilbert Glassblowing Set as part of the "Boy
Engineering" Series. the exact copyright date is
unknown, although based on information from "The Internet Archive" it is believed
that this publication is in the public domain. Many
today would not consider glassblowing to be a safe activity
for young people. Therefore, this book is
probably best appreciated for its historical value rather than
as a source for current information and good experiments.
If you try anything here, please understand
that you do so at your own risk. See our Terms
of
Use.
Pages 36 - 46
36
BOY ENGINEERING
he can see you. He will beg to be allowed to try, and finally you
let him, with the same laughable results.
Repeat with other friends.
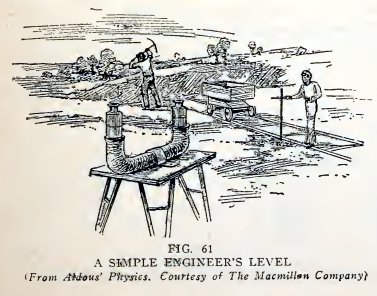
Experiment 44. To make an
engineer's level.
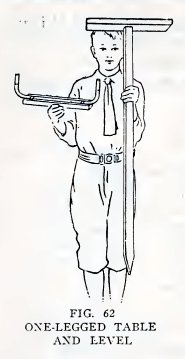
You can make one form of engineer's level (Fig. 61) as follows: Take
a full length of No. 6 tubing, bend it up 4 inches at each end,
smooth the ends, attach it to a small board, rest the board on a
one-legged table, and you have a serviceable level (Fig. 62).
Fill the tube with water, shove the pointed end of the leg into the
ground and sight along the outside of the upright tubes at the level
of the water surfaces. The line along which you sight is exactly
horizontal, because the water surfaces are at exactly the same
level.
Experiment 45. To use the
engineer's level.
An engineer's level is used to find the difference in level of two
or more points (Fig. 63).
To practice using your level, find the difference in level of two
points 100 feet apart on a road, sidewalk, or railroad.
To do this, you
GLASS
BLOWING 37
must first make what is called a leveling rod. Find a piece of wood
about one or two inches square and six or more feet long, mark on it
feet and inches, beginning at the bottom end, and your leveling rod
is complete.
Now to find the difference in level of two points 100 feet apart,
scratch a line or insert a small stake at one point, then pace off
100 feet and mark the second point. Now set up your level between
the two points, ask a friend to hold the rod on the ground and
upright, at the first point, sight along the water levels at the
rod, and ask your friend to move his finger, or a white card, up and
down until it is exactly in your line of sight. Now ask your friend
to tell you exactly where his finger or card is and record this
height. Let us suppose that it is 4 feet 6 inches above the ground.
Now leave the level exactly where it is, ask your friend to hold the
rod upright at the second point, and again sight along the water
levels at the rod. Let us suppose that his finger or card is now
exactly 3 feet above the ground.
The difference in level at the two points is 4 feet 6 inches minus 3
feet or 1 foot 6 inches. That is, the second point is 1 1/2 feet
above the first point or the grade is 1.5 feet in 100, or 1.5 per
cent.
You can now mark a third point 100 feet beyond the second point, set
up your level between the second point and third point, place the
rod at the second point, then at the third point, and find their
difference in level as above. If the third point is 1 foot above the
second, the total rise in the 200 feet is 2 l/2 feet; if, however,
it is 1 foot below the second, the rise is 1 1/2 minus 1 or 1/2 foot
in the 200 feet.
You can repeat this with as many points as you please.
38
BOY ENGINEERING
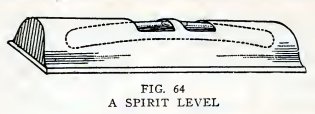
Experiment 46. To make a spirit
level.
The spirit level (Fig. 64) is simply a curved glass tube filled with
alcohol except for the bubble and closed at both ends. The curve of
the tube is part of a circle.
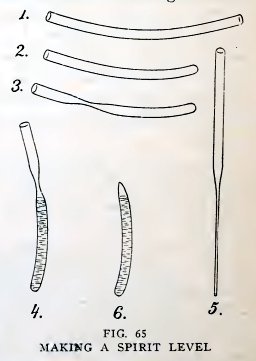
Make a spirit level as follows: Take a piece of No. 4 tube about 7
inches long, heat a space about 3 inches long in the lamp flame,
turn constantly, and when soft remove from the flame, hold both ends
and allow the center to sink into a slight curve (1, Fig. 65). 7.
Let the tube cool, mark the center of the curve with ink, and make
marks 2 inches from the center on each side.
Hold the tube crosswise in the lamp flame, heat at one mark, draw
down the tube and close it (2).
In a similar manner draw down the tube at the other mark but do not
close it (3).
Let the tube cool and fill it with alcohol to the level shown in 4.
To do this easily make the pipette (5), suck alcohol
into it within about 1 inch of the top, put your finger over the
top, insert the lower end of the pipette to the bottom of 4, and
remove your finger.
GLASS
BLOWING 39
Heat the small part of 4, without heating the alcohol, and close the
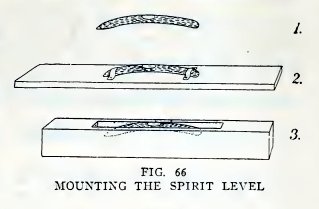
tube (6). Now attach the level to a smooth board as 2 or 3, Fig. 66,
mark the center of the bubble, and your spirit level is ready for
use.
Experiment 47. To make a
fountain-pen filler.
Attach a rubber coupling to the large end of one of your No. 4
nozzles, close the other end of the coupling with a glass plug, and
your fountain-pen filler is made (Fig. 67).
To make the plug, close one end of a piece of No. 4 tubing, allow it
to cool, cut off to a length of 1 inch and smooth the rough edges.
Insert the closed end of this plug into the rubber coupling.
Practice using the filler by drawing up and shooting out water.
Experiment 48. To make a syringe.
Take a half length of No. 6 tube and smooth both ends in the lamp
flame or blowpipe flame.
Now to make a plunger: Cut an 8 1/2-inch length of No. 2. smooth one
end, close the other end and blow a slight bulb. When cold, wet the
closed end and insert it into a small wet rubber coupling.
Note: Always grasp a tube
near the end when you insert it
40
BOY ENGINEERING
into a coupling or stopper, because if you hold it too far back you
may break it. Insert it with a twisting motion, after wetting the
end and the inside of the coupling or stopper.
Wet the inside of the large tube, wet the plunger and rub it on a
cake of soap to make it slippery, then try it in the large tube. If
the plunger is too large, stretch the coupling lengthwise if
it is too small, crowd the coupling together lengthwise. If the bulb
is too large or too small, dry it, heat in the blowpipe flame until
it shrinks, and blow another.
When the plunger is made, attach a No. 4 nozzle to the No. 6 tube
with a large coupling, arrange as in Fig. 68, and your syringe is
made.
Fill the large tube with water and see how long a stream you can
make.
Experiment 49. To make another
syringe.
Heat a piece of No. 6 in the blowpipe flame at a length of 7 1/2
inches and draw it out into a nozzle; smooth the other end in the
lamp flame. Use the same plunger as in Experiment 48, and your
syringe is made (Fig. 69). Try it out with water.
Experiment 50. To make a third
syringe.
Heat a piece of No. 6 tube in the blowpipe flame at a length of 7
1/2 inches, draw it out, and close the end, then smooth the other
end.
GLASS
BLOWING 41
Now to make a plunger: Heat a piece of No. 2 tube 8 1/2 inches from
one end in the lamp flame, draw it out into a nozzle, and break it
off, leaving a small hole at the end of the nozzle. Smooth the other
end in the lamp flame, flare it out slightly, allow it to cool, dip
it into water and insert it into a small wet coupling.
Now fill the large tube with water and insert the coupling plunger
(Fig. 70). Do you get a fine long stream?
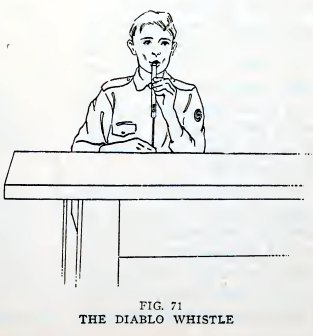
Experiment 51. To make a diablo
whistle.
Use the No. 6 tube and the No. 2 plunger from Experiment 48, arrange
as in Fig. 71, blow across the top, and move the plunger up and
down. Do you get a most diabolical sound?
The sound is produced by the vibration of the air column between the
top of the tube and the top of the plunger. Do you find that the
pitch of the note is higher the shorter the air column?
Experiment 52. Fun with the diablo
whistle.
Start with the air column long and blow the note, shorten it a
little and blow the next note, continue, and try the diablo whistle
42
BOY ENGINEERING
to blow the eight notes of an octave.
Try to play a tune.
Try to make the most weird sound you can.
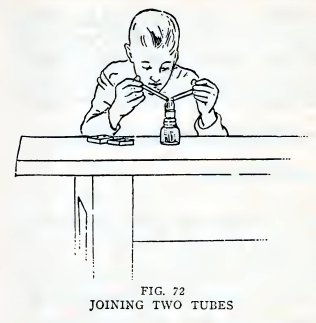
Experiment 53. To join two tubes
end to end.
Take a piece of No. 2 tube about 7 inches long, close one end,
smooth the other, and when cool cut the tube at the middle.
Now join these two pieces as follows: Hold the ends opposite each
other near the top of the lamp flame (Fig.72),. rotate constantly,
and when nearly red hot bring the ends accurately together in the
flame, press together slightly, draw out slightly, and remove from
the flame.
The ends are now stuck together, but the glass is in a slight lump
around the joint and if allowed to cool will crack very easily. It
is necessary to work the glass back and forth to get rid of the lump
GLASS
BLOWING 43
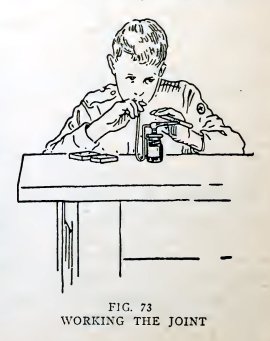
and to make the glass uniform on both sides of the joint. Do this as
follows: Heat one third of the joint in the blowpipe flame (Fig.
73), and when red hot blow a slight bulge. Now turn the joint one
third, heat the next third red hot and blow a slight bulge. Repeat
with the remaining third.
Now heat the first third again until it is red hot and shrinks, then
blow a slight bulge again. Repeat this with the other two thirds.
Repeat this whole operation a third time and blow just enough to
leave the joint the same size as the remainder of the tube or a
little larger.
This heating and blowing has worked the joint back and forth
until the glass is fairly uniform. It makes a strong joint.
Cut off the closed end and smooth the edge.
Repeat with a piece of No. 4 tube,
44
BOY ENGINEERING
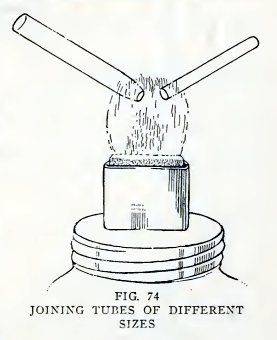
Experiment 54. To join tubes of
different sizes.
Take a piece of No. 4 tubing about 3 inches long and close one end.
Take a piece of No, 6 tubing, attach a handle to one end, heat the
No. 6 tube in the blowpipe flame about 1 inch from this end and draw
it down to smaller size.
Break the small part at a point where it is about the size of the
No. 4 tube. If the hole is too large, heat the edge until it is a
little too small and flare it out with the flaring tool. If the hole
is too small, heat the edge and flare it out.
Now heat the ends of both tubes (Fig. 74), and join them as
described in the last experiment.
GLASS
BLOWING 45
Repeat the operation of heating and blowing at least three times.
Join a No. 4 and a No. 2 tube in the same way.
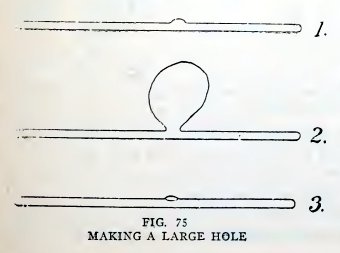
Experiment 55. To make a large
hole.
Take a piece of No. 4 tube about 6 inches long, close one end,
smooth the other, and allow it to cool.
Now to make a large hole in the side of this tube, proceed as
follows: Heat in the blowpipe flame the point at which you wish to
make the hole, and blow a slight bulge (1, Fig. 75). Then heat the
top of this bulge until it is red hot over an area about equal to
the size of the hole you wish to make, and blow hard to make a thin
bubble (2, Fig. 75). Break away the thin glass of the bubble, smooth
the edges, and the hole is made. The edge of this hole will project
beyond the side of the tube (3, Fig. 75). If you wish to make the
edge even with the side of the tube, heat it in the blowpipe flame
until it shrinks back level with the tube.
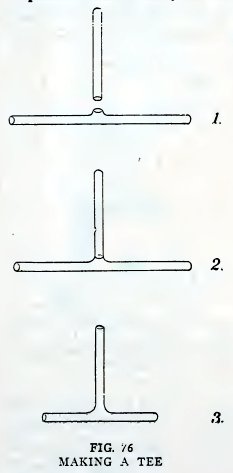
Experiment 56. To make a tee.
Take a piece of No. 4 tube about 6 inches long, close one end,
smooth the other, and allow it to cool. Take another piece 3 inches
long, close one end, and allow it to cool.
Now make a hole in the side of the first tube at a point 5 inches
from tne closed end. Do this as described in the last experiment but
leave the hole projecting beyond the side of the tube (1, Fig. 76).
46
BOY ENGINEERING
Now heat the edge of the hole and the end of the short piece in the
lamp flame, and make a joint (2, Fig. 76) exactly as described in
Experiment 53. Be particular to heat and blow all around the joint
at least three times to make the glass uniform, and on the last
blowing leave the joint a little larger than the tube. Cut off the
closed ends, make the arms equal in length, smooth the ends, and
your tee is made (3, Fig. 76).
Your first attempt may not be beautiful, but if you will repeat the
heating and gentle blowing often enough, the joint will be strong,
which is the main point.
Repeat until you can make a tee easily. Make a tee with No. 2
tubing.
Your flame is hardly large enough to make a tee with No. 6 tubing.
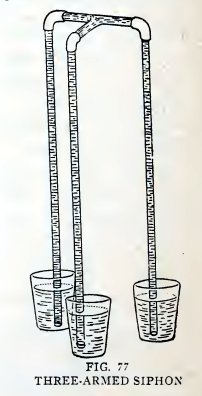
Experiment 57. A three-armed
siphon.
Make a three-armed siphon as shown in Fig. 77. Put two arms in
tumblers filled with water, suck air out of the third arm until the
water runs, and then put it in an empty tumbler.
Stand the three tumblers on the table. Does the water run until the
levels are the same?
Put one tumbler on a book. Does the water run into the other two
tumblers until the levels are the same?
Return the one tumbler to the table and put the other two on
"The Science Notebook"
Copyright 2008-2018 - Norman Young