The
Science Notebook
Gilbert Sound - Chapter
V
The
Science Notebook
Gilbert Sound - Chapter
V
NOTE: This book was published around 1920 as a
manual to accompany the Gilbert Sound set. The
set and manual were part of the "Boy Engineering" series,
While some of the experiments and activities here may be
safely done as written, some of them may be considered
hazardous in today's world. In addition, some of
the information contained in this book is either outdated
or inaccurate. Therefore, this book is probably
best appreciated for its historical value rather than as a
source of current information and good experiments. If
you try anything here, please understand that you do
so at your own risk. See our Terms of
Use.
Pages 52-66
[52]
Chapter
V
INTENSITY, PITCH AND QUALITY
So far in our experiments we have paid no attention to the
difference between sounds. All the principles we have
demonstrated in regard to the origin and transmission of sound are
principles which apply to sound in general. But of course you
know that all sounds are not alike. They differ from one
another in regard to intensity (or loudness), pitch and
quality.
INTENSITY
After tightening a string of the monochord, put it into vibration by
plucking it as you would a guitar or mandolin string and watch it
closely. As to the extent of the vibration - in other words,
their amplitude - becomes less, the sound grows fainter. This
is because the vibrations of greater amplitude cause more sharply
contrasted compensations and rarefactions of the air than those of
less amplitude, and they consequently have a greater effect upon the
ear which hears them.
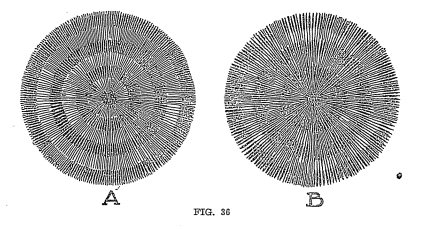
In the accompanying illustration (Figure 36), A represents the well defined
air waves produced by a violently vibrating body. B represents the air waves from
the same body when vibrating through a smaller amplitude. You
should note that the air waves are the same distance apart,
indicating the same rate of vibration in each figure. Just as
in the "to and fro" movement of the pendulum, the vibrations are at
the same rate, regardless of their amplitude.
In explaining the trick of carrying sound from the fork to the
glass, it was said that the vibration of the entire table
(52)
GILBERT
SOUND EXPERIMENTS 53
produced a louder sound than that of the fork alone. This
suggests the second thing upon which the loudness of sound
depends. Large vibrating bodies produce louder sounds than
small ones, because they set more air in motion.
When a vibrating body sends out a series of sound waves, these waves
move in all directions, and the further they go from their source
the more spread out they become and therefore, more faint. The
ripples caused by dropping a stone into the water grow less as they
go away from the spot where the stone fell. It naturally
follows that if these sound waves can be concentrated and not
allowed to spread as they travel, their intensity can be maintained
for a much greater distance. This is the principle of the
speaking tube.
PITCH
We speak of high pitch and low pitch of tones. The pitch of a
tone depends upon the number of sound waves reaching the ear per
second. Therefore, rapidly vibrating bodies produce
54
GILBERT BOY ENGINEERING
tones of higher pitch than bodies which vibrate more slowly.
This may be proved in many ways.
Experiment No. 22. Take
two
tuning forks, a long one and a short one. Set one into
vibration, using method No. 1, page 18, and place it close to the
ear. Note the tone. Now do the same with the other
fork. You will find that the shorter fork gives a higher tone
than the longer one. Since you already know that a short body
vibrates more rapidly than a longer one, you can readily reason that
the more rapid the vibrations the higher the pitch will be.
Experiment No. 23. Use
the
apparatus described in Experiment No. 15 (Manometric
flames). While the mirror is revolving, sound first a high
note then a low note near that megaphone. When the high note
is sounded, the points on the band of light are closer together than
when the low note is sounded. Since the mirror is revolving at
the same speed in each case, we are forced to the conclusion that
more sound waves are sent out per second in the case of the high
note.
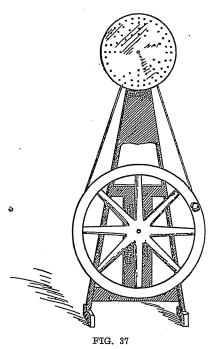
Experiment No. 24.
By illustration (Figure 37) we show you a piece of apparatus that
you can easily rig up for yourself and demonstrate with it the cause
of differences in pitch of
GILBERT
SOUND EXPERIMENTS 55
tones. Cut out a disc of metal about 12 inches in diameter.
Lay out four concentric circles on this disc and punch holes in the
metal so that around the four circles there will be sixteen, twelve,
nine and six holes, evenly spaced. Set the disk up as shown,
so that it can be rotated rapidly. While the disk is rotating,
direct a stream of air by means of a tube, toward one set of holes,
then another. You will find that the highest pitch is obtained
when the stream of air is directed toward the circle with the
greatest number of holes. Since the holes in the disc permit
air to pass through it intermittently as the disc rotates,
vibrations or air waves are set up, and their rate naturally depends
upon the number of holes in the disc which pass by the air stream
per second.
Have you ever noticed the bell or whistle on a locomotive which
passes you rapidly? While the locomotive is approaching you,
the whistle gives a high, shrill note. As the locomotive
passes and goes away from you, the sound of the whistle changes to a
note of lower pitch. This is due to the fact that, though the
whistle is the same all the time, more sound waves reach the ear per
second when the locomotive is approaching than when it is leaving
you. As it is approaching, each succeeding sound waves
produced by the whistle has a shorter distance to travel before
reaching your ear. Hence, the sound waves as you receive them
are crowded together. When the locomotive is going away, each
succeeding sound wave from the whistle has further to travel before
reaching you and the waves as you receive them are therefore spread
out. Bearing in mind the appearance of the manometric flames
in the case of the high tones and low tones, you will readily see
the connection .
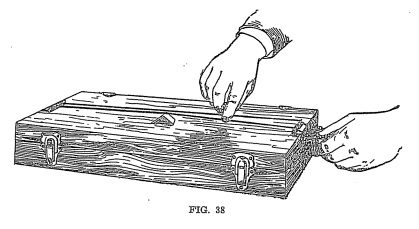
Experiment No. 25. Tighten
a
string on the monochord and, with the bridge at one end, cause it to
vibrate. Note the tone. Move the bridge to the middle of
the string (see Figure 38) and cause either half of the strain to
vibrate. This tone is higher than
56
GILBERT BOY ENGINEERING
the first, is it not? If you have performed the experiment
carefully, the second tone should be just an octave higher than the
first. That is, if the first note was middle C, the second
node should be high C. This is one of the laws about vibrating
strings which Phagoras discovered long ago. If you shorten a string to half its
original length, it will produce a note one octave higher.
Likewise
by shortening a string to any degree at all, the pitch of the note
produced will be increased in proportion. Isn't this just what
a violinist does when he plays his violin? Watch his
fingers.
Now recall the action of the pendulum. When we shortened the
thread, we got a more rapidly vibrating pendulum. Therefore,
we can conclude that when we shortened the string of the monochord
we caused it to vibrate more rapidly, producing a note of higher
pitch.
Experiment No 26. Tighten
a
string on the monochord and cause it to vibrate. Note the
tone. Now increase the tension of the string by taking part of
a turn on the adjusting screw.
GILBERT
SOUND EXPERIMENTS 57
When the string is now vibrated it produces a higher tone than
before. Isn't this just what the piano tuner does when he
tightens up the strings of a piano, or a musician in the orchestra,
when he turns the thumb screws of his violin and "tunes up" before
the concert? Other things being equal, then, the rate of
vibration of a string is proportional to its tension.
Experiment No. 27. Stretch
two
strings on a monochord, one thick and one thin string. Tighten
them to the same tension as nearly as possible and pluck them.
The result will prove to you the third law of vibrating strings;
other things being equal, the thicker the string, the more slowly it
vibrates. Notice the strings on a violin, guitar or
mandolin. The G string, which gives a low note, is very much
thicker and than the E string, for example, which produces the
highest note on the instrument.
LIMITS
OF AUDIBILITY
The limits of perceptible pitch vary a great deal with different
individuals, but it has been estimated that there must be thirty
vibrations per second in order to produce a continuous sound, and
when these vibrations exceed 38,000 per second it has been
determined that the sound becomes inaudible to the ear. Most
of the musical sounds that we hear are produced by vibrations
between 37 and 4,000 per second.
QUALITY
Everyone has his own idea as to the difference between noise and
music. Classical musicians consider most musical comedy of the
present day to be principally noise. Other persons, less
critical perhaps, describe the sound of coal beings shoveled into
the basement as noise and the sound produced by a whistle,
flute or piano, as music. In physics, a musical tone is
defined as a sound whose waves are of a uniform
character.
58
GILBERT ENGINEERING
We are all more or less familiar with the different qualities of
musical sounds, particularly that of voices. We speak of one
person's voice being rich and full. Another person may speak
monotonously. This is the quality of tones. The cause of
this difference in quality is due to the fact that sounding bodies
vibrate as a whole and at the same time they vibrate in parts.
This we are going to illustrate and explain to you in some
interesting experiments on springs and strings. It is these
vibrations and parts of vibrations that have to do with the quality
of tone, and the tones produced by these vibrations inside of
vibrations are known as overtones.
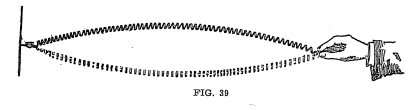
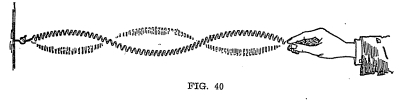
Experiment No. 28.
Attach a spring by means of a hook to the wall and set it in
vibration as a whole. (See Figure 39 showing vibration as a
whole). Now by careful manipulation, you can throw it into
vibration by halves, thirds and quarters. When it is vibrating
in parts, these vibrations are known as the loops (see Figure 40),
and the points that do not vibrate are known as nodes. Now as
the two vibration start, one at one end and one at the other, they
meet in the
GILBERT
SOUND EXPERIMENTS 59
center. As the two movements are of the same velocity or
strength, when they meet they neutralize each other and form a
node.
STRINGED
INSTRUMENTS AND THEIR NODES AND LOOPS
When a bow is drawn across the violin, it causes the strings to
vibrate first as a whole and then it breaks into small vibrations
just as the spring did in the last experiment. It is the
vibrations of the string as a whole (shown in Figure 39) which
causes the vital tones of sound and the other supplementary
vibrations - those that we referred to as halves, thirds and
quarters produce the overtones.
To get a clear idea of the nature of these secondary vibrations,
which are more rapid than that of the string as a whole, consider
the waves on a lake during a strong wind. You will see large,
slowly changing swells, and, on top of them, little ripples that
seem to dance.
Experiments No. 29. Make
some
very small paper washers and put them on a string of the
monochord. Stretch the string and then cause it to vibrate by
means of a violin bow. The interesting part of this experiment
is that you will soon see the washers group themselves at certain
fixed positions. These positions are the nodes and the washers
gather there because the vibration is less at these points.
Experiment No. 30. The
connection
between nodes and loops of vibrating strings and the quality of the
tones they produce may be strikingly demonstrated by an experiment
that you can do on any good piano. If you are at all familiar
with the piano, you know that when the keys are in their normal
position, felt-covered dampers are resting on the strings so they
cannot vibrate. When you strike a key, the damper is raised
and re-
60
GILBERT BOY ENGINEERING
mains away from the string as long as the key is held down, but when
the key is released to its normaL position, the damper falls back on
the string, deadening its vibration.
First, hold down the keys for the following notes, not striking
them, but holding the dampers away from the strings so they will be
free to vibrate: C in the bass clef, the C one octave above
that, and the E, G and B flat above that. Now strike loudly
the low C below the bass clef and, after two or three seconds,
release the key to its normal position. The fundamental tone
produced by the key that was struck is silenced, but you now hear a
soft, sweet chord made up of the five notes you held down but did
not strike.
The explanation of this should be apparent to you now. The
string which was struck vibrated in parts or sections, producing
overtones. The phenomenon of sympathetic vibration then came
into play and the strings that were held open were set into
vibration, producing the same sounds as the overtones of the lower
string. You should bear in mind that these overtones are
present in tone from the low C string, but cannot be easily
distinguished since the fundamental tone is so much louder.
They add quality to what would otherwise be a simple tone.
Why a good piano makes better music
than a cheap one is explained by the number and variety of
its overtones, especially those of lower notes. From the
experiments with vibrating strings, you will realize that you can
produce a given tone with a short, thick string or with a longer
thinner string. Now if you examine a good piano you will find
that it is overstrung - that is, the strings which produce the
lower notes are strung diagonally across the other strings of the
piano. The object of overstringing is to obtain greater
length, and the object of length is to obtain more overtones.
You can readily see that a long, thin string has more chance of
vibrating in halves, thirds, quarters, etc., than a short, thick
one. In cheaper pianos, all
GILBERT
SOUND EXPERIMENTS 61
strings are strung parallel and you do not get the richness of tone
from them that you to do in the case of a piano that is overstrung.
The fiddle string that can be made
to laugh or cry has always been a source of wonder to
people not acquainted with the scientific principles involved.
In the first place, you must realize that, in the violin, we have a
fine example of forced vibration. The tones from the
instrument last only a very short time after the bow is removed from
the strings. Also, a violin string without the violin gives a
very weak and unpleasant sound. The bow sets the strings into
vibration and strings cause the violin itself to vibrate, amplifying
and enriching the tones produced. This is why the construction
of a violin is so important a factor in the quality of its music,
and explains the great premium placed on instruments made by
the old master, Stradivarius, over those made by less skilled
workmen.
But after all, the secret of the laughing or weeping suggested by
tones from the violin lies in the bowing of the great player.
The number, variety and arrangement of secondary vibrations (which
produce the overtones) depend entirely upon how and where the string
is bowed. These secondary vibrations are so complex and so
changeable that is almost impossible to describe them or to say when
or where they begin or end, yet the great player has them under his
control at all times, and is therefore able to do what cannot be
done with any other musical instrument.
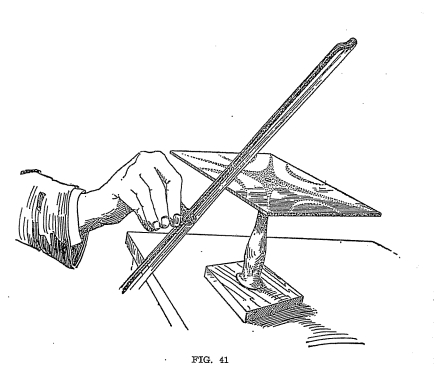
Experiment No. 31. The
nodes
and loops of vibrating plates may be illustrated in a very
fascinating experiment. Procure several metal plates about
6inches square. (See Figure 41.) Round plates may also be
used. Fasten these plates securely, either by clamps at the
edges or by metal rods through the center. Scatter fine sand
or powder evenly over the plates and set them vibrating by the use
of a violin bow. Draw the bow
62
GILBERT BOY ENGINEERING
across the edges of the plates at different points and you will see
the sand or powder arrange itself in lines, describing fantastic
patterns on the plates. The spaces between the lines of sand
are loops - areas of vibration - while the lines themselves are
nodes or points of rest. To complete the experiment, scatter
someone lycodium (sic) powder on
the plates, together with the sand. Now, when the plates are
vibrated, the powder will go to the places of greatest vibration
instead of to the nodal lines, and will demonstrate the loops
completely.
GILBERT
SOUND EXPERIMENTS 63
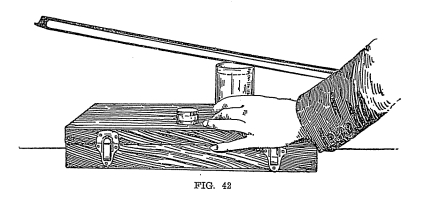
Experiment No. 32.
Draw a bow across the top of a thin, cut-glass goblet filled with
water (see figure 42) and sift some powdered sulphur evenly over the
top of the water. You will find a striking experiment, the
water being covered with ripples proceeding from the several
segments into which the vibrating body is divided.
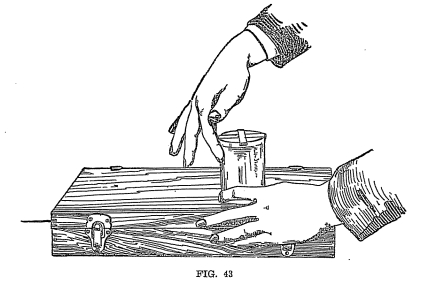
Experiment No. 33. Take a
thin, high-sounding cut-glass tumbler three-fourths filled with
water. It is very important to use a tumbler which has a good clear
ring when vibrated. See that the circumference of the upper part is
thoroughly dried and place on top of this, as in Figure 43, paper
branches cut and bent at little angles. This will make it impossible
for the paper to move off the glass when you produce certain
vibrations. Now, by rubbing the surface of the glass with moistened
finger, you can cause the glass to vibrate and emit musical tones.
The intensely interesting part of the experiment is that if you rub
your finger on the glass under one of the branches of the paper it
will not move; therefore, the paper branches are the points where
there is no vibration of the glass and would be known as nodes.
64
GILBERT BOY ENGINEERING
Now if you vibrate the glass at a point between the branches,
it will begin to move and turn about on the circumference of
the rim of the glass as if some magic influence were at work, and
this movement will continue until it reaches the point above that
part rubbed by the finger.
NODES
AND LOOPS OF COLUMNS OF AIR
Like the string instruments, air instruments have their loops and
nodes. The loop is the point at which the motion of air
particles is the greatest. The node is where the air is at
rest. These may be demonstrated in a very striking manner.
Experiment No. 34. In
one end of a glass tube, about 2 inches in diameter and 3 feet long,
fit a cork piston A (see
Figure 44) attached to the end of a small rod, so that it may move
freely in
GILBERT
SOUND EXPERIMENTS 65
the tube. Close the other end of the tube with a rubber dam,D. Now attach a cardboard
disc the size of the glass tube to the end of a glass or steel rod,
E, and clamp this ro firmly
in the middle. Place the rod, E, so that the cardboard disc on the and just
touches the rubber dam, D, across the end of the glass tube.
Now set the rod, E, in
longitudinal vibration by drawing a wet cloth, held firmly around
the rod, from the center to the outer end. By pushing the cork
piston, A, in or out, a
position will be found where the air column enclosed in the tube
will respond to the vibration of the rod. The air will then be
set in such powerful vibration that any fine dust or powder in the
tube will gather in heaps at the nodes, as it cannot remain in the
loops, where there is a rapid vibrating movement air
particles.
In the illustration there are six loops, indicating that the rod
makes six vibrations while the wave runs to the end of the tube and
returns. The distance between the nodes is half a wave length
and maybe measured quite
66
GILBERT BOY ENGINEERING
accurately. You may now substitute some other gas for the air
in the tube and repeat the experiment, again adjusting the position
of the piston and measuring the distance between the nodes. In
this way the velocity of sound in different gases may be
determined. Since the rate of vibration of the rod is the same
in each case, the velocity of sound in the gas will bear the same
ratio to the velocity of sound in air as the distances between the
nodes in the two cases.
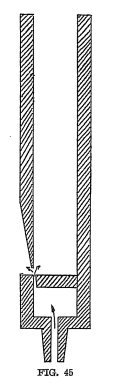
Now let us study the action of organ pipes. Figure 45
represents a cross section of an open organ pipe. Air rushes
from the small chamber through a narrow slit and strikes the edge
directly opposite. At this point, small air waves are set up
in much the same manner as ripples are produced on the up-stream
side of a pile standing in a river or flowing tide. These air
waves cause the stream of air coming up from the small chamber to be
deflected alternatively to the right and left, so that the entire
column of air within the pipe is set into vibration, producing a
strong, rich musical tone.