The
Science Notebook
The
Science NotebookMagnetism, Magnets and Electricity - Pt. 1
The
Science NotebookHome Terms of Use Safety Contact Us Experiment Pages Downloads Supplies Useful Links!
You have probably played with magnets at some point
and are already at least a little familiar with them.
But you may not know that magnetism and electricity are
related. In these experiments, we will study some of
the properties of magnets and magnetism, and we will also
see how a magnet can be used to produce electricity.
Materials
Needed: Two bar magnets. (NOTE:
Some magnets are labeled “N” and “S” on the ends. These
markings designate the “poles” of a magnet. However, if
your bar magnet is not marked, that doesn’t mean it doesn’t
have poles. We will learn how to mark and identify poles
later.)
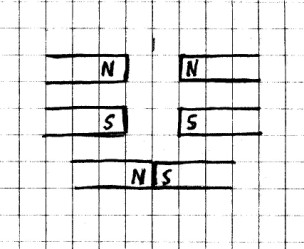
Procedure: Place
one of the magnets on a smooth surface such as a table.
Now bring one end of the other magnet to one end of the magnet
on the table and observe what happens. Next, separate
the two magnets, and bring the other end of the magnet you are
holding to the same end of the magnet on the table.
Again, watch what happens. Repeat the process for the
other end of the magnet on the table. Also, if the ends
are marked, note what happens as you bring the marked ends
together.
What Happened:
Every magnet is surrounded by an invisible field called an
“magnetic field”. If two magnets are brought together,
their fields affect each other. When the ends of the two
magnets were brought together one way, they were attracted to
each other. However, when you reversed one of the ends,
the magnets repelled or pushed each other away. If you were
using marked magnets, you should have seen that the “N” and
“S” ends attracted one another, but that the “S” and “S” ends
or the “N” and “N” ends repelled each other. On magnets
that are marked, the “N” end is commonly called the north pole
and the “S” end is the - you guessed it - south pole
of the magnet. And there is a very good reason why these ends
are called the north and south poles as we will see.
Going Further: Try
bringing your two magnets together in different places to see
whether there are other places where they attract and repel.
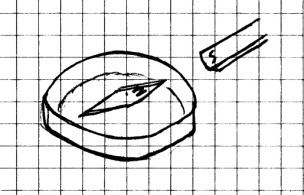
Materials
Needed: Small bar magnet; compass; tape; pen or
pencil.
Procedure: Identify
which end of the compass needle points north. It is sometimes
marked with a dot or an “N”, but if you are not sure, get some
one to help you. With the magnet several meters (yards) away
from the compass, allow the compass needle to settle down
until it points north.
Now, bring one end of the bar magnet to the compass. Note
which end of the compass needle swings toward the magnet. Move
the magnet several meters (yards) away from the compass.
Turn the magnet around, and bring this end of the magnet
toward the compass. Now which end of the needle swings toward
the magnet?
What To Look For: You
should see that the end of the compass needle that points
north is attracted to one end of the magnet, and the end that
points south attracted to the other end of the magnet. If your
bar magnet has is marked “N” on one end, and “S” on the other,
you should notice which end is attracted to the north pointing
end of the compass and which end is attracted to the south
pointing end.
What Happened: As you
have already seen, a magnet will attract one pole of another
magnet, but it will repel the opposite pole of that same
magnet. A compass needle is a weak magnet and it has north and
south poles. The end of the compass needle that points
north is the north pole of the compass needle magnet, and the
end that points south is the south pole.
Going Further: How far
away can you move the bar magnet and still attract one end of
the compass needle or the other.
Materials
Needed: Unmarked bar magnet (such as may be
found at Radio Shack ®. If your bar magnet is marked, have
someone to tape over the markings on each end with masking
tape so you can’t see them.); compass; masking tape; pencil or
pen.
Procedure:
If someone else has not already done so, put a small
piece of masking tape on either end of the bar magnet. Then,
bring one end of the unmarked magnet near the compass. If the
south pointing end of the needle swings toward the magnet,
label that end of the magnet “N”. If the north pointing
end of the needle swings toward the magnet, label that end
“S”. If you used a marked magnet that was taped over, see if
your labels agree with the marks.
What Happened: You
already know that the compass needle is a small bar magnet.
You also should remember that the end of the compass needle
which points north is the north pole of the magnet and the end
which points south is the south pole. Ordinarily, when a
compass is not close to another magnet, it is attracted to the
earth’s magnetic field. (More about that later!)
However, once you bring another magnet close to the compass
needle, the strength of your magnet is much greater than the
earth’s magnetic field, and the compass needle is attracted to
it. You have also seen that opposite poles attract when
two magnets are brought close to one another. Since opposite
poles attract, if the north pole of the compass swings toward
the end of your magnet, the end it is attracted to would be
the south pole. Likewise, if the south pole of the
compass is attracted to the end of the magnet, that end of
your magnet is the north pole of that magnet.
Going Further: See
whether there is any change when you turn your magnet
over. Some magnets that look like bar magnets, don’t
have the poles on the narrow ends. If you have such a
magnet, can you figure out where the poles are? How
about with a round, circular, or other odd shaped magnet?
We have seen that a compass needle is a bar
magnet. If that is true, can an ordinary bar magnet be
used as a compass? Let’s find out.
CAUTION! Always use sharp objects
such as knives or scissors with adult supervision
only! Hold any sharp point away from your body,
particularly your eyes.
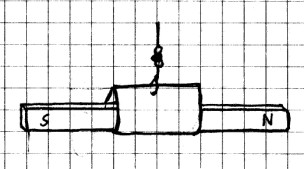
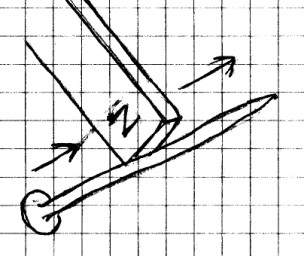
Materials
Needed: Marked bar magnet (The one you marked in the
last experiment is perfect!); compass; nylon fishing line or
string; fishing swivel; paper, scissors; tape; low lying tree
limb or other support.
Procedure: Cut a piece
of paper 3 cm (1 in) by 6 cm (2in). Tape the two 3 cm (1
in) ends together to form a teardrop shape. Punch a
small hole in the middle of the taped part almost at the
top. Hook the fishing swivel through this hole. Tie a 30
cm (12 in) piece of fishing line or string to the other end of
the swivel. Tie the other end of the line to a low tree
branch or other support as shown. Slip the magnet through the
paper loop and balance it. Once the magnet is balanced,
let it go until it stops swinging.
While you are waiting for the magnet to stop swinging, move
the compass some distance away from the hanging magnet, and
let it settle down as well. Note the direction in which the
compass is pointing. Now note the direction each pole of
the bar magnet is pointing.
(NOTE: If you don’t have a fishing swivel, you can simply tie
your line or string directly to the paper. However,
without the swivel, the magnet may twist around a bit,
especially if you had to use string, and you may need to give
it a few minutes to stop swinging. )
What To Look For: If
all was done properly, the north pole of the magnet should be
pointed north and the south pole should be pointed to the
south, just like the compass. If not, make sure the compass
and magnet are far enough apart that they don’t attract one
another, and try again. If the south pole of your magnet is
pointed north, and you labeled it yourself, check to make sure
that you labeled it correctly. If you are using a bar
magnet that has been improperly stored, it can sometimes
reverse poles as well. In any case, you should see
that both the magnet and the compass line up north to south,
and the magnet behave just like a compass.
CAUTION!
Always use sharp objects such as knives or scissors with
adult supervision only! Hold any sharp point away from
your body, particularly your eyes.
Materials Needed:
Several
magnets of different sizes and shapes; white paper;
powdered iron. Most school science labs have powdered
iron (also called iron filings) which you can borrow.
They won’t be “used up” so you should be able to return all of
the powdered iron when you are done. If you can’t get
some powdered iron, take a piece of steel wool and unroll
it. Using a sharp pair of scissors, have an adult help
you to cut tiny pieces by cutting across the strands of the
unrolled steel wool.
Procedure:
Place a magnet underneath under a sheet of paper.
Sprinkle a little powdered iron over the top of the paper.
What To Look For:
You should see a pattern of lines form on the paper running
from one pole to the other. The pattern will vary
depending on the shape of the magnet and its position under
the paper. (A bar magnet will produce a pattern
something like the one shown above.)
What Happened: There
is a force surrounding the magnet called a magnetic
field. The particles of iron are attracted to that
field, allowing you to see at least part of the field.
The field is strongest at the poles of the magnet, so most of
the powdered iron will concentrate there.
Going Further: Try
moving the magnet around underneath the paper to see different
parts of the field.
In the last experiment, you saw the magnetic field
in only one dimension - a flat surface. As you moved
the magnet, you could see different parts of the magnetic
field. But the magnetic field surrounds the field in three
dimensions, and in this experiment, you will be able to see
a portion of this field in three dimensions.
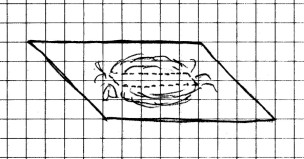
Materials Needed:
Several
magnets of different sizes and shapes; powdered iron (iron
filings); plastic sandwich bag.
Procedure:
Place one of the magnets inside the plastic sandwich
bag. Flatten the bag to get as much air out of the bag
as possible, and seal it. Now dip the magnet into the
powdered iron. After you have finished, remove the
magnet by turning the bag inside out so as not to get powdered
iron on the magnet. Powdered iron on the magnet won’t
hurt anything, but it will be difficult to remove.
Repeat this experiment with different magnets.
What To Look For:
You
should see the powdered iron concentrated near the poles.
What Happened: You
were able to see the magnetic field. In three dimensions.
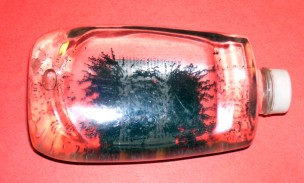
Materials
Needed: Several magnets of different
sizes and shapes; baby oil or mineral oil; clear flat plastic
bottle; powdered iron or steel wool clippings. (See last
experiment).
Procedure:
Find a clear plastic bottle with as nearly flat sides as
possible. The bottle that the baby or mineral oil comes
in is often nearly flat on at least two sides. Remove
the labels and fill the bottle completely with
oil. Add about 1/4 tsp of steel wool clippings or
powdered iron to the oil. Screw the cap on tightly and
shake well to spread the particles.
Place one of the magnets against the flat side of the
bottle. What happens to the iron or steel? Shift
the magnet around and see if the pattern changes. Shake
the bottle and repeat with different magnets.
Add a little more powdered iron if needed to see the pattern
clearly, but be careful not to add too much.
What Happened: You
were able to see the magnetic field, in three dimensions
because the thickness of the oil kept the particles of iron
from lumping together. This experiment and the last one
both show that a magnetic field is not flat. Instead, it
surrounds the magnet in all directions.
Materials
Needed: Several different magnets; several dozen
small pins, paper clips, safety pins, tacks, or other small
objects made of iron or steel. (You should use all of
the same kind of object, and whatever you use must be
attracted to a magnet.)
Procedure: Make a
table like the one shown below, but without the numbers.
Dip one of the magnets into the metal objects you have chosen
(we’ll assume you chose pins) and pick up as many as you
can. Remove the magnet and count the number of pins you
picked up. Write down the number in the table.
Remove the pins and repeat. Do the same thing with all
the other magnets.
| First Trial | Second Trial | Average | |
| Magnet # 1 | 18 | 16 | 17 |
| Magnet # 2 | 21 | 20 | 20.5 |
| Magnet # 3 | 7 | 11 | 9 |
What To Look For:
You’re trying to determine which magnet in your group is the
strongest. By seeing which magnet attracts the most
pins, you are measuring the relative strength of the
magnets. In other words, you are comparing the magnets
to each other. In the example above, magnet # 2 is the
strongest of the three.
If you set a standard for
measuring the strength of a magnet in “pins”, you might say
that magnet #1 has an average strength of 17 pins, since it
picked up an average of that many pins. You have now
created a new standard for measuring a magnet’s strength, the
"pin." By using this standard, you have now made an absolute
measurement of a magnet’s strength.
Materials
Needed: Small iron or steel object such as a small
nail (or a pin or needle); a magnet; a few small iron or steel
staples.
Procedure: Test your
nail to make sure it is iron or steel by using the
magnet. If it isn’t attracted to the magnet, you can’t
make a magnet from it. Also, you should not use a
galvanized nail. (Galvanized nails are coated with zinc and
usually have a gray color. If the nail has a little rust on
it, it probably is not galvanized.) Test the staples to
make sure they will be attracted to a magnet also.
Next, rub the magnet along the nail about 20 strokes in one
direction only. Do not rub back and forth. After
you have done this, bring one end of your metal object to a
few of the staples. What happens?
What To Look For: The
nail should now act like a magnet and attract the staples,
although the attraction will probably not be very strong.
What Happened: Rubbing
the magnet against the nail in one direction caused the iron
atoms in the object to line up and create a weak magnetic
field, which made the nail behave like a magnet. You had
to rub in one direction to get the atoms to all line up in the
same manner. If you had rubbed back and forth, the atoms
would not have lined up as well, and the magnetic field would
probably not be as strong, if one was created at all.
Magnetism created in this manner is called induced
magnetism.
Going Further: Can you
make the nail a stronger magnet by rubbing longer? How
about harder? How can you tell? Can you make a
stronger magnet by using a larger nail? Can you use what you
learned in the last experiment to measure the strength of your
magnet?
CAUTION! Always be careful to follow all safety precautions when using fire, and use with adult supervision only! Keep your candle in an aluminum pie pan, and keep the flame at least three feet away from anything that can burn, unless otherwise instructed.
Materials
Needed: Candle or alcohol lamp with safety pan;
nail magnet from the last experiment; a pair of pliers or
tongs; staples from the last experiment
Procedure:
Hold the nail magnet in a candle flame using a pair of
pliers. Move the nail through the flame so that all
parts of the nail are heated. Remove the nail from the
flame and allow it to cool thoroughly! Once it has
cooled, try to pick up the staples again.
What To Look For: Does
the nail magnet pick up the staples? If so, is it
stronger or weaker than it was?
What Happened: If you
heated the nail long enough, the nail was no longer
magnetic. Heat causes the atoms of iron in the nail to
vibrate, and as they do, they no longer line up to produce the
magnetic field. The nail may still have attracted some
of the staples, but you should have noticed that the
attraction was much weaker after the nail was heated.
Going Further: Can you
re-magnetize the nail after it has been heated?
Materials
Needed: Nail magnet; staples.
Procedure:
Make another nail magnet as described in Experiment
3-31. Test it using some staples to see how strong it
is. Next, hit the nail as hard as you can several times
on a hard surface such as a rock or sidewalk. Using the
staples, test your nail magnet again.
What To Look For: Does
the nail magnet still attract the staples? If so, is it
as strong as it was before?
What Happened: Just as
heat caused the molecules of iron to vibrate, hitting the nail
jarred the molecules out of line and destroyed or weakened the
magnetic field.
Going Further: Can you
re-magnetize the nail after it has been demagnetized in this
manner?
Now you know
the basics of magnetism, but to understand how magnetism and
electricity are related, you need to check out Magnetism,
Magnets
and Electricity - Pt. 2