The
Science Notebook
The
Science NotebookForces - Part 1
The
Science NotebookHome Terms of Use Safety Contact Us Experiment Pages Downloads Supplies Useful Links!
Inertia is a property of matter that you experience
every day. In fancy words, it is “the tendency of a
body at rest to remain at rest, and of a body in motion to
keep moving at that same speed and direction until acted on
by an outside force”. But what does that mean?
“Tendency” means what
something is likely to do. For example, little kids
have a tendency to like candy. To a scientist studying
forces and motion, a “body” is any object. It may be a
solid, liquid or gas. “At rest” means that the object
is not moving. “In motion” means just that - the
object is moving. So another way of defining inertia
is to say that is “an object that is not moving is
likely to stay put, and a moving object is likely to keep
moving in the direction it’s moving, and at the speed that
it is moving.” All this may not mean a whole lot to
you now, but once you do these experiments, you should be
able to understand exactly what this means.
Materials
Needed: Large coin such as a quarter; small piece of
cardboard such as a 3x5 card; small glass, cup or jar.
Procedure: Place the
cardboard on top of the container. Put the coin on top
of the cardboard. Thump the edge of the
cardboard. Watch what happens to the coin.
What Happened: The
coin on top of the cardboard was an object at rest. It
was not moving. When the cardboard was thumped, it moved
out from under the coin, but because of inertia, the coin had
a tendency to remain at rest instead of moving forward with
the cardboard. Since the coin did not move forward, it
dropped into the glass when the cardboard was removed from
underneath it..
Going Further: Why did
you have to thump the paper quickly? What would happen
if you didn’t?
You have probably seen a magician pull a tablecloth
out from under dishes set on a table. The dinnerware
“magically” stays in place. However, there is really
nothing magical about it at all. In this experiment
you will do the same thing - on a smaller scale. Just
to be on the safe side, though, you should use an
unbreakable dish.
Materials Needed:
Sheet of paper; unbreakable dish such as a cup, saucer or
glass; smooth counter top or table.
Procedure:
Place the paper on the counter and place your dish on top of
the paper. Quickly pull the paper out from under the
dish. What happens?
What Happened: Because
of inertia, the dish “at rest” didn’t move when the paper was
pulled out from under it.
Going Further: Why
did you have to pull the paper quickly? What would
happen if you didn’t? We’ll see a little later.
Materials
Needed: A friend; piece of tape; smooth flat
surface, such as a driveway or gym floor.
Procedure:
Place the strip of tape on the driveway or floor. Have
your friend to back up about 30 meters (100 feet) behind the
tape. Instruct him or her to run toward the tape as fast
as possible and to stop exactly on the tape. Position
yourself beside the tape and observe your friend.
What To Look For:
Notice what happens when your friend tries to stop.
What Happened: When
your friend approached the tape at a run and tried to stop at
the tape, you should have seen his or her body lean
forward. Your friend may not have been able to stop at
the tape. Your friend was “a body in motion”.
Because of inertia, he or she had to expend some energy to
stop. Even so, your friend’s body had a tendency to keep
going forward.
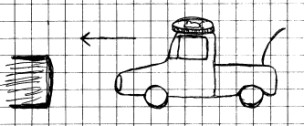
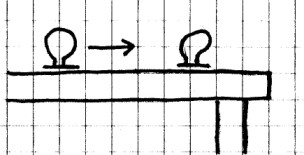
Materials
Needed: Toy car or truck that rolls smoothly; small
object that can be placed on top of the vehicle such as a
small coin; a hard cover book.
Procedure:
Place the book on a flat surface. The book should not be
as high as the top of the vehicle. Position the car or
truck four or five feet away from the books. Then, place
the small object on the roof of vehicle and give it a slow
push it into the book. What happens to the object on top
of the vehicle?
What Happened: If you
pushed too fast, the car moved, but the object was left
behind, just like the coin and the dish in the experiments
above. However, if you pushed the car slowly, the object
stayed in place until the “crash”. When the toy
car “crashed”, the object was thrown forward. Once the
vehicle started rolling, the object on top of the vehicle
began moving with the vehicle because it was acted on by an
outside force - the push of your hand. Once moving, it
had a tendency to keep moving, even when the vehicle was
stopped by the book.
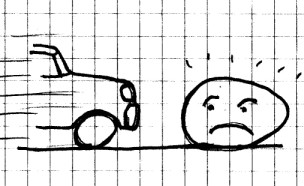
In the same way, you have probably been in a car with your
seat belt on when the driver applied the brakes
suddenly. If so, you no doubt felt yourself pushed
forward against the seat belt. You were a moving
object. When the vehicle braked, it slowed down but you
continued to go forward until restrained by your seat
belt. Without the seat belt, you could have been
thrown into the windshield and seriously hurt.
Going Further: What
happens when you are in the back seat of a car going around a
sharp curve? Why?
Materials
Needed: Food tin; several small coins.
Procedure:
Stand directly over the tin. Try to drop the coins into
the can one by one. Practice this until you are able to
hit the tin nearly every time. Next, place the tin about
3 meters (ten feet) away. Walk toward the can and try to
drop a coin in the can as you walk by. If you miss the
can, make a note of where the penny falls. Keep trying
until you are able to get a coin to go into the can every
time. What did you have to do?
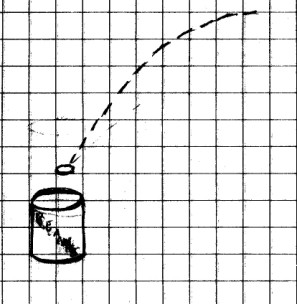
What Happened: You
were probably able to drop a coin into the can while standing
over the can with little or no practice. However, trying
to drop a coin into the can while you were moving was much
harder.
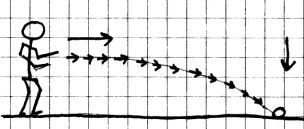
When you walked while carrying the coin, both you and the coin
were “in motion”. When you let the coin go, it had a
tendency to keep going forward at the same speed as you even
while it was falling, so it actually fell along a curved path
as shown in the diagram. Because of this forward motion,
in order to get the coin to fall into the can, you actually
had to release it before you got over to the can.
Because of inertia, when bombs are dropped from a plane, they
continue to move forward at the same speed as the plane.
If the plane doesn’t change speed or direction, the bombs will
hit the ground almost directly underneath the plane, although
air resistance will slow their forward motion down some.
Going Further: Have a
friend who doesn’t know what is supposed to happen to do this
same experiment while you watch. Can you see the curved
path of the coin when your friend drops it.
Objects in motion can be stopped because of a
property of matter called “friction”. Friction is
caused when two types of matter “rub” against one
another. No surface is perfectly smooth. If you
look at most any solid surface that appears to be smooth to
the naked eye, and then look at that same surface under a
microscope, you will see that it often has small bumps or
ridges. When these bumps or ridges rub against the
bumps and ridges of another surface, they cause the two
surfaces to resist movement against each other. This
resistance is called friction. The rougher the
surface, the more resistance, and the greater the friction
between the two surfaces.
Materials
Needed: Two microscope slides or two pieces of
glass from small picture frames; two pieces of sand paper;
cooking oil.
Procedure:
Place a drop of cooking oil on one of the two microscope
slides and try rubbing them together again. Do you
notice any change from the last experiment?
Cut two 3 cm (1 in) squares of sandpaper, and place several
drops of oil on the rough surface of one of them. Rub
the rough surfaces of the two squares together. Do you
notice any change from the last experiment?
What Happened: You
should have noticed that the two surfaces were able to slide
against each other more freely. The most improvement
should have been seen on the glass surfaces, but you should
have seen some improvement even in the sandpaper. Here,
the oil was used as a “lubricant” by filling in some of the
gaps between the rough spots on the rough surface of each
piece of sandpaper allowing them to move more freely against
one another.
Going Further: Try
placing a drop or two of water between the slides. Does
this work better than the oil? Why or why not? Also, try
placing some softened butter or margarine between the
sandpaper squares. Does this work better than the
oil? Why or why not?
Materials
Needed: Old toy car that rolls smoothly; rubber band;
tape.
Procedure:
Tape the rubber band to the front of the car by running a
piece of tape through the loop of the rubber band. Place
the car upside down on a smooth hard floor and give it a
steady pull. As you do, notice how easy or difficult it
is to pull the car. Also notice how far the rubber
band stretches.
Now turn the car right side up on its wheels and pull it over
the same surface. Again, notice how easy or difficult it
is to pull the car. Also, observe how far the rubber
band stretches with a steady pull.
What Happened: You
could tell that the car was much easier to pull when it rolled
on its wheels. Wheels are mechanical devices that reduce
friction. You also saw that the rubber band stretched
farther when the friction was greater. The distance the
rubber band stretches is a measure of the amount of force
required to overcome friction. The more force
required to overcome friction, the farther the rubber band
stretches.
Going Further: If you
can, borrow a spring scale from your school. Repeat this
experiment using the spring scale instead of the rubber
band. See whether you can measure the amount of force
required to move the car by observing the reading on the
scale.
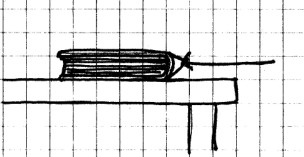
Materials
Needed: Hardcover book; rubber band; string; table
top.
Procedure:
You should use an old book that you don't care to keep since
there is a slight risk that the book could be damaged.
Run the string through the
rubber band and tie it to the rubber band.
Next, loop the rubber band inside the book between two pages
somewhere in the middle of the book so that the string is
in the middle of the spine on the outside. (NOTE: The illustration above
shows the book with the rubber band looped around the top
and bottom of the book, instead of inside the book, and this
is not correct. If you follow the illustration, part
of the friction will be due to the rubber band underneath
the book. A new illustration will be provided soon.) Place
the book flat on the table and pull it steadily along the
table top. Notice how far the rubber band stretches.
Now place the rubber band around the outside of the book.
Turn the book upright so that the spine is vertical and
the string is again lined up with the middle of the spine.
Now carefully pull the book across the table top again.
How much does the rubber band stretch now?
What Happened: The
rubber band probably stretched much farther when the book was
flat on the table. This indicates that more force was
required to overcome friction when the book was flat.
The more surface area that is in contact between two objects
moving against one another, the greater the friction between
those two objects.
Going Further: If
you
can borrow a spring scale from your school, repeat this
experiment using the spring scale and a loop of string instead
of a rubber band and see whether you can measure the amount of
force required to move the book.
CAUTION!
Always use sharp objects such as knives or scissors with
adult supervision only! Hold any sharp point away from
your body, particularly your eyes.
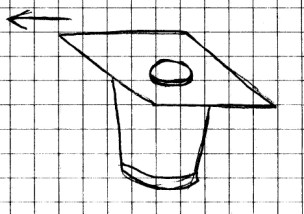
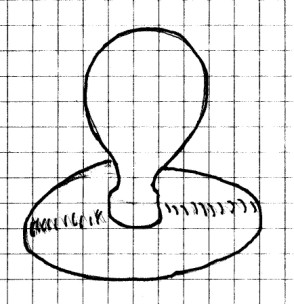
Materials Needed: Old
compact disc (CD) or 10 cm (4 in) diameter cardboard circle;
plastic soft drink bottle top; glue; balloon; sharp knife or
scissors.
Procedure: If
you don’t have an old CD, use a compass to draw a 10 cm (4 in)
diameter circle on a piece of thin stiff cardboard. Cut
out the circle and cut about a 1 cm (½ in) circle from the
center.
The bottle top should be made of soft plastic and have just a
slight flare around the edge. Most soft drink tops have
this slight flare and will do very nicely. Glue the bottle top
to the very center of the cardboard disc or CD. You
should use a good strong glue. The author used glue from
a hot glue gun, but any strong general purpose glue except
“Super Glue”® type adhesives should work. Super
Glue® is very strong, but it won’t work very well on these
surfaces. Also, if you are not very careful, it is easy
to get Super Glue® stuck to your fingers where it does stick
all too well.
Allow the glue to dry completely. Then, carefully punch
a hole in the bottle top. You should start with a small
hole. If you need to make it larger, you can do so once
you’ve tested it, but you can’t make it smaller once it’s too
big!
Inflate the balloon and hold your finger over the hole in the
cap. Keep the balloon pinched so as not to let out the air
while you stretch the mouth of a balloon over the bottom of
the cap. You may need to have someone to help you with
this.
Remove your finger from the hole in the cap. Quickly
place the disc on a table top and give it a slight push.
What To Look For: The
disc should skim across the table with very little
friction. If it doesn’t, you should remove the balloon
and enlarge the hole a little bit at the time until it does.
What Happened: The
air leaving the balloon created a thin cushion of air between
the disc and the table top. The disc glided along on
this cushion of air with very little friction to slow it
down. In fact, it was much more likely to be slowed down
by the air resistance and inertia of the balloon.
You have just made an air puck. This air puck works on
the same principle as the air pucks used in air hockey
games. An air hockey puck glides along on a cushion of
air coming through the holes on the surface of the table from
underneath. This is also the principle used by a hovercraft to
skim over water or land on a cushion of air created by large
fans.
Going Further: There
are lots of ways you can experiment with the design of your
air puck. You can try using different materials such as
plastic sheets or foam board, and you can also try changing
the size and shape of the puck. In fact, if you keep
careful records, you can probably design an experiment to test
the different designs which could turn into a good science
project.
Air pucks such as the one you just made can help
you to study collisions without the interference of
friction.
There are two types of
collisions - elastic and inelastic.
In an elastic collision,
neither of the objects is permanently changed or altered by
the collision. This is the case with bowling pins and
a bowling ball. When they collide, the pins and balls
may go off in different directions, but they are not
altered. This is also true of marbles and billiard
balls.
On the other hand, in an
inelastic collision, one or both of the objects are altered
by the collision - usually be being dented, cracked or
broken. This is the case with a car crash, for
example.
Materials
Needed: Two air pucks. (See
previous experiment.)
Procedure: You
will need to make a second air puck just like toe one you made
in the last experiment. Inflate the balloons and place
the two air pucks about a 30 cm (1 ft) apart on a smooth
tabletop. Push one into the other and observe what
happens. Do the balloons have any effect?
What Happened: When
the moving puck collided with the stationary one, it stopped
or at least slowed down, and the second puck moved away.
The energy from the first puck was transferred to the second
puck, causing the second puck to move away.
Going Further: Try
this same experiment using two marbles on a smooth surface
instead of two air pucks. Do you get the same
result? Also, if you know someone who has an air hockey
game, you might want to try this experiment, and the next few,
using the air hockey table and pucks. If you do, are
your results the same or different? Why?
Materials
Needed: Two air pucks; modeling clay.
Procedure: Place three
small lumps of clay on one of the pucks. The lumps
should be the same size, and should be placed the same
distance from the center and from each other so that when the
puck moves, it is balanced and does not drag on one side.
You may have to work on this for a while,. If you
put too much clay on the puck, it will be too heavy to glide,
so take your time getting this one right.
Inflate the balloons on both pucks and place them about 30 cm
(1 ft) apart on a smooth tabletop. Next, push the
heavier puck into the lighter one and observe what happens.
What Happened: When
the heavier puck hit the lighter stationary one, it had
considerable energy stored in it. Because it was
heavier, it took a stronger push to get it going.
Because of this, not all of it’s energy was transferred to the
lighter puck. Although the lighter puck moved off as
before, the heavier puck may have continued to move
also. It did not move quite as fast, however, because it
transferred some of its energy in the collision to the lighter
puck.
Going Further: Try
using different amounts of weight on the heavy puck. If
you have a balance, you may want to weigh the pucks before
each collision. In fact, with a little careful
thought, you might be able to design a science project around
elastic collisions. The next experiment may also give
you some ideas.
Materials
Needed: The two air pucks from the last experiment;
extra modeling clay.
Procedure: Inflate the
balloons and place the air pucks about a 30 cm (1 ft)
apart as before. However, this time push the lighter air
puck into the heavier one. Before you do this, what do
you think will happen? Why?
What Happened: The
heavier air puck may have moved away when it was struck by the
lighter one, but probably not nearly as fast or as far.
The lighter one probably moved off in a different direction or
stopped moving.
The heavier air puck absorbs all, or nearly all, of the energy
of the lighter one, so the lighter puck stops moving or slows
down considerably. However, since the second puck was
heavier, the energy transferred from the lighter puck was not
enough for the heavier puck to move off at the same speed, so
it moves away slower and did not travel as far as
the lighter one would have.
Going Further:
Again, you may want to repeat this experiment
using different amounts of clay.
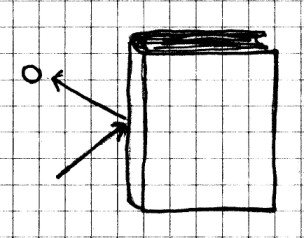
Materials
Needed: A marble; smooth tabletop; a heavy hardcover
book.
Procedure: Place the
book flat on the tabletop. Roll the marble toward the
spine at an angle as shown, and observe the direction it moves
after the collision.
What Happened: The
marble moved away from the book in the opposite
direction. If you were to draw an imaginary line at a
right angle away from the book where the marble hit, the angle
of the marble as it approached the book would be the same size
as the angle made when the marble moved away.
Going Further: Try
this experiment at different angles. Is the angle of the
marble as it bounces off the book always the same size as the
angle going toward the book. If it isn’t, why not?
You can also try this using a billiard ball on a pool table,
or using an air puck against the book.
Materials
Needed: A toy car that rolls; an egg.
Procedure: This
experiment must be done on a smooth surface such as a flat
driveway where it is OK to break an egg. Once the egg is
broken, you should clean it up immediately and rinse the area
with water. Dried raw egg is tough to clean up, and
after only a little while in the sun, it can smell really bad!
Place the egg a couple of feet away from the toy car.
Roll the car into the egg SLOWLY! Observe what happens.
Repeat this several times, slowly increasing the speed of the
toy car until the egg breaks.
What Happened: The
first few collisions were elastic. The egg was able to
absorb the energy by rolling away. However, as the
energy you put into the car was increased and the car went
faster, a point was reached where the egg was unable to absorb
all of the energy and transfer it into movement. When
that point was reached, the egg broke, and the collision
became an inelastic one.
Gravity is a force we experience all of the time
every day. It is that force which holds us to the
ground and keeps us from flying off into space. These
next few experiments will help us to explore some of the
properties of gravity and how it works.
Materials
Needed: Metal nut or other small object; string.
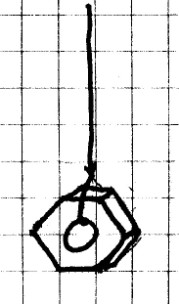
Procedure: Tie
the nut to one end of a 1 meter (3 ft) length of string.
Hold the other end and let the nut hang freely. In which
direction are the string and nut pointing?
What Happened: Your
first response is probably to say that the nut is pointing
down, and you would be right. But more specifically, the
nut is pointing toward the center of the earth. The
force of gravity exerted by the earth tends to draw all
objects under it’s influence toward the center of the earth.
Going Further:
The string and nut combination is a simple device known as a
“plumb bob”. A plumb bob is used to insure that an
object is perfectly straight up and down or vertical.
You can use this simple plumb bob to straighten picture frames
on a wall.
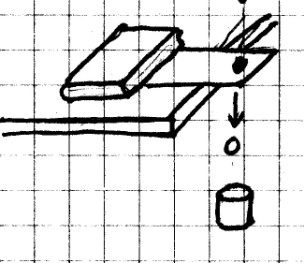
Materials
Needed: Food tin; marble; piece of cardboard; book;
table; plumb bob from the last experiment.
Procedure: Cut a hole
in one end of a piece of cardboard large enough for the marble
to drop through freely. Place the cardboard on the
edge of the table with the hole off the edge. Place a
book on the other end to hold the cardboard in place.
Place the nut on the end of the plumb bob through the hole and
lower a short distance above the floor. Position the can
so that the plumb bob is over the center of the
can. Remove the plumb line.
Drop the marble through the hole. Where does it
go? Next, have a friend to drop the marble through the
hole while you watch. What do you see?
What Happened: In
each case, the marble fell straight down. The earth’s
gravity pulls all objects directly toward the center of the
earth. In general, all falling objects near the earth
fall toward the center of the earth.
Materials
Needed: Two rocks of different size and weight;
chair; a friend.
Procedure: This
experiment should be done outside on a driveway or on the
ground. Stand on a good steady chair and hold both rocks
at the same height above your head, one in each hand.
Let both rocks go at the same time while a friend watches the
ground underneath. Have your friend to note which rock
hits the ground first. Then, have your friend repeat the
experiment while you watch.
What Happened: Both
rocks hit the ground at the same time or nearly so. The
force of gravity will cause all objects to fall at the same
rate of speed, regardless of how much or how little they
weigh. However, there is one other force that can
affect the speed of the fall, as you will see in the next
experiment.
Going Further: Try
this with a variety of objects such as coins, pens, pencils or
small hardware.
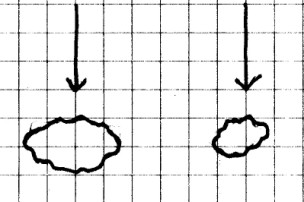
Materials
Needed: Two identical sheets of notebook paper;
chair; a friend.
Procedure: Crumple
one of the sheets of paper into a ball. Stand on a
good sturdy chair and hold one piece of paper in each hand at
the same height above your head. While your friend is
watching, drop both pieces of paper. Have your friend
notice which hits the ground first. Have your friend to
repeat the experiment while you watch.
What Happened: The
crumpled paper hit the floor first, while the flat sheet of
paper fell much slower. The difference was caused by air
resistance. As the flat sheet fell, it’s surface area
exposed to the air was much greater than the surface area of
the crumpled piece. As both pieces fell, they were
slowed down by the air, but the flat sheet was slowed more
because of the greater surface area. All objects falling
through air are slowed by air resistance, but objects that are
very light, or those which have a large surface area compared
to their weight, are affected more.
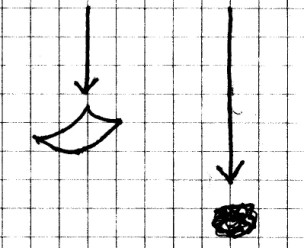
Air resistance allows a
parachute to work as it does.
CAUTION! Always use sharp objects such as knives or scissors with adult supervision only! Hold any sharp point away from your body, particularly your eyes.
Materials
Needed: Handkerchief or other small piece of light
cloth; light thread; nut or other small weight. (HINT:
You can substitute a square cut from a plastic grocery
bag for the cloth.)
Procedure: Cut four
pieces of thread each about twice the length of one side of
the handkerchief. Tie one end of each piece of thread to
each corner of the handkerchief. Tie the other end of
each string to the weight to make a small parachute.
Roll up this small parachute and throw it as high as you
can. What happens?
What Happened: If the
parachute opened properly, it fell gently down to the ground.
The surface area of the handkerchief presented a large surface
area for air resistance to oppose the pull of gravity and slow
the fall just as a real parachute does.
Materials
Needed: Two baseballs or softballs; a friend.
Procedure: Have you
friend stand some distance away and to one side of you.
Hold one ball in each hand. At the same time, drop one
ball and throw the other ball as straight ahead of you as
possible. Be careful that you throw the ball as level as
you can, rather than have it arch upward. Have your
friend to observe when each hits the ground. Repeat this
two or three times.
Next, have your friend to repeat the experiment while you
watch. What do you see?
What Happened: If you
were careful to throw the ball straight ahead, and if you
released both balls at the same time, the balls should have
hit the ground at the same time. It isn’t all that easy
to throw a ball straight ahead without arching it up a little
bit. It also will take some practice to throw and
release at the same time, so the two balls might not have hit
at exactly the same time. You may need to do this a few
times before it works.
The forward speed of an object does not affect the force of
gravity on that object. It still falls at the same rate
as one which is not moving forward. Even a very fast
moving object, such as a bullet fired from a gun, falls at the
same rate as it would if it were not moving forward.
This is because there are actually two separate forces at work
on the moving ball at the same time. One is the forward
force given by your hand and the other is the downward force
of gravity. The two forces combine to produce a curved
path for the ball.
Going Further: Explore
the
curved paths with a friend by taking turns throwing the ball
and observing the thrower. Notice the path that a ball
takes when it is thrown straight ahead and when it is thrown
upward and forward. Can you sketch these paths?
In this experiment, you are going to use a simple
math formula to measure how much distance a falling object
covers over time. The formula we use to do this is:
This formula may look complicated, but it
isn’t. “d” is the distance an object falls in meters
when dropped. That is what we are looking for.
“t” is the time in seconds and in this formula, it is
squared (or multiplied times itself). “g” is the
number that represents how fast gravity increases the speed
of an object as it falls. “g” is a constant which
means it’s value doesn’t change. For objects here on
earth, “g” equals 9.8 meters/second2. What this means is that for every
second an object falls, it speed increases 9.8 meters per
second over it’s speed the last second.
Now let’s see how it all
works.
Materials Needed: Tennis
ball;
stopwatch; a friend; a building with several stories; small
weight; roll of string; meter stick; marker; calculator
(optional).
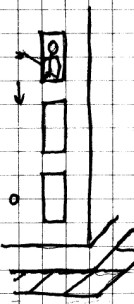
Procedure: Find
a building that is several stories tall and that has windows
from which you may SAFELY drop a tennis ball. This
should never be done when there is anyone nearby who could be
struck by a falling or bouncing ball!
You will need a friend to help you with this experiment.
Start at a first floor window. Tie a small weight to the
string and lower the string from the bottom of the window to
the ground, a meter at a time. Use the marker to make a
mark on the string every meter. When the weight has
reached the ground, note the distance to the ground.
Drop the ball out the window even with the bottom
windowsill. Start the stopwatch at the same time.
Use the stopwatch to measure how long it takes from the time
you release the ball until it hits the ground. Do this
several times and average the times.
Repeat this for the second and third floors. For safety
reasons, you should not go past the third floor.
To calculate distance the ball fell from each floor (and thus
the height it was dropped from), use the formula explained
above. For example, suppose it took the ball two seconds
to hit the ground. Using the formula:
Compare the distance you measured with the string with the distance as calsulated using this formula. The two should be close.
Going
Further: If you live near a tall bridge or cliff, you
can use this same formula to calculate how far the bridge or
cliff is from the ground. If you try this, though, be
sure to always keep safety in mind and only do this with the
help of an adult.
The formula from the last experiment may also be
used to determine how high a ball is thrown.
Materials Needed: Ball;
a
friend with a good pitching arm; stopwatch.
Procedure: Have your
friend to pitch the ball as high as he or she can straight
up. Use the stopwatch to time how long it takes for the
ball from the time it leaves your friend’s hand until it
strikes the ground. Do this a couple of times.
Have your friend to throw several high arching curves while
you again time how long the ball is in the air.
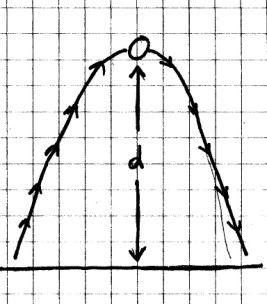
What To Look For: When
your friend throws the ball straight up, notice how long it
takes for the ball to go up, and how long it takes for the
ball to come back down. You should see that the times
are the same or nearly so. This is because an object
moving against the force of gravity is slowing down at the
same rate that an object is accelerating when it is moving
with the force of gravity. Because of this, to figure
out how high the object went, you should divide the total time
in half.
Keeping this in mind, use the formula
Going Further: Try this same experiment using a toy dart gun.
This is only half the story about forces. To
learn more, visit the Forces - Part
2 page!