The
Science Notebook
The
Science NotebookForces - Part 2
The
Science NotebookHome Terms of Use Safety Contact Us Experiment Pages Downloads Supplies Useful Links!
For every solid object, there is a point where it
appears that all the weight of that object is
concentrated. That point is called it’s “center of
gravity.” The center of gravity is the point at which
you can balance the object. An object which is moved
outside of it’s center of gravity will become very unstable.
Materials
Needed: You; a friend.
Procedure:
With your friend watching, place your feet together and stand
up straight. Bend over and touch your toes.
Next, stand with your back and heels against a wall.
Again, try to bend over and touch your toes. Can you do
it?
Now have your friend to do what you have just done.
Watch the position of his or her body. What is
different when your friend is against the wall?
What Happened: Neither
of
you should have had any trouble bending over when you were
away from the wall, but with your back against the wall, it
was impossible. When you bent over away from the wall,
your legs bent backwards and your backside moved backwards as
well. This counteracted the weight of your upper body
moving forward, and kept your weight balanced near the
center. However, when you stood against the wall, you
could not move your backside backwards and your center of
gravity shifted forward causing you to fall forward.
Materials
Needed: Thin cardboard; ruler; compass;
scissors; sharp pencil.
Procedure: Cut
a rectangle from your piece of cardboard. Using
your ruler, draw a straight line from one corner to the
opposite corner. Now draw another line between the
other two opposite corners. Press the point of your
pencil into the point where the two lines intersect (cross) to
make a small indentation. Now carefully try to balance
the rectangle on your pencil point where you just made the
indentation.
Next, use the compass to draw a circle on the cardboard.
Press the compass point firmly into the cardboard to make a
small indentation at the center of the circle. Carefully
cut out the circle. Try to balance the circle on the
pencil point at its center.
What Happened: You
found the geometric center of the rectangle and the
circle. Both should have balanced on the pencil point at
their center. The center of gravity of a regular shaped
geometric figure, such as a rectangle or circle, is the same
as it’s geometric center.
Going Further: See if
you can construct a square, a pentagon, a hexagon and an
octagon from cardboard and locate their geometric
centers. Is this the center of gravity for each
figure? (NOTE: If you don’t know what each of these
figures is, you may want to get some help from a math
teacher. Your teacher may also be able to help you
locate the center of each. To keep it simple, make sure
that all the sides of each figure are of equal length.
Materials
Needed: Cardboard; scissors; string; push pin; small
washer, nut or other small weight; pencil.
Procedure: Cut out an
irregular shape of cardboard similar to the one
shown.
Cut a piece of string about one and a half times longer than
the widest part of the cardboard. Tie one end of the of string
to your weight, and tie the other end to the straight pin near
the head.
Punch a hole in the cardboard with the pin, anywhere near the
edge. Hold on to the pin, but allow the cardboard to
swing freely. When the cardboard stops swinging, draw a
line on the cardboard where the string is hanging.
Remove the pin and stick it in at another point along the edge
and do the same thing again. Do this a third time.
If you have done this carefully, all three lines should
intersect at the same point. If they don’t, check your
lines again. Make sure that the cardboard is free to
swing when you hold the pin.
Press the point of your pencil into the cardboard where the
lines intersect to make a small indentation. Now try to
balance this object on your pencil at this point.
What Happened: You
have located the center of gravity of an irregular flat
object. An object that is allowed to swing freely will
move so that it’s center of gravity moves to it’s lowest
point. Therefore, the center of gravity will be located
somewhere along the line of your string. (Remember the plumb bob?) When you move the pin
to another point, the center of gravity will again be located
somewhere along the line of the string. Where the lines
intersect is where the center of gravity is located.
Going Further: Can
you use this method to find the center of gravity of the
circle or rectangle? Is it where you expected it to be,
based on the last experiment?
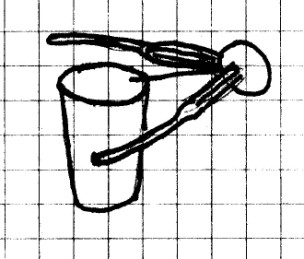
Materials
Needed: Two forks; coffee stirrer; large radish;
drinking glass.
Procedure: Place the
two forks and the coffee stirrer in the radish as shown.
Move the coffee stirrer along the edge of the glass until the
forks balance. Looks unusual doesn’t it?
What Happened: The
center of gravity of the forks and radish was somewhere along
the edge of the stirrer between the two forks. This
means that the weight in front of the edge of the glass where
the coffee stirrer is resting is equal to the weight behind
that same point. Therefore, the balance point is the
center of gravity.
Materials
Needed: Small pail such as a toy sand bucket; water.
Procedure: This
experiment should be done outside. You should also find
a pail with a sturdy handle and no leaks!
Choose an open spot far away from anything or anyone that
might be hit if you should lose your grip on the pail.
Fill the pail about 1/4 full of water. Holding the pail,
stretch your arm out and it spin around in a horozontal
circle. Watch the water as you do. What happens?
Next, swing the pail around in a vertical circle. What
happens?
What Happened: The
water stayed in the bucket, even when you swung the pail over
your head. Centrifugal force is a force which tends to
push an object away from the center of it’s rotation or
revolution. In this experiment, the water was pushed
toward the bottom of the pail as it was spun around.
This force was greater than the force of gravity, so the water
did not come out of the pail, even when the pail was upside
down and over your head.
Going Further: Centrifugal
force keeps
you from falling in many carnival rides that quickly turn
you upside down and back up again, or that spin you
around while the floor drops out from under you.
Can you think of any rides you have ridden that use
centrifugal force ?
A pendulum is a swinging weight suspended from a
fixed point. Two common examples of the pendulum are a
child’s swing and a clock pendulum. The following
experiments will help us see how pendulums work.
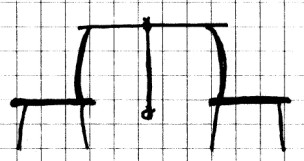
Materials
Needed: String; small washer, nut or other small
weight; meter stick, yard stick or long dowel; two chairs.
Procedure: Tie
the small weight to one end of an 80 cm piece of
string. Measure 75 cm from the weight and tie the other
end of the string to the dowel or stick. You should try
to have as close to 75 cm of string from the weight to the
stick as possible.
Place the backs of two chairs a little over 75 cm apart, and
place the stick over the two chair backs as shown.
Pull the weight to one side and let it go. You have made
a simple pendulum. In order to study pendulums, there
are a few terms you will need to understand.
First, the length of the pendulum is the distance from
the point where it is suspended to the center of gravity of
the weight. In this pendulum, the length is 75 cm.
Second, the period of the pendulum is the time it takes
the pendulum to make one complete swing from one side to the
other and back again.
Third, the frequency of a pendulum is the number of
periods or complete swings per second.
Finally, the amplitude of a pendulum is the distance from
the low point or center of the pendulum to the highest point
of the swing.
Materials
Needed: String; small washer, nut or other small
weight; meter stick, yard stick or long dowel; two chairs;
watch that measures seconds or a stop watch.
Procedure: Make a
pendulum as you did in the last experiment, but with a length
of 50 cm.
Move the pendulum weight horizontally 5 cm from the
center. Release the weight and time how long it takes
for the pendulum to complete ten complete periods.
Repeat for 10 and 15 cm.
What Happened: The
time should have been the same, or very close, regardless of
amplitude. You may have noticed minor differences, but
these may have been due to small amounts of friction or air
resistance or both.
The time required for the pendulum to make one complete cycle
or period is the same regardless of amplitude. You
measured the time required for ten periods instead of just
one, because it was easier to measure. If you divide this time
by 10, you will get a more accurate time for 1 period than you
would if you tried to time a single period.
Materials
Needed: Setup from the last experiment; a
second identical weight.
Procedure: Move the
pendulum weight 10 cm from the center and again time how long
it takes for the pendulum to complete ten complete periods.
Next, add the second weight to your pendulum to double it’s
weight. Again, move the pendulum 10 cm from the center
and time how long it takes for the pendulum to complete ten
periods. Is there a change?
What Happened: Changing
the
weight had little or no effect on the period. Again,
small differences may be seen due to friction or air
resistance or a combination of the two.
The period of the pendulum is the same regardless of it’s
weight.
Going Further: Try
this experiment using other weights.
Materials
Needed: Setup from the last experiment with
only one weight.
Procedure:
Start with the pendulum at 50 cm long. Move the pendulum
weight 15 cm from the center and release it. Time how
long it takes the pendulum to complete ten periods.
Shorten the pendulum length to 40 cm and repeat. Do the
same thing for 30 and 20 cm. How does the length of the
pendulum affect the period?
What Happened: Shortening
the
pendulum length shortens the pendulum’s period.
A clock that uses a pendulum to keep time depends on this
property of a pendulum that allows us to adjust the pendulum’s
period. If you observe a grandfather clock, you will see
that the period of the clock’s pendulum is one second, or a
multiple of one second.
Going Further: This is
a challenge for you, and there may be another science project
here. If we know the pendulum length, we can calculate
the period using the following formula:
T is the period in seconds, π (
pronounced “pie”) is a constant which is about 3.14 (and
that's close enough for our purposes), L is the length of the
pendulum, and g is the constant for the acceleration due to
gravity on earth which is 9.8 meters/second2.
This formula reads, "T is equal to 2 times π (or 3.14)
times the square root of the length of the pendulum, all that
divided by g (or 9.8 meters/second2).
This formula is a little harder to use than the earlier ones
we used, so you may want to get a math teacher to help you,
particularly if you don’t understand square roots or how the
math is done. Once you have learned how the math is done, try
calculating T for several different pendulum lengths.
Then, make pendulums of those lengths and measure the period
of each. See how closely your measurements and your
calculations agree.
In this experiment, you will construct a pendulum
that has a period of one second.
Materials Needed: The
pendulum setup from the last experiment; a watch that measures
seconds.
Procedure: Starting
with a length of 50 cm, begin shortening the length of your
pendulum until ten cycles or periods take exactly ten
seconds. Once you have determined the correct length,
measure it.
Going Further: Here
is another real challenge! There is another way to determine
how long the pendulum should be other than by trial and
error. To calculate the length using math, we use the
formula:
Here, L is the length of the pendulum, T is the period in
seconds, π is a constant which is about 3.14, and g is the
constant for the acceleration due to gravity or 9.8
meters/second2. If this looks a little like
the formula in the last experiment, it is because it is the
same formula. It has just been rearranged to solve for
L. You may want to get a math teacher to show you
how. You may also need some help doing the math.
Sir Isaac Newton was a famous scientist whose work
formed the basis for much of what we know about gravity and
forces today. Among the things he discovered was his
third law of motion. This law states, “For every
action, there is an equal and opposite
reaction.” But what does this mean?
Have you ever tried to step
out of a small boat that was not tied to a pier or being
held by someone without holding on to something? If
so, you may have found that as you tried to step out of the
boat by stepping forward, you also pushed the boat
backward. The force generated by your feet and legs
propelled you forward, but it also pushed the boat backward
with an equal amount of force. (In the process, it may
have given you a swim as well!) This is an example of
Newton’s third law. The next few experiments will
provide a few more examples.
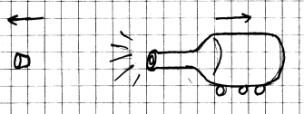
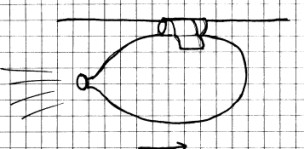
Materials
Needed: Three or four round pencils; a “long neck”
glass bottle with a flat side; rubber or cork stopper
(available from many hardware stores) to fit the bottle;
vinegar; baking soda; paper towel.
Procedure: This
experiment can get a little messy, so it should be done
outside on a smooth level surface.
Place the pencils parallel to one another on a flat surface
close enough to each other to lay the wide part of the bottle
across them as shown.
Fill the bottle 1/4 full of vinegar. Place 8 ml (1 tsp)
of baking soda in a small square piece of paper towel and
twist the corners of the paper towel to seal it inside.
Drop the paper towel and baking soda in the bottle.
Quickly stopper the bottle and place it on the pencils.
Keep clear of the cork and the mouth of the bottle.
What To Look For:
Notice what happens when the cork pops out of the bottle.
What Happened: The
vinegar and baking soda reacted to produce carbon dioxide
gas. As this gas was produced, pressure built up inside
the bottle, pushing in all directions. When the pressure
was great enough, the cork was pushed out of the bottle. When
the cork was pushed backward, the bottle was pushed
forward. The popping of the cork was the action, and the
rolling of the bottle was the reaction.
The forces involved were equal but opposite.
Going Further: You
probably noticed that the cork went much father than the
bottle. If the forces involved were equal, then why did the
cork go farther than the bottle?
The answer is actually pretty simple. The cork was much lighter than the bottle, and the same amount of force would move it much farther than the heavier bottle.
If you can find an old roller
skate or toy car, you might be able to make a "cradle" to hold
the bottle. This would probably work better than the
pencils, and it could be the start of a good science project
to investigate how the reaction would be affected by different
weights and sizes of bottles and corks..