The
Science Notebook
The
Science NotebookGases - Part 2
The
Science NotebookHome Terms of Use Safety Contact Us Experiment Pages Downloads Supplies Useful Links!
Materials
Needed: Empty plastic soft drink bottle.
Procedure: Make
sure the bottle is clean. Place your mouth firmly around
the mouth of the bottle and blow into the bottle while
squeezing the side of the bottle. What happens? Pull
your mouth away from the bottle? What happens now?
Again, place your mouth over the mouth of the bottle, but this
time, draw as much air from the bottle as you can. What
happens?
What Happened: When
you blew, you forced air into the bottle. This
compressed the air inside the bottle which increased the air
pressure inside. You were able to feel the increased
pressure because the bottle resisted your squeeze.
When you drew air out of the bottle, the bottle began to
collapse. Air was taken out of the bottle, and the
pressure inside dropped. Since the air pressure on the
inside was less than the air pressure on the outside, the
outside air pressure caused the bottle to collapse until the
two pressures were equalized.
Removing air is not the only way to lower air
pressure. A fast moving current of air will do the
same thing.
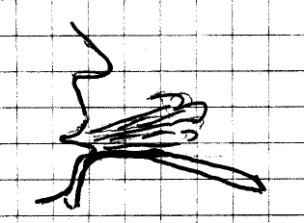
Materials Needed: Strip
of
paper, 3 cm (1 in) by 23 cm (9 in).
Procedure: Hold
the narrow side of the strip of paper just underneath your
lower lip and blow across the paper. What happens?
What Happened: The
paper strip rose.
A fast moving stream of air has a lower air pressure than a
slower air stream. As the stream of air moved over the
top of the paper, the air pressure over the paper dropped. The
air pressure underneath the paper stayed the same. The
greater air pressure underneath lifted the paper strip and it
rose. The idea that a moving air stream has lower air pressure
than air that is not moving is called “Bernoulli’s Principle”.
Materials Needed: A
piece of stiff paper (such as construction paper), 3 cm (1 in)
by 20 cm (8 in).
Procedure: Fold the
paper 3 cm (1 in) from each end into a “U” shape. Place
this paper upside down on a table top near the edge as shown.
Blow gently underneath the
paper. Gradually blow harder. What happens?
What To Look For: Does
the
paper blow away? Can you blow hard enough to blow it
away?
What Happened: When
you blew underneath the paper, you created a moving stream of
air. We know that Bernoulli’s Principle says that air in
this moving stream is lower than the still air above it.
The higher air pressure above the paper pressed the paper
down, and the harder you blew, the more the paper was forced
down.
CAUTION!
This experiment should be done only with adult
supervision. You should always be very careful when
you use an electric fan. Keep your fingers out!
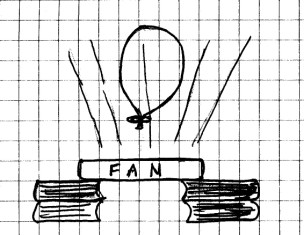
Materials Needed:
Balloon; paper clips; small electric fan; several books.
Procedure: Use the
books to position the electric fan so that it is blowing
straight up. You should also make sure that air can get
to the back side of the fan. You may need to use several books
to support the fan in order to do this.
Inflate the balloon and tie it off. Slip one paper clip
onto the neck of the balloon. Turn the fan on low and
hold the balloon in the middle of the air stream. Let it go.
What To Look For: The
balloon should be suspended above the fan. If it falls
toward the fan, try turning the fan up higher, or removing the
paper clip. If the balloon blows away, add a second
paper clip.
What Happened: The
force of the moving air underneath the balloon was enough to
hold it up. The weight added by the paper clip prevents
the balloon from going too high. But that is only part
of the story. The balloon stays inside the moving stream
of air because the pressure inside is the air stream is lower
than the still air around it. As the balloon moves toward the
still air outside of the air stream, the higher pressure of
the still air forces the balloon back into the lower pressure
of the air stream. Bernoulli’s Principle at work again!
Going Further: Try
this with a beach ball if you have one. The beach ball
is probably heavy enough so that you won’t have to use
anything to weigh it down. If you do need extra weight,
try taping one or more paper clips to the ball.
CAUTION!
Take care when using the straight pin in this
experiment. Make sure that the pin cannot poke you in
the eye by not holding the spool straight up!
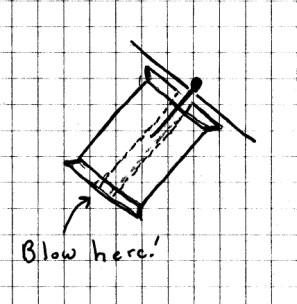
Materials Needed:
Small piece of cardboard; sewing thread spool; straight pin.
Procedure: Cut
about a 5 cm (2 in) square from a small piece of cardboard
such as a “3 x 5" card. (The size is not
critical.) Place a straight pin through the center of
the cardboard, and place the cardboard and pin in one end of
spool. The straight pin must be shorter than the spool!
Tip the spool up just enough to keep the cardboard and pin
from falling out. (See CAUTION!) Blow through the bottom
of the spool. Try to blow the cardboard off of the
spool.
What Happened: This
is Bernoulli’s principle at work again. The force of the
moving air underneath the cardboard created an area of lower
pressure. The higher pressure from the still air above
the cardboard was greater than the moving air beneath it. The
greater pressure from above pushed down on the cardboard and
prevented you from blowing it away from the spool.
Try this on your friends!
When a car or truck moves down the highway, it
moves through a stream of air. Depending on how the
car or truck is shaped, the air can make the ride smooth or
rough. If the air stream cannot move smoothly, it will
create drag on the vehicle and will require much more fuel
to move. These next experiments show how air streams
move around different shaped objects.
CAUTION!
Always be careful to follow all safety precautions when
using fire, and use with adult supervision only! Keep
your alcohol lamp or candle in an aluminum pie pan, and keep
the flame at least three feet away from anything that can
burn, unless otherwise instructed.
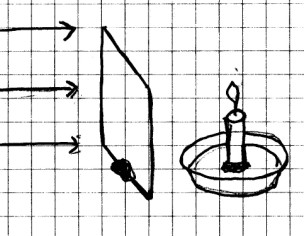
Materials Needed: A
piece of stiff cardboard cut to about 10 by 16 cm (4 by 6 in);
modeling clay; alcohol lamp or short candle (about 8 cm or 3
in); a friend.
Procedure: Make
a stand for the cardboard from modeling clay as shown.
Place the cardboard about three to four inches in front of the
lighted candle or alcohol lamp. Press down on the clay
to hold the cardboard firmly on the table top. Have a
friend blow gently onto the cardboard while you observe the
flame on the other side. Have your friend to blow harder until
the candle is blown out as you watch. What do you see?
Now turn the cardboard so that the edge faces the
candle. Relight the candle and again have your friend to
blow until the candle goes out. Is anything different?
What Happened: When
the air stream hits the flat surface of the cardboard, it is
forced to spread across the front of the cardboard before it
can go around. As it goes around, it swirls near the
ends of the cardboard creating “turbulence”. This
swirling turbulence causes the flame to be pulled toward the
cardboard. It also causes the flame to be pulled in several
different directions which may cause the candle to “sputter”
before going out.
When the thin edge is in the airstream, air can move much more
efficiently, and you should see much less turbulence.
The candle is much easier to blow out as well.
CAUTION!
Always be careful to follow all safety precautions when
using fire, and use with adult supervision only! Keep
your alcohol lamp or candle in an aluminum pie pan, and keep
the flame at least three feet away from anything that can
burn, unless otherwise instructed.
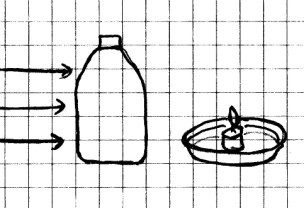
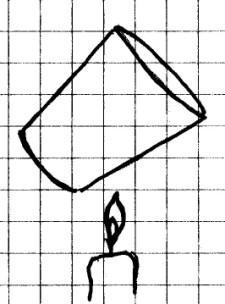
Materials Needed:
Round glass bottle, such as a soft drink bottle; candle or
alcohol lamp.
Procedure: Place
the glass bottle about three to four inches in front of the
alcohol lamp or candle. Have a friend to try blowing out
the flame by blowing on the bottle from the side opposite of
the flame. What do you see?
What To Look For: How
much force is needed to blow out the flame?
What Happened: The
flame was much easier to blow out than when blowing on a wide
flat surface as in the first part of the last
experiment. We say that the bottle is much more
“streamlined” than the flat cardboard, because it’s round
shape allows a stream of air to flow around it much more
smoothly than a flat surface. Cars, planes, boats and
other fast moving objects are designed to be streamlined to
allow air to move around them as smoothly as possible.
When vehicles are streamlined, they are much more fuel
efficient, because energy is not wasted by fighting
unnecessary drag of the air.
So far you have seen some of the effects of air
pressure. These next experiments will illustrate
another very important characteristic of air - how it
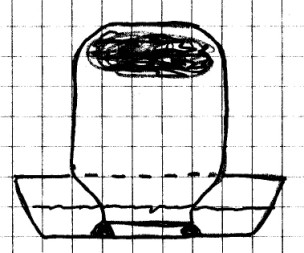
behaves when its temperature changes.
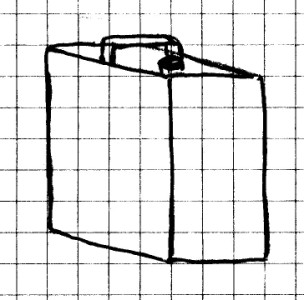
Materials
Needed: Two or three liter plastic soft drink
bottle; quarter (or other coin that will cover the mouth of
the bottle); refrigerator.
Procedure: Remove the
cap from the bottle and place the bottle in the freezer
portion of the refrigerator for about a half hour. When
the bottle is ready, wet a quarter and remove the bottle from
the freezer. Place the quarter on top of the mouth of
the bottle and observe what happens. Save the cap and
bottle for use in the next experiment.
What Happened: After a
moment or two, the quarter begins to move. Do you know
why? See if the next experiment helps you to understand?
Materials
Needed: Two or three liter plastic soft drink
bottle; refrigerator.
Procedure: If
you are using the bottle from the last experiment, allow it to
warm back to room temperature. Screw the cap on the
bottle and squeeze the bottle. Note how easy or hard it
is to squeeze. Remove the cap and place the bottle into
the freezer portion of the refrigerator for about a half hour.
Remove the bottle from the refrigerator and immediately put
the cap back onto the bottle. Allow the bottle to warm back up
to room temperature. When the bottle has warmed, squeeze
the bottle again. How easy or hard is it to squeeze now?
Remove the cap. What happens?
What Happened: The
bottle was much easier to squeeze before you placed it into
the refrigerator than after it was removed. You should
have also heard the sound of rushing air when you removed the
cap. Do you know why? The next experiment should
give you more information.
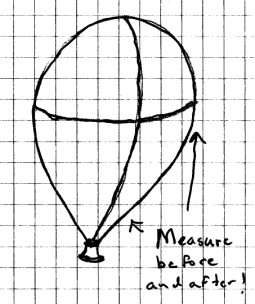
Materials
Needed: Balloon; refrigerator; ruler; string.
Procedure: Inflate
the balloon and tie it off. Place the string all the way
around the balloon at its longest point. Remove the
string, stretch it out, and measure its length. Write
this number down. Do the same thing for the widest point
around the balloon.
Place the balloon in the freezer for 30 minutes. Remove
the balloon and very quickly take the same measurements.
(You may even want to do this while the balloon is still in
the freezer.) Are the numbers the same or different?
Allow the balloon to warm back to room temperature and take
these measurements one more time. What are they now?
What Happened: You
should have seen that the measurements decreased slightly when
the balloon was chilled, but as the balloon warmed back up,
they increased. In fact, they were probably about what
they were at the beginning. Hopefully, you’re beginning
to see what’s going on. If so, you should be able to
predict what will happen in the next experiment.
Materials
Needed: Two or three liter plastic soft drink
bottle with cap; refrigerator.
Procedure: Place
the
cap on the soft drink bottle tightly and put the bottle in the
freezer portion of the refrigerator. Remove the
bottle. What do you see? With the cap still on,
allow the bottle to return to room temperature. Are
there any changes?
What Happened:
When you removed the bottle from the freezer, it should have
partially collapsed. However, as bottle rewarmed, the
bottle should have expanded back to it’s original size.
In each of
the experiments in this series, air was cooled and allowed to
rewarm. In every case, when the air was cooled, it
contracted. When the air warmed back up, it
expanded.
In the first experiment, when you cooled the bottle without
the cap, you started with a bottle of cold air. When you
placed the wet coin over the top, you formed a weak
seal. As the air inside the bottle warmed, it expanded,
and the pressure inside began to increase. The expanding
air broke the seal and escaped, which caused the coin to jump.
In the next experiment, you used the bottle cap to seal the
bottle of cold air. As the air warmed, it again
expanded, but there was no way for it to escape. The
pressure inside increased, which made the bottle more
difficult to squeeze. When you removed the cap, the air
rushed out and relieved the pressure inside.
When the balloon was cooled, it shrank, and when it was
rewarmed, it expanded again. Likewise, when the sealed
bottle was cooled, it collapsed because the cooled air inside
contracted, but when the air warmed back up, it expanded
again, causing the bottle to return to its proper size.
In all of these experiments, you observed the same
thing. When air was heated, it expanded. When air
was cooled, it contracted. You have probably also
figured out that if this happens in a sealed container, the
pressure inside is affected by the expansion or
contraction.
The next two experiments will help us better
understand how pressure and temperature are related.
CAUTION!
Always be careful to follow all safety precautions when
using fire, and use with adult supervision only!
Keep your alcohol lamp or candle in an aluminum pie pan, and
keep the flame at least three feet away from anything that
can burn, unless otherwise instructed.
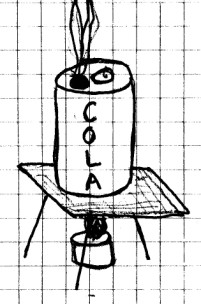
Materials Needed: Aluminum
soft
drink can; pair of kitchen tongs; bowl of water; stove,
hotplate or alcohol lamp and burner stand.
Procedure: Pour
about 1 cm (½ in) of water into the bottom of the drink
can. Using the tongs, place the can over a heat source
and allow the water inside the can to boil. (The steam
helps to raise the temperature inside of the can.) With
the tongs, very quickly remove the can from the heat and turn
it upside down into the bowl of water. Be careful not to
spill hot water on yourself, or on anyone around
you.
What
Happened: When the air inside the can was heated, it
expanded. The opening in the top of the can allowed the
expanding air, along with the steam, to escape as it was
heated. When you removed the can and put it into the
water upside down, two things happened. First, the
surrounding water very quickly cooled the air inside of the
can. As a result, the air inside contracted.
Second, the water sealed the top of the can so that air from
the outside could not get in. Because the can was sealed as it
was cooled, the pressure inside of the can dropped very
quickly, and the air pressure outside of the can caused the
can to collapse.
You should now be able to explain what happens in
this experiment.
CAUTION! Always be careful to follow
all safety precautions when using a stove, and use with
adult supervision only!
Materials Needed: One
gallon metal can with a screw top; hotplate or stove top; oven
mitts; metal sink or insulated potholders; water.
Procedure:
Place about an 3 cm (1 in) of water in the bottom of the
can. With the top off, heat the can over the hotplate or
stove until it boils. Using the oven mitts, remove the
can from the heat and place the can in a metal sink or on
potholders. Then, quickly screw the top back on and
observe what happens.
What Happened: Once
again, the air inside the can was heated. The heat
caused the air to expand, so that some of the air was forced
out of the top along with the steam. When the can was
removed from the stove, the heating stopped. By placing
the cap on the can, air from the outside could not get
in. As the air inside cooled, it contracted, and the
pressure inside the can dropped. This allowed the
greater pressure outside to crush the can.
Let’s review what you’ve learned about air and air
pressure:
1. Air has
weight and takes up space.
2. Air exerts
pressure on everything around it. This pressure is
about 14.7 pounds per square inch at sea level.
3. Air may be
compressed by forcing more air into a closed space.
Liquids such as water cannot be compressed.
4. Bernoulli’s
Principle
says that air pressure is lower in a moving air stream.
5. Air
expands when warmed and contracts when cooled.
6. When air
expands in a closed container, pressure increases.
When air contracts in a closed container, pressure
decreases.
This is quite a lot to know
about air, but there is more!
CAUTION!
Always be careful to follow all safety precautions when
using fire, and use with adult supervision only!
Keep your candle in an aluminum pie pan, and keep the flame
at least three feet away from anything that can burn, unless
otherwise instructed.
Materials Needed: Glass
jar
or tumbler; candle with safety holder.
Procedure: Light
the candle. Carefully cover the candle with the glass
container. Observe what happens.
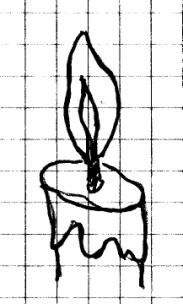
What
Happened: The candle flame gradually died out.
You probably already know why. One of the gases in air
is oxygen, and oxygen is required for burning. The
candle flame will burn so long as there is oxygen inside of
the jar. However, when all of the available oxygen is
used up, the flame goes out. "Used up" may not be the
best phrase to describe what happens to the oxygen, and we'll
see why in just a bit.
Burning is one type of a process known as “combustion”.
Combustion is a chemical reaction that breaks down an element
or compound, the fuel, by adding oxygen. This reaction
releases energy in the form of heat.
CAUTION!
Always be careful to follow all safety precautions when
using fire, and use with adult supervision only! Keep
your candle in an aluminum pie pan, and keep the flame at
least three feet away from anything that can burn, unless
otherwise instructed.
In the last experiment, you
saw that oxygen is required for burning. In this
experiment you will see two things that are produced by
burning.
Materials Needed:
Candle in a safety holder; glass jar or tumbler.
Procedure: Light
the candle. Carefully hold the outside bottom of the
glass container in the flame. What do you see?
What To Look For:
Do you see any droplets of water on the glass? What else
do you see?
What Happened: You
should have seen droplets of water forming on the outside of
the glass near the flame. Water vapor is produced when
many fuels are burned. As the candle burned, water vapor
was formed and condensed on the cooler surface of the glass.
You should have also seen some soot on the inside of the
bottom. A candle burns because the melting wax produces
a flammable gas, that serves as fuel for the burning
candle. As the fuel burns, heat is produced. However,
when many fuels burn, they don’t burn completely. This
soot from the candle flame is made mostly of carbon that did
not completely burn.
CAUTION!
Always be careful to follow all safety precautions when
using fire, and use with adult supervision only! Keep
your candle flame at least three feet away from anything
that can burn.
This experiment has been
around for a long time. In fact, you may have already
seen it at school, or may have done it yourself. But
this experiment doesn’t show what most people think it
shows! Let’s see why.
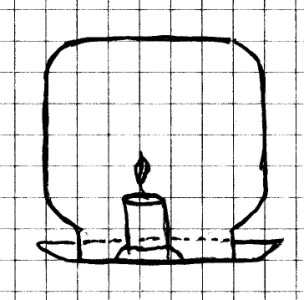
Materials Needed:
Glass bowl; glass jar or tumbler; modeling clay; candle.
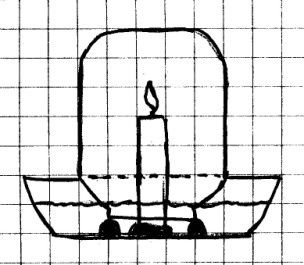
Procedure: Use a
little modeling clay to make a holder for the candle in the
bottom of the glass bowl. Also make three or four clay balls
about 3 cm (1 in) in diameter. Press these balls onto
the bottom of the bowl so that the jar or tumbler can rest on
them when placed upside down over the candle. Make sure
to leave some space between the three balls to allow water to
move between them.
Fill the bowl with about 8 cm (3 in) of water. Light the
candle and place the jar or tumbler upside down over the flame
and allow the mouth to rest on the clay balls. Observe
what happens as the candle goes out.
What To Look For:
Watch the water level inside the jar. Do you see
any air bubbling out from under the jar or tumbler as it was
placed under the water? If you don’t see this at first,
repeat the experiment and watch for it.
What Happened: You
should have seen the water level in the glass rise up about
one fifth of the way up the side of the container. This
is usually explained by saying that air is about one fifth
oxygen, and that as the burning candle uses the oxygen, water
is drawn up into the container to replace the oxygen.
However, this isn’t exactly correct.
It is true that air is about one fifth oxygen, and that the
candle cannot burn without using oxygen. However, as the
oxygen is being used up, another gas is being produced.
As you saw in the last experiment, anything that is being
burned produces water and may also produce carbon in the form
of soot or ash. But the burning candle was also
producing a gas called carbon dioxide. In fact, about as much
carbon dioxide was being formed as oxygen was being used up.
Combining what we have learned so far, we cans say that
burning can be represented by saying. “fuel combined with
oxygen produces heat, carbon dioxide gas, water vapor
and sometimes carbon or other substances”. Burning can
also be represented by the following equation:
Going Further: If
carbon
dioxide, a gas, is being produced by burning at the same
time the oxygen is being used up, why does the water get drawn
up into the container as the candle goes out?
Think about this before you try the next experiment.
Also, think about why some of the gasses bubbled out when you
first placed the jar over the candle.
CAUTION!
Always be careful to follow all safety precautions when
using fire, and use with adult supervision only! Keep
your candle flame at least three feet away from anything
that can burn.
This experiment takes a
little while to set up, but it is well worth the time
required to do it, and it solves the mystery of the missing
gas from the last experiment!
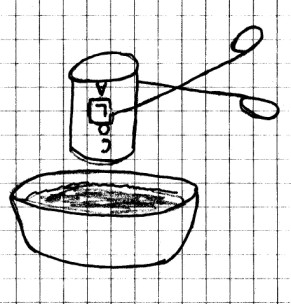
Materials Needed: Glass
bowl;
glass jar or tumbler; modeling clay; candle; two used model
rocket engine igniters (unused igniters will also work); paper
match; tape; wire; 60 cm (2 ft) of insulated wire; 9 volt
battery; plastic tubing or two flexible soda straws.
Procedure: Use
modeling clay to make a candle holder and three small balls in
the bottom of the bowl just as you did in the last experiment.
You will need two 30 cm (12 in) pieces of insulated
wire. You can use wire from the Christmas light set used
in the electricity experiments, or if you can find a small two
wire electrical cord, you can have an adult to help you cut
off a 30 cm (1 ft) piece of this cord. Carefully trim
about 2 cm (½ in) of insulation from each end of both wires.
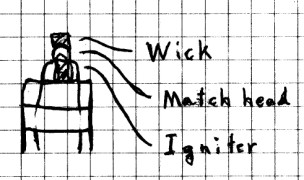
Twist one end of each wire to each end of the igniter.
Put a piece of tape over these twists to hold them securely.
Tape the igniter to the candle so that the center of the
igniter touches the candle wick. Next, place the head of
a paper match between the wick and the igniter. Make
sure that the igniter, match head, and wick are touching
firmly, and that the bare parts of the two wires leading to
the igniter don’t touch.
At this point, you should test
your setup to see if you have done everything properly.
Touch the other ends of the two wires to the terminals of the
battery. The thin wire of the igniter should heat up
enough to light the match, and the match should light the
candle. If it does not, check your setup
carefully. If needed, you may use small bits of modeling
clay or tape to hold everything in place. If you use an
unused igniter, the thin wire inside will heat the chemical
spot on the igniter causing it to burn. This will also
light the match.
Once your setup is working, rewire the candle for the rest of
the experiment. Your igniter is probably good for two or three
uses, but if the small wire is broken, replace the igniter
with another one.
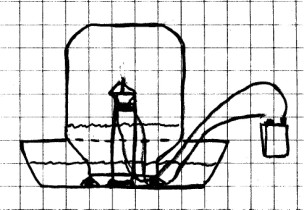
Fill the bowl with about 8 cm (3 in) of water. Place the
jar upside down over the candle. Next, stick the rubber
tubing up inside the jar above the water. (If you don’t
have rubber tubing, you can use two flexible drinking straws
taped together.) Draw some of the air out of the jar to raise
the water level inside about to about 1/4 the volume of the
jar. Place your finger over the end of the tubing and
pull it out. Stick a piece of tape on the side of the
jar to mark the water level.
Use the battery to light the
candle as before. Observe what happens.
What To Look For:
Carefully notice what happens to the water level from the time
the candle lights until the time it goes out.
What Happened: As the
candle began to burn, you should have seen the water level go
down. However, when the candle burned out, the water
level again rose, and returned to about the same level as at
the beginning. Here’s why.
When the candle was lit, the air inside the jar was
heated. Oxygen was being consumed by the burning candle,
but about the same volume of carbon dioxide was being formed
at the same time, so the total volume of gases stayed about
the same. However, remember that heated gases expand.
So, the gases inside the jar expanded due to the heat, and
pushed the level of the water down. By raising the level
of water in the jar before you started the experiment, you
were able to see the gases expand without letting them escape.
When the candle flame went out, the gases inside the jar began
to cool. As gases cool they contract. The
contracting gases caused the pressure to drop inside the jar
and water was drawn back inside by the lowered pressure.
Remember that carbon dioxide is being formed as oxygen is
being used up. Since about the same volume of
carbon dioxide is being produced as oxygen is being used, and
since you sealed all of the gases inside the jar, once the
gases cooled, the water level inside of the jar didn’t change
all that much from when you started.
This experiment doesn’t change the fact that oxygen is being
used when fire burns. Nor does it change the fact
that air is about one fifth oxygen. However, it does
show that the water drawn up into the jar in the “classic”
candle experiment is drawn up because of expanding and
contracting of air, and not because oxygen is being used
up. It is something of a coincidence that the water
level rises up about one fifth of the way up the jar.
CAUTION!
Always be careful to follow all safety precautions when
using fire, and use with adult supervision only!
Keep your candle in an aluminum pie pan, and keep the flame
at least three feet away from anything that can burn, unless
otherwise instructed.
Materials Needed: Steel wool or soap pad made from steel wool;
scissors; candle with safety holder; pair of pliers or tongs;
oven mitt.
Procedure: If you are using a soap pad, wash all
of the soap out of the pad and allow it to dry. Cut a 3
cm (1 in) square from the steel wool or soap pad and spread
out the steel strands. Next, light the candle.
Using the oven mitt, grasp the steel wool with the pliers and
hold the steel wool at arms length in the candle flame.
Observe what happens.
What Happened: The steel wool burned in a shower of
sparks. If iron is heated hot enough, and is cut into
pieces small enough that are completely surrounded by oxygen,
the iron will burn. This is another example of burning.
You should have noticed some brown or black products produced
by burning. This is called “iron oxide”, but you know it
better as rust.
You may have seen similar sparks while burning a
sparkler. The sparks from a burning sparkler are also
produced by bits of burning metal.