The
Science Notebook
The
Science NotebookGases - Part 1
The
Science NotebookHome Terms of Use Safety Contact Us Experiment Pages Downloads Supplies Useful Links!
Look around you.
Wherever you are, you are surrounded by “stuff.” But a
good scientist doesn’t go around calling stuff,
“stuff”! That’s too simple. Instead, a really
good scientist calls all this stuff we are surrounded by,
“matter”. So what exactly is matter... besides
being “stuff”? Matter is anything that (1) takes up
space and (2) has mass (or weight).
All matter on earth may be
classified as either solids, liquids or gases. These
are known as the three states of matter, and we will
be spending some time exploring the properties (or
characteristics) of each.
As you begin your study of
solids, liquids and gases, you’ll be doing a number of
experiments that you may have done before. You may be
tempted to skip over them, but you really should try them
again. Why? Because eventually, you’ll be
learning how individual molecules of substances behave, and
by taking time to closely observe how solids, liquids and
gases behave in these familiar experiments, you’ll probably
see some things you did not notice before. Then,
you’ll be better able to understand what is going on with
the molecules of these substances when the time comes.
Gases are one state of
matter. Since all matter must have mass and take up
space, if gases are matter, they must have must have
mass and take up space. Let’s see if we can show
whether they do.
Materials
Needed: Balloon.
Procedure:
Blow up the balloon, and tie it off. Squeeze the balloon
gently.
What To Look For:
Notice how the balloon fills with air, and when you squeeze
it, how it resists the pressure of your hands. Also, notice
that when you squeeze the balloon in one place, it bulges in
another.
What Happened: It is
obvious from this experiment that air takes up space. If
it did not, the balloon would not expand when you put air into
it by blowing it up. This simple experiment shows that
air meets at least one of the two tests for matter - it takes
up space.
We can show that air takes up space in another way
as well.
Materials Needed: Sink
or large container full of water; drinking glass or jar; sheet
of paper.
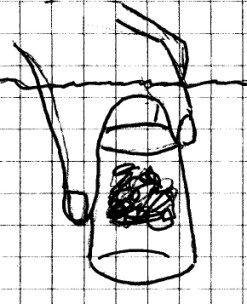
Procedure:
Wad
the sheet of paper and stuff it into the bottom of the
container so that it won’t fall out when the container is
turned upside down. Turn the container upside down and
push it down into the water until it is completely
covered. If possible, move the jar or glass so that you
can see where the water is inside. Remove the container
from the water and observe the paper inside.
What Happened: The
air inside the container would not allow the water to go
inside and the paper remained dry, again showing that air
takes up space. If you observed the water carefully, you
may have noticed that it was able to move up inside just a
short distance. The pressure exerted by the water
compressed the air inside slightly.
More about that later!
Materials
Needed: 2 jars, a sink filled with water.
Procedure:
Submerge one of the jars into the water and allow it to fill
with water. Keeping the jar under water, turn it upside
down. Next, turn the second jar upside down, and push it
under the water. Bring it under the first jar and tilt
it up slightly to begin “pouring” air into the first
jar.
What Happened: You
obviously realize by now that the air filled the second
jar. Since the air was lighter than the water, when the
second jar was tilted, it allowed the air to escape and begin
bubbling up toward the surface. However, the air was
trapped by the first jar, and the air forced the water out of
that jar. Again, you have shown that air takes up space.
OK, so after three simple experiments (some might even say "lame" experiments, you are willing to admit that air takes up space, but does it meet the second test for matter? Does air have mass? Let's find out.
(We’ll use the term, “mass” instead of weight because it is
a little more accurate, but whenever we do, you can assume
we’re talking about weight - at least here on Earth.
You may have learned from the Measuring
Mass page that there is a difference between the two,
but it only really matters where gravity has a stronger or
weaker pull than here on Earth, such as on another planet,
or out in space.)
Materials Needed: Two
large balloons; homemade
balance or yard or meter stick or a good
school balance such as a triple beam balance; push pins or
thumbtacks; pin.
Procedure:
Blow up both balloons and tie them off. Use the meter or
yard stick as the balance arm on your homemade balance. Fasten
one balloon to each end of the balance arm with a push pin or
thumbtack. Adjust the balance so that it is level.
At this point, the masses on both sides of the balance are
equal. (NOTE: If the balloons are big, you may
need to position the balance on the corner of a table so that
the balance arm can move freely.)
Now carefully pinch one of the balloons near the neck and stick a hole in the pinched area with the pin. If you are careful, you can easily put a hole in the balloon without bursting it. Watch what happens as the air leaves the balloon.
Or...If you don't want to make the balance, you can just use a meter or yard stick suspended from a piece of string tied in the middle. Once you have the ballons attached, balance the two sides so that the stick is level. It might be a little more tricky to balance than when done with the homemade balance, but it can be done. You just have to be a little patient. When the stick is balanced, the total mass of each side is equal. Carefully stick one of the balloons and observe what happens.
Or...
Use a single balloon - the larger the better - on the school scale. Weigh it. Then blow it up, tie it off, and weigh it again. Is there any change?
What Happened: You could hear the air rushing out of the balloon you pricked, and as it did, the side of the balance that this balloon was on got lighter. You could tell this because that side of the balance rose above the other. Since the mass on that side decreased, and since (almost) the only thing that was removed was the air inside the ballon, this shows that the air has some mass.
If you used a school balance or scale, depending on how large the balloon was, you probably saw that the inflated balloon was at least 1/10 of a gram heavier, and possibly considerable more.
One other thing that has to be considered when you blow up a balloon is that your breath has some moisture as well, and that adds at least a little bit to the weight. However, you will still clearly see the change in weight if you are able to use perfectly dry air. However, when you do any experiment, you should always look for things that you might affect your results. Failing to do that has sometimes caused good scientists to misinterpret their results.
Going
Further: If you can, get a football or basketball,
and let the air out of it. How heavy does it feel?
Now inflate it. Can you tell a difference?
Although air, as well as other gases, are much lighter than
solids or liquids, they do have some weight. Assume that
the balloon you deflated held about a liter of
air. A liter of air has a mass of a little
less than a gram. That isn’t very much. However, a one
inch square column of air going from the ground to the edge of
space weighs about 6.7 kg (14.7 pounds). All that air
does add up!
The air around you has much more of an effect on you than you
might think, as these next series of experiments will show.
Materials
Needed: Clear soda straw; glass of water.
Procedure:
Stick the straw down into the water.
Observe the water level inside the straw. Next, remove
the straw and place your thumb over the top of the
straw. While holding your thumb over the top of the
straw, stick the straw down into the glass and note where
the water level is inside the straw. Leve the straw
where it is and remove your thumb from the straw.
Observe the water level again. Finally, place your
thumb over the top of the straw while it is still in the water
and lift it out. What do you see?
What To Look For:
You
should notice that the change in the water level is affected
by whether the air can get in or out of the top of the straw.
What Happened: When
you first placed the straw in the water, the air was pushed
out of the top of the straw by the water below. However,
when you placed your thumb over the top, the air was not able
to leave and it exerted pressure on the water to keep the
water from filling the straw. When you lifted your
thumb, the air could escape from the top of the straw, and the
straw filled with water. Finally, when you replaced your
thumb and lifted the straw from the water, the water remained
inside the straw, since air could not take the water’s place
through the top of the straw.
Materials
Needed: Medicine dropper; glass of water.
Procedure: Place the
tip of the medicine dropper under the water and squeeze the
bulb. What happens? Next, release the bulb.
What happens now?
What Happened: This
was so simple that you probably knew exactly what was going to
happen before you even did it. When you squeezed the
bulb, you forced some air out of the dropper. You saw
the air bubble out and up to the surface. When you released
the bulb water was sucked inside the dropper. But as
simple as this is, it is the principle on which pumps are
based.
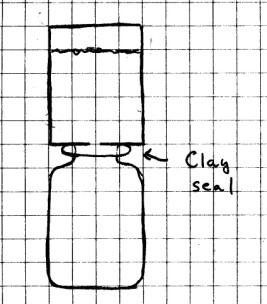
Materials
Needed: Small can; small jar or bottle whose mouth is
smaller than the bottom of the can; nail; hammer; modeling
clay; water.
Procedure: Using the
nail, punch a hole in the bottom of the can. Roll out a
thin strip of modeling clay just long enough to fit around the
mouth of the jar. Press the clay around the mouth and
place the bottom of the can on top of the clay. Press
down enough to make a good seal between the jar and the can,
but don’t push so hard that you cut completely through the
clay. It would be a good idea at this point to move the
can and jar to a sink just in case there is a spill.
Fill the can with water and observe what happens. Next,
tilt the can just enough to break the clay seal. Now
what happens?
What Happened: When
you poured the water in the can, it was not able to flow down
into the jar below because of the pressure being exerted on it
by the air in the jar. Because the air in the jar had no
way to escape, the water in the can could not push it out of
the way. Once you broke the seal, air could then flow
out from the jar, and water was then able to flow from the can
into the jar.
Here is yet another example of air pressure that
you’ve probably seen before, but with an added twist.
As you do it, see how it is similar to the last experiment.
Materials Needed:
Small jar (or glass); 2 pieces of cardboard big enough to
cover the mouth of the jar; nail; toothpick; water.
Procedure: This is
another one that is probably best done over the sink.
Fill the jar to the brim with water and place one of the
pieces of cardboard over the mouth. While holding the
cardboard in place, turn the jar over. Let go of the
cardboard. What happens? Tap the corner of the
cardboard. Now what happens?
Next, take the other piece of cardboard and punch a small hole
in the center with the nail. Fill the jar to the top and
place the piece of cardboard over the mouth as before.
Again, holding the cardboard in place, and with a finger over
the hole, turn the jar upside down and let go of the
cardboard. What happens? Remove your finger from
the hole. What happens now? Stick the toothpick through
the hole and let it go. What do you observe?
What Happened: In both
cases, when you turned the jar over, the cardboard stayed in
place. Air pressure pushing up on the cardboard
prevented the cardboard from falling off. However, when
you tapped the cardboard, you probably added just enough
downward force to overcome the force of the air pressure, and
the cardboard came off. (You did do this over the sink,
didn’t you?) When you did this the second time, water
could not flow out of the hole due to the air
pressure. The water was also prevented from running
out by something called “surface tension”, and you’ll learn
more about that on the Liquids pages.) By the way, the
toothpick just adds a nice touch to keep your friends
guessing.
Going Further: You’ve
probably figured out already that there are limits to how big
the hole in the cardboard (or the can in the previous
experiment) can be and air pressure still prevent the water
from flowing. You may have also wondered how small or
large an opening in a jar, glass, or maybe even a shallow pan,
can be and this still work. You may also want to see
whether the size of the container makes any difference.
Perhaps you could design a science project to answer one or
more of these questions.
If you just want to have some fun with your friends, get a
flat piece of clear stiff plastic packaging material of the
sort that many items are “blister” packed in. Cut a flat
piece just a little larger than the mouth of a glass or
jar. With a little practice, you should be able to hide
it in your hand and “palm” it over the full container.
When you turn the container over, it will look like the water
is being held inside the container with nothing
underneath. If you are careful, you may even be able to
make a small hole for a toothpick, as in this
experiment.
You may recall that that a one inch square column of air going
from the ground to the edge of space weighs about 6.7 kg (14.7
pounds). This much weight exerts a significant amount of
pressure, and it can lead to some pretty interesting results.
Materials
Needed: Plastic soft drink bottle with cap (2 liter
works very well); nail; water.
Procedure: Using the nail, punch a small hole in the soft
drink bottle about 1/4 of the way from the bottom. Do
the same thing about 1/4 of the way from the top directly over
the first hole. Hold fingers over both holes and fill
the bottle to the top with water. Place the cap on the bottle.
Now remove your finger from the top hole and observe what
happens. Place your finger back over the hole and remove
your finger from the bottom hole. What do you see
now? Finally, remove your fingers from both holes.
Can you explain what you observe based on the previous
experiments you have done?
What Happened: This
one is for you to figure out.
Going Further: Gather
several plastic drink bottles of various sizes, and repeat
this experiment except place the holes in different locations
and see what happens.
In the previous experiments, you have seen several examples of
the effects of air pressure. In these next experiments,
you will see that this air pressure can be quite strong.
CAUTION! Always use sharp objects such as knives or scissors with adult supervision only! Hold any sharp point away from your body, particularly your eyes.
Materials
Needed: Radish; smooth counter top; towel; smooth
lightweight saucer.
Procedure: Cut the
radish in half and hollow out the center of one of the
halves. Press the radish firmly down on the counter top
while squeezing it slightly. Now lift the radish.
What happens?
Place the saucer on a towel. The towel will be used as a
cushion for the saucer. Next, hollow out the other half of the
radish, and press it firmly down onto the center of the
saucer. Carefully lift the radish. You don’t have
to lift it very far! What happens?
What To Look For: You
have just constructed two small suction cups. If they
don’t work like suction cups, make sure you made a nice even
cut when you cut them in half. If there is a gap around
the bottom where air can get in, it won’t work. If the
radish is dry, you might want to moisten it using a little
water.
What Happened: When
you tried to lift the radish from the counter top, you had to
exert a little force. The surrounding air pressure
prevented you from easily removing the radish. The air
pressure should have exerted enough force on the other half of
the radish to allow you to lift and hold the saucer.
Going Further: Just
how much weight can you support with a radish suction cup? Try
picking up other heavier dishes. Is there a limit?
When you try this, be sure to use a cushion under the dishes,
and lift only an inch or so. You don’t want to break
anything! Also, you might want to try other fruits or
vegetables such as potatoes, beets or oranges.
Materials
Needed: Suction cup dart from a toy gun; towel;
saucer.
Procedure: Fold the
towel to use as a cushion for the saucer. Stick the suction
cup dart to the middle of the saucer and lift up an inch or
so.
What To Look For: Is
this suction cup stronger or weaker than the radish in the
previous experiment? Why? How can you tell?
What Happened: This
really depends on the type of suction cup dart you used, but
whether it was stronger or weaker depends mostly on (1)
whether the suction cup made a tight seal with the saucer and
(2) how big it was. The bigger around the suction cup
is, the more surface area there is for air pressure to act
on. If this isn’t immediately clear to you, try the next
experiment.
Materials
Needed: Plumber’s friend; smooth wall or floor.
Procedure: Push the
plumber’s friend firmly against the floor or wall and push the
air out. Now pull the plumber’s friend away from the
floor or wall.
What Happened: It was
obviously much harder to remove the plumber’s friend than it
was to remove the suction cup dart. The suction cup on
the end of the plumber’s friend is much larger than the
suction cup on the dart, and there is a much greater surface
area for air pressure to affect. It should not be
surprising, then, that if there is more air pressure being
exerted on the plumber’s friend, more force is going to be
needed to remove it.
Remember how we said that a square inch column of air weighs
about 14.7 pounds? Well, that exact weight or pressure
changes as the weather changes. Lower pressure generally
means wet weather, and higher pressure generally means fair
weather. As you go higher above sea level, the pressure
also drops. So perhaps a better way of saying this is
that the average air pressure at sea level is about 14.7
pounds per square inch. In these next two experiments,
we will see how you can observe the day to day changes in air
pressure.
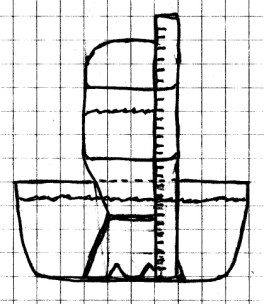
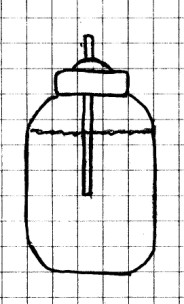
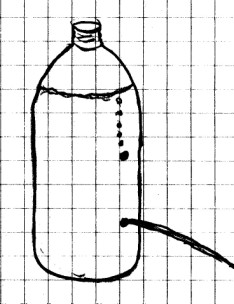
We measure changes in air pressure using a device
called a “barometer”. This first barometer shows a
change in air pressure by showing changes in the water level
of water inside of a bottle.
CAUTION! Always use sharp
objects such as knives or scissors with adult supervision
only! Hold any sharp point away from your body,
particularly your eyes.
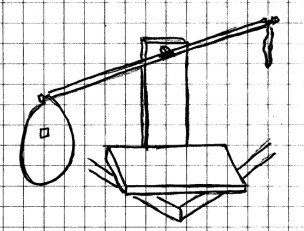
Materials Needed: Plastic
or
glass soft drink bottle; small bowl (a whipped topping
container works great); two rubber bands; ruler (one with a
millimeter scale is best); small foam coffee cup; water.
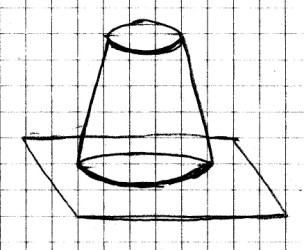
Procedure:
Carefully cut out the bottom of the cup to make a support for
the bottle as shown. The cup must hold the mouth of the
bottle about 1/4 inch above the bottom of the bowl. You
will also need to make two small cuts in this support so that
water will be able to move freely between the bottle and the
bowl.
Fill the bottle about 2/3 full with water, and fill the bowl
with water so that the water level will be higher than the
mouth of the bottle. Place the cup support over the top of the
bottle, and, holding your hand over the mouth of the
bottle, turn it over and place the mouth of the bottle under
water. Remove your hand from the bottle. You
should try to get the water level about half way up the side
of the straight portion of the bottle. If you need to
let some water out, lift the mouth slightly above the
water. If you need to add water, remove the bottle and
start over. (This doesn’t have to be exact, so don’t
worry too much about the level, just get it close.) Make
sure that the bottle is level and steady, and that water can
move freely in and out of the bottle through the cuts on the
bottom of the support.
When you have the water level where you want it, fasten the
ruler to the bottle with a couple of rubber bands. It
doesn’t matter exactly where you place the scale on the ruler,
since you are going to use the ruler only to observe the
change in the water level. This experiment should be set up
where you can leave it undisturbed for a few days. You
should also set this up in a room where the temperature stays
about the same.
Observe where the water level is on the scale. Check the water
level every day for several days. Each time you check
it, write down the date and time, the water level, and what
the weather is like outside.
What To Look For: If
you look carefully on the scale at the water level, you will
see that the water seems to be drawn up slightly all around
the edge of the bottle. Because of this, the water level
does not appear to be a sharp line, but is, instead, a thin
band. You should always measure from the bottom of this
band.
The water level should change as the air pressure changes, but
you will have to look carefully to see the change, since it is
usually very slight.
What Happened: As air
pressure increased, more pressure was exerted on the surface
of the water in the bowl. This forced a little of the
water inside the bottle, and the water level rose. When
the air pressure decreased, a little of the water inside of
the bottle was forced out by the air inside, since the air
pressure inside the bottle was now greater than that
outside. This increased pressure pushed some of the
water out of the bottle.
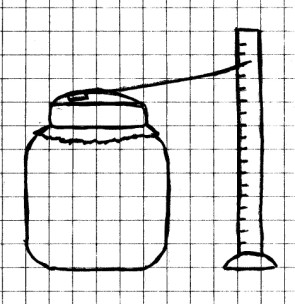
Here is another way to observe changes in air
pressure.
CAUTION! Always use sharp objects
such as knives or scissors with adult supervision
only! Hold any sharp point away from your body,
particularly your eyes.
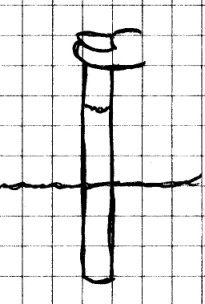
Materials Needed: Wide
mouth
glass jar; rubber balloon; rubber band; scissors; clear tape;
broom straw or thin soda straw; ruler; modeling clay.
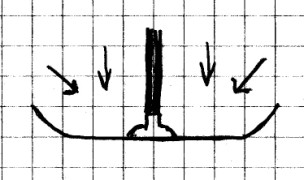
Procedure: Cut
the rubber balloon into a thin sheet and stretch it over the
mouth of the jar. With the balloon stretched tightly
over the jar, wrap the rubber band around the mouth a couple
of times to make a tight seal. Using a small piece of
tape, tape one end of the straw to the middle of the balloon,
and let the straw rest on the mouth of the jar as shown.
Use a small lump of modeling clay to make a support for the
ruler, and place the ruler near the end of the straw. As
in the previous experiment, you should place this where it
won’t be disturbed, and in a room where the temperature is
fairly constant. Watch the straw from time to time for a few
days to see what happens. As in the previous experiment,
write down the date and time, the level of the straw on your
ruler scale, and what the weather is like outside.
After you have made and recorded your observations for a few
days, try this: Hold your hands around the side of the jar for
a few minutes. Do you see any change? Does this
explain why you needed to set your barometer up where the
temperature stays about the same?
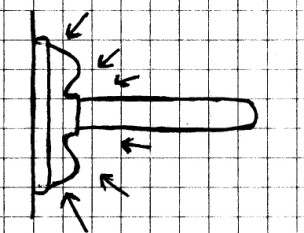
What To Look For: The
straw should rise and fall as the air pressure rises and
falls.
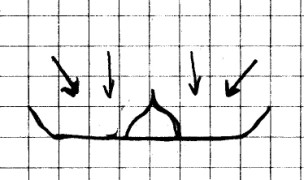
What Happened: When
you stretched the balloon over the jar and sealed the air
inside, the pressure of the air outside and the air pressure
inside were equal. When the air pressure outside
increased, it pressed down on the balloon until the air
pressure inside the jar again equaled the outside. This
caused the balloon to cave inward and the straw to rise
up. When the air pressure outside dropped, the air in
the jar pushed outward until the pressure was again equal,
which caused the balloon to bulge outward and the straw to
fall.
When you placed your hands around the side of the jar, your
hands warmed the air inside. This caused the air inside
to expand, the balloon to bulge upward, and the straw to move
downward. This tells you that changes in temperature can
affect the results of you simple barometer, and shows why you
should keep it where the temperature is as constant as
possible.
Going Further: If you
were keeping good records in this experiment and the last, you
may have noticed that the air pressure was generally lower
when the weather was damp or stormy, and higher when the
weather was fair. In fact, this is why air pressure is
such a good forecaster of weather. If you can find a
real barometer, you may even notice that it has words like
“rain”, “snow” or “stormy” at the lower end of the scale,
“change” or “unsettled” in the middle, and “fair” or “sunny”
on the high end.
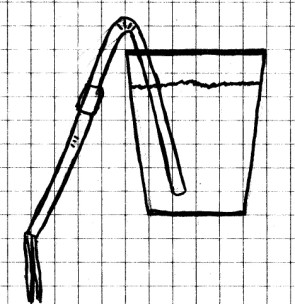
People have been using siphons to move liquids for
a long time. These very useful devices depend on air
pressure and gravity to work.
Materials Needed:
Drinking glass; two flexible drinking straws; tape (If you
have a short piece of plastic tubing, you can substitute that
for the straws and tape.); water; sink.
Procedure:
If you are using drinking straws, push one of the straws
inside the other. You may have to make a small slit in
one of the straws to make them fit together. Tape
the two straws together, being careful that the tape makes a
tight seal. Bend the straws at one of the flexes as
shown.
Fill the glass with water, and place the short end of the bend
into the water. Suck on the straw to fill it with water and
quickly bend the long end down into the sink below the bottom
of the glass. What happens?
Repeat the experiment, except this time, do not allow the long
end of the straw to fall below the water level. What
happens now?
What To Look For: When
you allow the filled straw to drop below the level of the
water, you should see water begin to flow from the
glass. However, if you don’t hold the straw down lower
than the surface of the water, the water in the straw will
simply fall back into the glass.
What Happened: When
you dropped the straw below the water level in the glass, the
water in the straw was pulled down by gravity. This
created a vacuum which drew the water from the glass
through the straw and down into the sink. For this to
happen, the water in the straw had to be below the level of
the water in the glass in the first place. Otherwise,
the water would have drained back into the glass.
Going Further: If you
can get some clear plastic tubing from a hardware store, you
can experiment with a number of different siphon
designs. CAUTION! When experimenting with siphons,
be sure to only use clean water. Since you are drawing
the liquid with your mouth, you don’t want to swallow anything
harmful!
The siphon you made in the last experiment has one
serious problem. You cannot use it to move liquids
that are dirty or unsafe, because you must first get the
liquid flowing by sucking up some of the liquid into a straw
or tube. The device you will make in the next
experiment uses the same principle as the siphon, but it
will allow you to siphon liquids without the risk of
swallowing something unpleasant. It can also be used
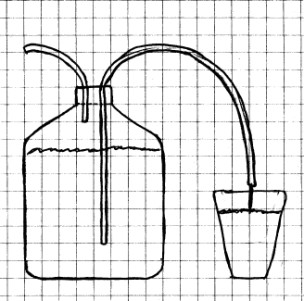
to provide a source of water in your home lab.
CAUTION! Always use sharp objects
such as knives or scissors with adult supervision
only! Hold any sharp point away from your body,
particularly your eyes.
Materials Needed:
Plastic gallon milk jug with cap and silicon sealant; plastic
tubing (1/4 inch outer diameter or smaller); clothespin;
knife. (You can get silicon sealant and plastic tubing
from most any good hardware store.)
Procedure: Cut one
piece of tubing about 9 inches long. Cut another piece
of tubing about two and a half times the height of the jug.
Use a sharp knife or drill to bore two holes into the cap for
the tubes. The holes should be just large enough for the
tubing to fit through. Run the tubes through the cap and place
a layer of silicon sealant around both tubes to make the cap
air tight. Allow this to dry thoroughly!
Fill the jug with water and place the cap on the mouth of the
jug. Blow into the jug with the short tube. Water
should begin to flow from the long tube. If the longer
tube is held below the bottom of the jug, water will continue
to flow due to the siphon effect after you stop blowing.
To stop the flow, you can use the clothes pin as a clamp on
the longer tube. The longer tube will need to remain
below the level of the bottom of the jug, or else you will
need to blow into the short tube again to restart it.
You have now completed your wash
bottle. With this device, you will have a supply of
water ready for your lab when you need it.
What Happened: When
air is forced into the jug, pressure is increased inside, and
the increased pressure forces water up the other tube.
When the water in the tube falls below the water level in the
bottle, gravity takes over and the water is siphoned out of
the jug.
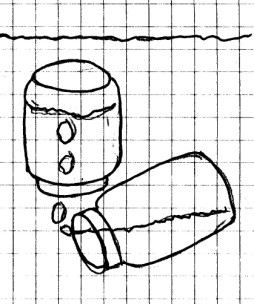
Materials
Needed: Plastic soft drink bottle with cap; water.
Procedure: With
the cap off the bottle, hold you hand above the mouth of the
bottle and squeeze. What do you feel? Screw the
cap on tightly and squeeze again. What happens when you
squeeze the bottle now? Now, fill the bottle completely
with water, replace the cap and squeeze again. What do
you feel now?
What Happened: When
you squeezed the open bottle, you forced some of the air out
of the mouth. When you placed the cap on the bottle and
squeezed again, there was no place for the air to go, but you
were able to squeeze the bottle together. In other
words, you were able to compress (or squeeze together) the air
inside the bottle. However, when you filled the bottle
with water and capped it, you could not squeeze the bottle
very much at all because you could not compress the water
inside.
Gases such as air may be compressed, but liquids such as
water, may not.
In an earlier experiment, you saw that air takes up
space inside of a glass or jar when the glass or jar is
turned upside down and placed under water. In this
experiment, you will take that experiment one step further
to see how water pressure affects the air.
Materials Needed: Drinking
glass or jar; large aquarium, sink or bathtub; water.
Procedure: Fill
the aquarium, sink or bathtub with water. Turn the jar
or glass upside down and lower it into the water, slowly
pushing it to the bottom of the container.
What To Look For: Notice
the
water level at the bottom of the glass as you lower it to the
bottom.
What Happened: As you
lowered the glass into the water, the water rose a little way
up into the glass. As the glass was pushed deeper, the
water level inside the glass got higher. This
happened because water exerts pressure on the air inside the
glass. This pressure increases as the depth of the
water increases. Because pressure on the air inside the
glass increases as the glass is pushed deeper, the air is
compressed.
You feel this pressure as you swim under water. In fact,
the deeper you swim, the more you have to work against water
pressure to stay at that depth. Submarines, which can go
many feet below the surface of the ocean, must to be built to
withstand tremendous pressure. If they were not, they
would be crushed.
CAUTION!
Always use sharp objects such as knives or scissors with
adult supervision only! Hold any sharp point away from
your body, particularly your eyes.
Materials Needed: Plastic
soft
drink bottle with cap; barrel from a plastic pen; pliers;
tape; hammer; nail; scissors or small screwdriver; modeling
clay; water.
Procedure: Find an
old plastic ball point pen with a plastic barrel. Have
an adult to help you remove the pen from the barrel. (A pair
of pliers may help.) If the barrel has a hole in the
middle, you will need to cover the hole with tape.
Punch a hole in the plastic cap using the hammer and
nail. Using scissors or a small screwdriver, make the
hole just large enough for the barrel to fit through snugly.
Push the barrel of the pen through the hole until about 1/4 of
the barrel is above the top of the cap. Press modeling
clay all around the barrel and cap top to make a tight
seal. Fill the bottle about half full of water and screw
the cap onto the bottle. Make sure the bottom of the
barrel is under water. If it isn’t add a little more
water.
Hold the bottle and barrel firmly and blow hard into the
bottle. Take your mouth away and watch out!
What Happened: When
you blew into the bottle, you compressed the air inside.
When you pulled your mouth away, the increased pressure inside
forced water up and out of the barrel, and if you weren’t
quick, into your face. Water squirted out until the
pressure on the inside of the bottle was equal to air pressure
on the outside.
Going Further: Try
this on your friends... but make sure they have a good sense
of humor!
Just as air may do some very interesting things when
compressed, it also holds a few surprises when its pressure is
decreased. The first experiments on the next Gases page will
show what happens when you lower air pressure.
Don't stop now. There's much more to learn
about gases. Be sure to check out Gases -
Part 2.