The
Science Notebook
The
Science NotebookHeat - Part 1
The
Science NotebookHome Terms of Use Safety Contact Us Experiment Pages Downloads Supplies Useful Links!
You may already know that matter is anything that
has mass and takes up space. You may also know that
matter exists in three states on earth - solids, liquids and
gases. In these experiments, we will investigate the
ways that heat affects matter.
Many of the properties of solids, liquids and
gases may be better understood when you know how the
molecules of each of these states of matter behaves. These
next few experiments will illustrate how molecules
behave in solids, liquids and gases.
Materials
Needed: A strong smelling substance such as perfume
or cologne.
Procedure: Place the
perfume or cologne container on one side of a room. Open
it and move to the other side of the room. How long does
it take for you to smell the substance from the other side of
the room?
What Happened: After a
short period of time, you were probably able to smell the
substance, even though you were not able to see anything in
the air.
All matter is made up of
tiny particles called “molecules”. These molecules are
so small that they cannot be seen even with the most
powerful light microscopes. There is a special kind of
microscope called the electron microscope that can magnify
things many thousands of times their actual size. But
even with the electron microscope, the largest molecules
look a little like fuzzy blobs.
The substance you smelled,
like all other matter, is made up of molecules. Some
of these molecules broke away from the surface of the
liquid. We say that they evaporated from the
surface. These molecules then spread throughout the
room by a process called diffusion. Even though you
could not see them, you knew they were there, because your
nose is capable of detecting the odor of only a very few
molecules.
In the next few experiments,
we will make “models” of molecules in solids, liquids and
gases. Models in science usually can’t show us all we
would like to see, but they can be helpful. For
example, a plastic model airplane you assemble from a kit
will show what the real airplane looks like, so you can use
it to learn a little something about how a real plane is put
together. However, this kind of model isn’t made to
fly, so it might not be as useful as a gas powered model
plane in helping you to understand how a plane flies.
Scientists often use models to better understand things that
are too large, too small, too fast, or too slow to observe
in nature. Molecules are far too small to be easily
seen, even with the most powerful electron microscopes, but
models can help us understand how they behave in the
different states of matter.
Our models will use sugar
crystals to represent molecules. Sugar crystals don’t
really look line molecules, but they can give us some idea
how the molecules behave.
You may have learned that a solid always has a definite
volume and shape. If you mold a lump of clay
into a ball, it keeps that shape. If you cut a star
from a piece of wood, it keeps the shape of the star.
If left alone, the clay and the wood will not change in
either shape or volume.
Solids keep their shape and
volume because the molecules in a solid are strongly
attracted to each other in much the same was as strong
magnets are attracted to each other. Because molecules
are so strongly attracted, they cannot move around very much
at all. It is almost as if each molecule is tied
to all the others around it, so the object cannot change
shape.
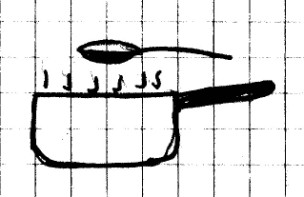
CAUTION: Hot steam can cause serious
burns! Do this experiment only with adult supervision
and be sure to use an oven mitt or potholder to protect your
hands.
Materials Needed:
Sugar; metal spoon; oven mitt or potholder; small metal pot;
water; stove.
Procedure: Bring a cup
or so of water to boil on the stove. Place a spoonful of
sugar over the steam from the boiling water for about a
minute. You don’t want to get the sugar hot enough to
melt. Instead, you just want it to be exposed to the
steam.
Allow the spoon to cool down to room temperature. Hold
the spoon over a sink or trashcan and slowly turn it
over. What happens?
What Happened: The
steam caused the sugar crystals to stick together. If
sugar is left exposed to the air for any length of time, it
will absorb water in the air, and will “clump up” or stick
together on it’s own. The only thing the steam did was
to make this process go a little faster.
When sugar crystals stick together, they behave a little like
molecules in a solid. In a solid, molecules are not free
to move around since they are strongly attracted to one
another. However, unlike sugar crystals, molecules in a
solid vibrate, or move back and forth in place, but their
attraction to each other is strong enough to keep them from
moving around each other. This is why a solid keeps a
definite shape.
What our models cannot show easily is that even though the molecules in a solid are not able to move around, they do vibrate in place.
Liquids have a
definite volume, but not a definite shape. If
you pour a liquid into any container, gravity will pull the
liquid to the bottom of the container, and the liquid will
take on the shape of that container.
Liquids behave like this
because molecules in a liquid are attracted to one another,
although not as strongly as they are in a solid. You
can imagine this attraction being something like that of
very weak magnets, rather than strong ones. The
attraction of molecules in a liquid causes the molecules to
stay close to each other and not wander off, but the
attraction is not so strong that they “stick” together as
they would in a solid. The molecules are free to move
around each other.
Materials Needed:
Sugar; two cups; clean paper.
Procedure: Fill one of
the cups with sugar. Now, pour the sugar into the other
cup. Do you see how the sugar pours a little like a
liquid?
Next, pour the sugar out onto a piece of clean paper.
What does the sugar do?
What Happened: The
sugar crystals behaved somewhat like molecules in a
liquid. When you poured the sugar into a cup, it filled
the cup just like a liquid would. When you poured the
sugar onto the paper, it spread out almost like a liquid, but
not quite. A liquid would not pour into a heap in the
center like the sugar, but this just shows us that our model
isn’t perfect. The sugar crystals are shaped like small
blocks, and so they “catch” one another and tend to pile
up.
Another weakness of our model is that molecules in a liquid
are attracted to one another, and the sugar crystals are
not. The crystals fill the cup and stay together because
of the force of gravity alone. In fact, when you poured the
sugar onto the paper, you probably saw that some of the
individual grains along the edge of the paper moved away from
the rest. In a liquid, the molecules won’t move apart
like that because of the weak attraction between them.
Going Further: Another
model for liquids may be made of M&M’s ®, Reese’s Pieces
®, or similar candy. These candies are rounded and
smooth so the candy “molecules” will move against each other
better than sugar crystals when you pour them out. It’s
also a good excuse to help yourself to a treat - all in the
name of science, of course!
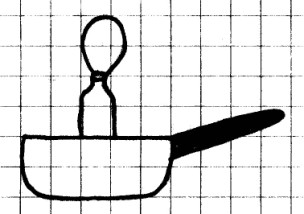
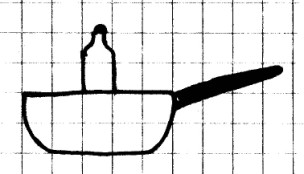
Gases do not have
either a definite shape or a definite volume. If
air is in a bottle, it fills the whole bottle and takes on
the shape of that bottle.
Gases behave like this
because molecules in a gas are constantly in motion.
They are also much more spread out than molecules in a solid
or a liquid. Because of this, the attraction between
molecules in a gas is not strong enough to hold them
together.
Materials Needed: Your
imagination;
sugar; a spoon.
Procedure: Scoop up a
spoonful of sugar. Imagine you are on the International
Space Station and you are weightless. Based on what
you’ve seen with the astronauts, what would happen if you were
holding this spoon on the Station?
Now take the spoon outside and throw the sugar as high into
the air as you can. What happens to the sugar?
What Happened: If
you were inside the Space Station, the individual sugar
crystals would have left the spoon and floated off in all
directions. After a while, sugar crystals would have
been all over the place. When you threw the sugar in the
air, you could see the crystals spread out just as they would
in the Station, but only for a very short period of time,
since gravity quickly pulled them back to the ground.
Sugar on the International Space Station would behave exactly
like molecules in a gas. Molecules in a gas are much
farther apart than in a liquid or a solid, and they have very
little attraction for each other. Because of this,
molecules in a gas will spread apart until they have filled
whatever container they happen to be in. That’s why a
bottle will never be “half full” of air.
A gas will always spread out
to fill up whatever space it has.
Going Further: Another
way of making a model of gas molecules is to use a fine
powder, such as baby powder, or flour. Take a spoonful
outside on a calm day and throw it into the air. Because
the particles are much smaller and lighter than sugar
crystals, air resistance slows their fall, and you can see
them spread out much better than the sugar. If you could see
the individual molecules of gas in a container, they might
look something like this powdery cloud.
In the last few experiments, you have used
particles of sugar to represent molecules. You may
have noticed when you used sugar to model a liquid, that
there were spaces between the sugar crystals. Even
though we cannot see the spaces between molecules in a
liquid, they are still there, and other molecules will fit
in these spaces.
Materials Needed: Liquid measuring
cup (If you are using metric units, substitute a 250 ml
measurer); 1 liter (1 quart) clear glass or plastic container;
tape; salt; rice; water; alcohol.
Procedure:
The success of this experiment depends on your being very
careful to measure exactly one cup. Each time you
measure, be very careful to fill the cup to exactly the same
level!
Fill the measuring cup with 1 cup (125 ml) of water.
Being careful not to spill any, pour the water into the
container. Carefully measure and add a second cup (or
125 ml) of water. Place a piece of tape on the container to
mark the water level in the jar. Pour out the water and
dry the inside of the container completely. You now have a jar
that will serve as a two cup measuring cup (or if using metric
units, a 250 ml measuring device)..
Measure one cup (or 125 ml by volume) of rice and pour it in
the container. Measure one cup (or 125 ml by volume) of
salt and add it to the rice. Shake the container gently
a few times. Do the rice and salt come up to the two cup
(or 250 ml) mark on the tape? Why or why not? Empty the
rice and salt and wipe out the container.
Next, measure one cup (or 250 ml) of water and pour it in the
container. Then measure one cup (or 250 ml) of alcohol
and add it to the water. Stir and remove the
spoon. Be careful not to lose any liquid. Observe the
level of the liquid. Does the liquid come up to the two
cup mark?
What Happened: When
you combined one cup of rice and one cup of salt, you got far
less than two cups total because much of the salt was
able to fit in the spaces between the grains of rice.
This should not have been surprising. The rice and
salt were crude models for molecules of two different sizes,
and this model allowed you to see how molecules of one
substance could fit in the spaces between the molecules of
another substance.
When you mixed one cup of alcohol with one cup of water, there
was slightly less than two cups of liquid. The alcohol
molecules are larger than the water molecules, so when the
alcohol and water were mixed together, some of the water
molecules were able to fit in between the larger alcohol
molecules. This time, you were dealing with actual
molecules of water and alcohol. While you obviously
could not see the space between the molecules, you could
see the effect of that space.
All matter is affected by heating and
cooling. With a very
few exceptions, when any matter is heated, it will
expand. When it is cooled, it will
contract.
CAUTION: Hot
steam can cause serious burns! Do this experiment only
with adult supervision, and be sure to use an oven mitt or
potholder to protect your hands.
Materials Needed:
Glass bottle with a narrow neck; balloon; small pot; water;
stove; oven mitts or potholders.
Procedure:
Place the neck of the balloon over the mouth of the
bottle. Put about 6 cm (2 in) of water in the bottom of
the pot and place the bottle and balloon in the pot.
Heat the water slowly over the stove. You do not need to heat
the water to boiling. What happens to the balloon?
Remove the bottle and allow it to cool. What happens to
the balloon now?
What Happened: When
the air inside the bottle was heated by the hot water, it
expanded. As the air expanded, some was pushed into
the balloon causing it to expand slightly. When the air
inside the bottle cooled, it contracted and the balloon
shrank.
Just as you saw a gas expand when heated, you can
see how it contracts when cooled using the same material as
in the last experiment.
CAUTION: Hot steam can cause serious
burns! Do this experiment only with an adult, and be
sure to use an oven mitt or potholder to protect your hands.
Materials Needed:
Glass bottle with a narrow neck; balloon; small pot; water;
stove; two oven mitts.
Procedure: Place a
couple of inches of water in the bottom of the pot and place
the bottle in the pot. Heat the water to almost
boiling. Then, using the oven mitts, remove the bottle
and quickly place the balloon over the neck. Allow the
bottle to cool and observe the balloon as the bottle cools.
What Happened: As the
air inside the bottle cooled, it contracted. This caused
the balloon to be drawn into the bottle.
CAUTION: Hot
steam can cause serious burns! Do this experiment only
with adult supervision, and be sure to use an oven mitt or
potholder to protect your hands.
Materials Needed: Glass
soft
drink bottle; water; food coloring (or instant coffee or
powdered fruit drink mix); small pot; water; stove.
Procedure:
Put a little food coloring or a pinch of coffee or fruit drink
mix in the bottle. Fill the bottle completely with cool
tap water. Place a couple of inches of water in the
bottom of the pot and carefully place the bottle in the pot,
being careful not to spill any of the water. Slowly heat
the water in the pot almost to boiling and observe what
happens to the water in the bottle.
What Happened: As the
water inside the bottle was warmed, it began to expand.
The bottle could no longer hold all of the water and the water
began to “bulge” from the top. Some may have even spilled out.
CAUTION: Hot tap
water can cause serious burns! Do this experiment with
adult supervision, and be sure to use an oven mitt or
potholder to protect your hands.
Materials Needed: Glass
or
plastic soft drink bottle; hot tap water; oven mitts or
potholders.
Procedure: Fill the
bottle completely to the top with hot tap water. Try to
get as few bubbles in the water as possible. Allow the
bottle to cool where it will not be disturbed. Be
careful not to spill any of the water. After the bottle
has cooled to room temperature, observe the level of the water
in the bottle.
What Happened: The
water level was slightly below full. As the water
cooled, it contracted causing the water level to drop.
However, there may also be another effect here as well.
If you used water with a lot of bubbles, those bubbles
also took up a part of the volume inside the bottles. As
the bubbles eventually floated to the top, they would have
decreased the volume slightly. Can you think of some way
to insure that what you are seeing is not a result of the
bubbles?
The general rule that has already been stated is
that matter expands when heated and contracts when cooled,
but there are a few exceptions. The most important
exception is water when it freezes.
Materials Needed:
Plastic soft drink bottle with screw-on cap; water; newspaper;
grocery bag.
Procedure:
Fill the bottle to the top with water and replace the
cap. Wrap the bottle in several layers of newspaper and
place the bottle and paper in the bag. Put the bag in
the freezer and leave it there until the water freezes.
Remove the bag and paper and examine the bottle. What do
you see?
What Happened: The
bottle was shattered or very swollen. When water is
cooled, whether as a gas (water vapor), a liquid, or a solid,
it will contract. The one major exception to this is
when water reaches the freezing point and changes from liquid
water to ice. At that point, the water expands, rather
than contracts. This expansion caused the bottle to
break.
The reason water behaves this
way has to do with the shape of it’s molecules. When water
freezes into ice, it’s molecules line up in a certain way, and
when they do, they take up more space than they did as a
liquid. It is almost as if the molecules elbow each
other out of the way, and this causes the ice to take up more
space than the liquid water.
Once the water freezes and gets colder than the freezing point
( 0º C or 32º F), it begins to contract again. The only
time water expands when cooled is at the point where it
freezes. However, the fact that water expands when it
freezes is very important in nature. For example, one of the
ways that rocks are broken down into soil is by water freezing
in the cracks of rocks. When the frozen water expands,
it has enough force to cause the rock to split or break into
smaller and smaller pieces.
CAUTION!
Always be careful to follow all safety precautions when
using fire, and use with adult supervision only! Keep
your alcohol lamp or candle in an aluminum pie pan, and keep
the flame at least three feet away from anything that can
burn, unless otherwise instructed.
Materials Needed: Wire
coat hanger; wire cutters; sandpaper; straight pin; coffee
stirrer or broom straw; tape; books; candle or alcohol lamp
with safety holder.
Procedure:
Using the wire cutters, cut a rod from the long bottom section
of a wire coat hanger. Keep this wire as straight as
possible. Use the sandpaper to sand the paint off the
wire. (You are going to heat this wire, and you need to
remove the paint to avoid fumes from burning paint!)
Cut a section of the coffee stirrer or broom straw about 3
inches long. Push the straight pin through the middle of
this section. The straight pin should fit snugly.
If it doesn’t, use a small piece of tape to hold it in place.
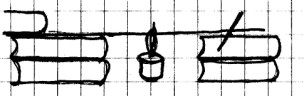
Set up the rod, pin, books and heat source as shown.
Make sure that the end of the rod away from the pointer is
firmly against a book, and that the rest of the rod is
touching only the pin, and not the surface of the books.
Heat the rod using your heat source, and observe what happens
to the pointer. Remove the heat source without
disturbing the rod and watch what happens as the rod cools.
What Happened: As the
rod was heated, it began to expand. Since one end of the
rod was against the book, it could expand in one direction
only. As it expanded, the rod moved over the pin,
causing the pin to roll slightly. Although the pin may
not have rolled more than a quarter turn, the pointer allowed
you to see this motion very clearly. As the rod cooled,
it contracted and moved the pin and pointer back to where they
started.
We have seen that solids
expand when heated and contract when cooled.
Engineers who design roads, buildings, towers, and other large
structures must know how much a substance will expand or
contract over the range of temperatures it is expected to
encounter. The engineers then have to design the
structure to prevent damage from expansion or
contraction. These next experiments will have you to
examine some of these structures on a hot day in summer and a
cold day in winter. They could become part of a science
project on heating and cooling.
Materials Needed: Camera (optional);
thermometer; ruler; notebook; railroad tracks.
Procedure:
Pick a very hot and a very cold day to do this.
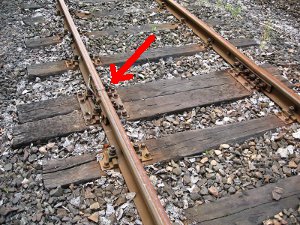
Walk along a railroad track until you find a place where two rails are joined together. You should see a small gap between the rails where they are fastened together. This gap is called an “expansion joint”. Some newer tracks have rails that are continuously welded together and do not use expansion joints. If you walk for some distance and do not see a gap between two rails, the tracks you are looking at are probably of this kind. If possible, you should try to locate an older track, or even one that is no longer in use. Such track will be more likely to have expansion joints.
If you are able to locate an
expansion joint, measure and write down the outside
temperature, along with the date and the time. Also,
measure and record the size of the gap. The millimeter
scale is probably the best scale to use. If you have a camera
(particularly if this is part of a science project) take a
picture of the joint. It is a good idea to take this
picture with the ruler in place. Save your notes.
If you did this on a hot day, repeat it on a cold day, or vice
versa. Can you measure any difference in the size of the
gap?
What Happened: The
gap is slightly narrower on a hot day, because the rail
sections on either side of the gap expand with the
increased heat. If expansion joints were not put in
place and the rails were placed tightly together on a cold
day, when they were warmed by the sun, they would buckle and
perhaps come loose. If the rails were put down tightly
on a hot day, they would pull apart in cooler weather. Either
could cause a very serious accident.
CAUTION: There
is no need for you to get close to the lines to do this
experiment, but you should still be careful. Do this only
with adult assistance.
Materials Needed: Camera;
thermometer;
notebook; power lines between two poles or towers.
Procedure:
This experiment, just like the last, will need to be done on
both a very cold and a very hot day.
On a very hot or cold day, locate power lines near your home
hanging between two poles or towers. Notice how much the
lines sag. Measure and record the temperature as well as
the date and time. Select a good spot to take a picture
of the lines. Carefully note exactly where you make this
picture in your notebook, including any zoom setting and the
center of your photo. Make sure that you will be able to
return to the exact spot several months from now.
Return to the same spot when the weather is much hotter or
colder, depending on when you did this the first time.
Again, measure and record the temperature, date and
time. Take another picture of the wires using the same
zoom settings and center point as before.
Compare the two pictures. What do you see?
What Happened: The
wires sagged much less in cold weather. Wire, like all
other solids, expands when it is warmed and contracts when it
is cooled. In hotter weather, it will expand more,
causing the wires to sag more.
When power or phone lines are strung, they are always sagged
to allow for expansion and contraction. If they were to
be strung too tight, they could snap when they contract in
colder weather.
Materials
Needed: Camera (optional); thermometer; ruler;
notebook; various locations (See Procedure)
Procedure: There
are many other examples of expansion and contraction you may
observe. Some suggestions are sidewalks, concrete roads,
bridges, and tower guy lines. Can you find others? See
if you can identify expansion joints or other structures used
to prevent damage from expanding and contracting in
each. If you are doing this as part of a science
project, do this on both a cold day and a hot one, and be sure
to record your results.
As we have seen, solids usually expand when heated
and contract when cooled. However, some solids don’t
always behave according to this rule, as this experiment
will show.
Materials Needed: Small
cardboard
box; rubber band; pushpin; small weight; string; hand held
hair dryer.
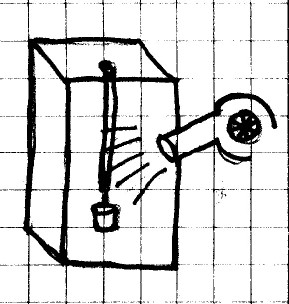
Procedure: Turn
the box on its side as shown. Place the pushpin in the
top edge of the box and hang the rubber band over the
pushpin. (If you can’t get the pushpin to hold firmly,
try taping the rubber band.)
Tie a small weight to the other end of the rubber band.
The weight should be heavy enough to stretch the rubber band,
but not enough to break it.
Set the dryer on it’s hottest setting and heat the rubber
band. Note what happens to the rubber band.
What Happened: Instead
of expanding as we would have expected, the rubber band
contracted and lifted the weight. Molecules of rubber
are long and twisted, something like a loose spring.
Rubber molecules compress when they are heated, causing them
to draw together like a tighter spring. When all of the
molecules do this, the rubber band contracts.
There's more "hot" stuff on the Heat - Part 2 page!