The
Science Notebook
The
Science NotebookHeat - Part 2
The
Science NotebookHome Terms of Use Safety Contact Us Experiment Pages Downloads Supplies Useful Links!
Heat moves from
one place to another by means of conduction, convection,
or radiation. The following experiments will
help us understand how each of these work.
Heat moves through solids mainly by
conduction. When a solid is heated, heat moves away
from the source of the heat through the solid.
CAUTION!
Always be careful to follow all safety precautions when
using fire, and use with adult supervision only! Keep
your alcohol lamp or candle in an aluminum pie pan, and keep
the flame at least three feet away from anything that can
burn, unless otherwise instructed.
Materials Needed: An
old metal butter knife; candle or alcohol lamp with safety
pan.
Procedure: Light your
heat source, and hold one end of the knife in the flame.
Hold the knife just until it begins to feel warm. Remove it
from the flame as soon as it does so that you don’t get
burned.
What Happened: The
heat moved from the end of the knife in the flame to the end
in your hand by means of conduction.
CAUTION!
Always be careful to follow all safety precautions when
using fire, and use with adult supervision only! Keep
your alcohol lamp or candle in an aluminum pie pan, and keep
the flame at least three feet away from anything that can
burn, unless otherwise instructed.
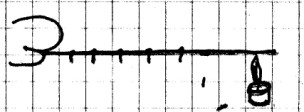
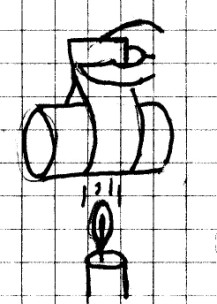
Materials Needed: A
metal rod such as a piece of coat hanger wire; sandpaper;
candle with safety holder; pliers or tongs.
Procedure: Have an
adult to cut a piece of straight wire from the bottom of a
coat hangar. Sand all the paint off the wire.
(You’re going to heat this wire, and this will prevent fumes
from burning paint!) Light your candle. Allow it to
drip a single drop of wax about of every 3 cm (1 in) or so
along the metal rod as shown. Let the wax harden.
Place your candle in the safety pan and hold one end of the
rod with pliers or tongs. Place the other end of the rod
in the flame. Observe the drops of wax along the length
of the rod.
What Happened: As the
heat moved along the rod, you could see the drops of wax begin
to melt. The melting began closest to the flame and
moved outward. This shows how heat moves through the rod
away from the heat source by conduction.
CAUTION!
Always be careful to follow all safety precautions when
using fire, and use with adult supervision only! Keep
your alcohol lamp or candle in an aluminum pie pan, and keep
the flame at least three feet away from anything that can
burn, unless otherwise instructed.
Materials Needed: A
piece of solid copper wire (See Procedure); candle with safety
pan.
Procedure:
Find a piece of solid copper wire the same length as the steel
rod from the last experiment, and as nearly the same thickness
as possible. Use the candle to drip wax along the copper
wire just as you did on the steel rod in the last experiment.
Place the candle in the safety pan and hold one end of the
wire in the flame. Notice how long it takes for the heat
to melt the drops of wax along the length of the wire.
What Happened: The
wax melted faster in the copper than in the steel rod.
Heat moves through different substances at different rates.
Copper is a better conductor of heat than steel, and the
better a substance conducts heat, the faster heat moves
through it.
In the butter knife, the clothes hangar rod, and the
copper wire, heat moved away from the heat source because
the heat caused the molecules near the heat source to
vibrate faster. As the molecules vibrated faster,
they began to bump into the molecules next to them.
Like a line of falling dominoes, the molecules passed
the heat energy along the entire length of the rod. This
is how conduction works. You’ll learn more about
how heat is related to the moving molecules a little
later.
We have now seen how heat travels by conduction
through a solid. However, there are some substances
that don’t conduct heat very well, and these substances are
called “insulators”. Insulators are very useful
because they allow us to keep things warm or cool longer by
preventing heat from moving.
Materials Needed: Four
waterproof thermometers; measuring cup; food tin; glass or
porcelain coffee cup; Styrofoam ® drink cup; Thermos
® bottle; hot tap water.
Procedure: Allow the
tap water to run until it is very hot. Fill each
container with 250 ml (1/2 cup) hot tap water. Place the
thermometers in each container and measure the
temperature. (If you only have one thermometer, you can
do each container one at a time.) Write down your
results.
Measure and record the temperature every 10 minutes for an
hour. Use a chart similar to the one below to record
your results.
| Food Tin | Glass | Styrofoam ® | Thermos ® | |
| Start | ||||
| 10 min | ||||
| 20 min | ||||
| 30 min | ||||
| 40 min | ||||
| 50 min | ||||
| 60 min |
What
Happened:
The temperature inside the food tin and the glass
container dropped much more quickly than the Styrofoam ® or
the Thermos ® bottle. Glass and metal are better
conductors of heat, so they are poor insulators. The
material used to make the Styrofoam ® cup is a very poor
conductor of heat. The Thermos ® bottle has a double
layered inner shell which has had most of the air removed from
between the layers. This makes it a very poor conductor
of heat as well. A poor conductor of heat is a good
insulator and will not allow heat to move from one place to
another very quickly.
Going Further: Repeat
this experiment using very cold water. Heat moves from
warmer areas to cooler ones, so is cold being trapped by the
insulators or is heat being kept out?
Have you ever felt a draft in a cold room on a
winter day? How about a cool spot in a swimming pool?
Both are caused by convection currents. Convection currents are
currents of moving matter, usually gases or liquids,
caused by uneven heating or cooling. These next
experiments will allow you to observe and study convection
currents.
Materials
Needed: An ice cube; tongs or pliers.
Procedure: Hold the
ice cube with the tongs or pliers. Hold your hand just
underneath the ice cube. Slowly move your hand downward
about a meter underneath the ice cube. What do you feel?
Next, hold your hand just above the ice cube. Slowly
raise your hand about a meter above the ice cube. What
do you feel now?
You may see mist around the ice cube. If so, what is
happening to the mist?
What Happened: When
you placed your hand under the ice cube, you felt cool
air. As you moved your hand downward, you probably felt
cool air for some distance. However, when you placed
your hand over the ice cube, you felt cool air near the ice
cube only.
If you were able to see mist coming off the ice cube, you
probably noticed that the mist fell downward. Hot air
generally rises above cooler air. Likewise, cooler air
drops below warmer air. It is this movement of air
caused by temperature differences that creates convection
currents.
Materials
Needed: Compass; construction paper; scissors;
ruler, pencil with an eraser; small needle; lamp.
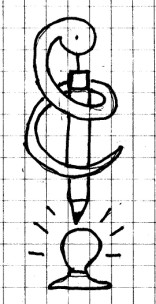
Procedure: Using
a compass, draw a 12 cm (4 in) diameter circle on the
paper. Copy the spiral diagram below onto the circle and
cut along the line on the pattern to make a spiral “snake.”
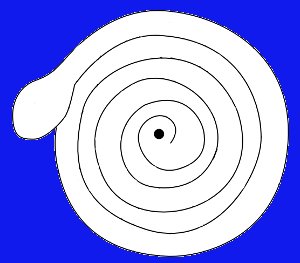
If you prefer, you can download a larger version of the above diagram by clicking here. You can then print it and cut it out.
Push the needle into the top of
the eraser. Place the center of the paper spiral on top of the
needle and press down just enough to male a small dimple in
the paper to hold the paper in place. When you hold the pencil
straight, the snake should be able to turn on the needle
freely. Hold your paper “snake” directly over the light bulb
of a lamp that has been turned on. Hold the snake as
steady as possible for a few moments. What do you see?
What Happened: You
should see the “snake” begin to turn, and continue to turn for
as long as it is over the bulb. The air over the light
bulb is heated. When this air is heated, it begins to
rise, and creates a current of moving air as cooler air moves
in to take its place. This type of current is called a
convection current. As this convection current moves up
and away from the bulb, it moves through the paper snake,
causing the snake to spin.
You have already seen that convection currents are created in
air when part of that air is heated and rises. These
next two experiments will demonstrate that convection currents
exist in liquids as well.
Materials
Needed: Four clear soft drink bottles of the same
size; warm tap water; cold tap water; food coloring or other
coloring agent; two small pieces of cardboard.
Procedure: Place a
drop or two of food coloring (or a few grains of instant
coffee or powdered drink mix) into the bottom of two of the
bottles. Fill these two bottles completely with hot tap
water. Fill the other two bottles with cold tap water.
Place a piece of cardboard over the mouth of one of the hot
bottles, and place this bottle upside down over one of the
cold ones. Carefully remove the cardboard so that the
water in the two bottles can mix. What happens?
Next, place a piece of cardboard over the mouth of the
remaining cold bottle, and place this bottle upside down over
the remaining hot bottle. Again, carefully remove the
cardboard so that the water in the two bottles can mix. What
happens this time?
What To Look For: Notice
the
area right around the mouths of the two bottles to see how the
water moves.
What Happened: Just
as hot air rises over cooler air, so a hot liquid will rise
over a cooler one. Warmer liquids are less dense than
colder ones and are therefore lighter. When the warmer
liquid was on top, the liquids did not mix, or mixed very
slowly. However, when the warmer water was on the
bottom, the water in the two containers mixed very rapidly,
since the lighter warm liquid rose up over the cooler liquid.
Going Further: What
happens when you leave the first two bottles alone for several
hours? Why? Also, would it make any difference if
you colored the cold water instead of the hot?
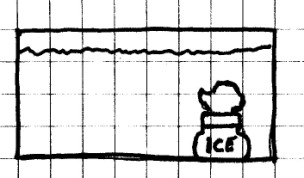
Materials
Needed: Small aquarium or large clear bowl; small jar
such as a baby food jar; ice; rock; food coloring.
Procedure: Fill the
aquarium with water and allow it to come to room
temperature. Fill a baby food or similar jar with
crushed ice. Add enough water to the jar to completely
fill it and place the cap on the jar. Weight the jar
down with a rock and sink it at one end of the aquarium.
Allow it to sit for a few minutes and then place a few drops
of food coloring (or a few grains of instant coffee or
powdered drink mix) on top of the water above the jar. Observe
how the coloring moves through the water.
What Happened: The
food coloring added to the water allowed you to see the
movement of the water in the aquarium. The water surrounding
the jar of ice was colder than water that was farther
away. The coloring near the cool water tended to drift
downward. As the coloring moved away from cool water to
the warmer water, it drifted upward.
With
convection, heat moves by warm gas or liquid rising and
cooler gas or liquid moving in to take its place.
Heat may also
travel by radiation. When heat moves by radiation,
it travels mainly as energy through gases or empty space.
It may also travel through some liquids and a few solids
such as glass. Heat moves from the sun through many
millions of miles of empty space by means of
radiation. Heat from a fire warms by means of
radiation as well. Even heat from a light bulb moves outward
by means of radiation.
CAUTION!
Always be careful to follow all safety precautions when
using fire, and use with adult supervision only! Keep
your candle in an aluminum pie pan, and keep the flame at
least three feet away from anything that can burn, unless
otherwise instructed.
Materials Needed:
Electric lamp with the lampshade removed; candle (for “Going
Further”).
Procedure:
Turn on the lamp. Hold your hand about 30 cm (12 in)
from the bulb. Can you feel the heat?
Next, place your hand 30 cm (12 in) above the light and slowly
raise it to about 1 meter (1 yard). What do you feel?
Now move your hand 30 cm (12 in) underneath the lamp and
slowly move it downward about a meter. What do you
feel?
What Happened: You were able to feel heat all
around the bulb, although it may have felt slightly hotter
above the bulb. When energy moves by means of radiation,
it moves outward in all directions. As the radiant
energy comes in contact with matter, such as air or your hand,
this energy changes into the heat you feel.
Heat created by radiation may move by other means as
well. You may remember from the paper snake experiment
that when air surrounding the bulb is heated, it rises.
This explains why you may have noticed that it was warmer on
top of the bulb. You were able to feel heat for some distance
above the bulb because, as the air around the bulb was heated,
it rose and created a convection current. Since the only
heat you felt below and to the sides of the bulb was due to
radiation, you were probably not able to feel quite as much
heat below the bulb as you did above.
Going Further: Try
this same experiment with a candle. Be careful!
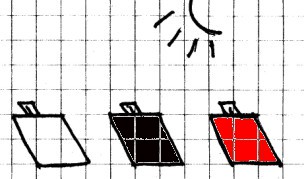
Materials
Needed:
Three thermometers; three sheets of construction paper
- one white, one black, and one another color of your
choosing; a sunny day.
Procedure:
Find a sunny location such as a driveway. Place the
three thermometers on the driveway. After about five
minutes, record the temperature of each.
Cover each thermometer with a sheet of paper and leave the
paper in place for about 15 minutes. Remove the paper
and record the temperature under each piece.
What Happened: At the
beginning, the temperature was the same. At the end of
the experiment, the temperature under the white paper was
coolest, under the black paper it was hottest, and it was
probably somewhere in between under the colored paper.
When heat comes from the sun as radiant energy, it doesn’t
actually change to heat energy until it comes in contact with
matter. When the sun’s rays struck the driveway, the
radiant energy changed to heat, which could be measured.
Different colors absorb different amounts of radiant
energy. White absorbs the least energy. Most of
the radiant energy is reflected away from the paper.
Since less energy is absorbed, less is changed to heat and the
temperature is cooler.
Black is just the opposite. Most of the sun’s energy is
absorbed by black and converted into heat. This makes
the temperature under the black paper much warmer. The
other colors are somewhere in between. Generally, the
darker the color, the more radiant energy it will absorb and
change to heat.
Going Further: If you
can get several thermometers and several different colors of
paper, try to determine which colors absorb the most heat.
Materials
Needed: Large glass jar with lid; two thermometers
(at least one should be able to fit inside the jar); a sunny
day.
Procedure:
Find a sunny spot outside. Place one of the thermometers
inside the jar upside down and place the lid on the jar.
Turn the jar upside down so that you can read the
temperature. Place the jar with the thermometer and the
other thermometer in sunlight. Record the temperature of
each. Repeat after 30 minutes and one hour.
What Happened: The
temperature rose inside the jaras compared to the temperature
of the air outside the jar. Radiant energy that reached
the inside of the jar was converted to heat. Some of
this heat was trapped inside the jar by the glass. As
more radiant energy was changed to heat energy, the
temperature rose. At some point, heat began to escape
through the glass by means of conduction and the increase
leveled off. This is sometimes called the "greenhouse
effect." It is what makes the inside of a closed car
much hotter than the outside when it has been in the sun, and
it is also what makes the inside of a closed
greenhouse warmer than the outside.
Going Further: Other
substances besides glass can trap heat. Carbon dioxide,
a gas in the air, is able to trap heat and to keep the earth
warm. Carbon dioxide is formed when organisms use
oxygen or when most fuels burn. Because of this, some
scientists are worried that we may be producing too much
carbon dioxide by burning coal, wood, gasoline and other
fuels. They believe that too much carbon dioxide in the
atmosphere will raise the temperature of the earth, and may
cause the polar ice caps to melt. If this happens, many
areas close to sea level could eventually be flooded by the
oceans, and the growth of certain plants and animals might be
affected as well. This heating is called the “greenhouse
effect”. Find out more about it at your school or public
library, in an encyclopedia, or on the Internet.
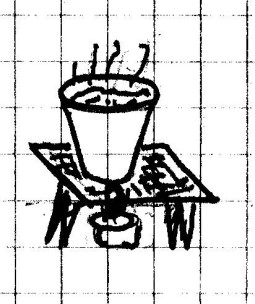
CAUTION!
Always be careful to follow all safety precautions when
using fire, and use with adult supervision only! Keep
your alcohol lamp or candle in an aluminum pie pan, and keep
the flame at least three feet away from anything that can
burn, unless otherwise instructed.
Materials Needed:
Alcohol lamp or candle with safety pan; burner stand; paper
cup; water.
Procedure:
IMPORTANT! You need to be sure that the cup you use is paper
and not plastic or Styrofoam ®. Fill the cup 3/4 full of
water and place it over your heat source. Watch what
happens.
What Happened: After a
few minutes, the water began to boil. You might have
expected the cup to burn, but as long as there was water in
the cup, it did not. This is because the water absorbed
the heat before the paper could reach a temperature hot enough
to burn.
CAUTION!
Always be careful to follow all safety precautions when
using fire, and use with adult supervision only!
Keep your alcohol lamp or candle in an aluminum pie pan, and
keep the flame at least three feet away from anything that
can burn, unless otherwise instructed.
Materials Needed:
Candle or alcohol lamp with safety pan; piece of paper play
money (or a small piece of notebook paper about the size of a
dollar bill; tin can with smooth sides and no ridges; pair of
pliers.
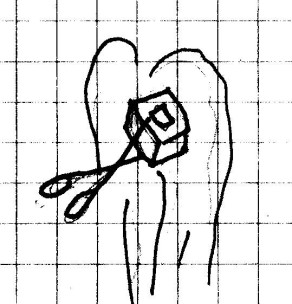
Procedure: Light
your heat source. Wrap the paper around the can and hold
it with the pliers as shown. Place the paper in
the flame for a few seconds and remove. Examine the
paper.
What Happened: The
paper near the flame may have been covered with soot and
possibly a little scorched, but it didn’t burn. As the
heat from the flame struck the paper, it was quickly conducted
away from the paper by the metal in the can, and the
temperature could not rise high enough for the paper to
burn. This result is very similar to the last
experiment.
Up to now, we have learned that when matter is
heated, it generally expands, and when it cools, it
generally contracts. We have also seen that heat may
travel by conduction, convection, or radiation, and we have
seen examples of each. But to really understand why
matter behaves as it does, we need to understand what is
going on with the individual molecules in matter. This
next series of experiments will help us understand why
solids, liquids and gases behave as they do when they are
heated, and we will also learn the difference between heat
and temperature.
We have already learned that all matter is made of
molecules. In solids, these molecules are strongly
attracted to each other, and they are not free to move
around. In liquids, the molecules are attracted to
each other as well, but the attraction is much weaker.
This allows the molecules to “stick” together, but they are
still free to move around each other. Finally, in
gases, the molecules have almost no attraction between them,
and they are able to spread out and completely fill any
container.
Here’s something new. All molecules,
regardless of whether they are in a solid, a liquid, or a
gas, are constantly moving. Even in a solid where the
molecules cannot move around, they vibrate, or move back and
forth, in place. Even though we cannot actually see
the molecules move, we can see the effects of their moving.
Materials Needed: Jar
or clear glass; food coloring (see Procedure); water.
Procedure: Fill the
container with water. Allow it to become as still as
possible. Add a drop of food coloring to the water,
trying to disturb the water as little as possible. (If
you don’t have food coloring, you can use a pinch of instant
coffee or powdered drink mix.) Observe how the coloring
moves through the water. Allow the water to sit
for an hour or so and observe it again. What do you see
now?
What Happened: The
food coloring began to swirl in the water. If you
watched closely, you should have seen the food coloring begin
to slowly spread throughout the water. Even though the
water appears to be still, the individual molecules of water
are constantly moving. As they come into contact with
the molecules of food coloring (which are also moving), they
bump each other around. In this way, the molecules of
food coloring are eventually spread throughout the water.
The more molecules are heated, the more energy they
have, and the faster they move, as this experiment will
show.
Materials Needed: Two
clear jars or glasses; food coloring; hot and cold water.
Procedure: Fill
one of the containers with cold water from the
refrigerator. Fill the other container with hot water
from the tap. Allow both to settle.
Place a drop of food coloring (or other coloring agent - see
the last experiment) in each container, being careful to
disturb the water as little as possible. Notice how
quickly the coloring moves through each container.
What Happened: The
coloring moved through the hot water considerably faster than
through the cold. This is because the molecules of hot
water were moving much faster than the molecules of cold
water. This caused them to collide with the molecules of
coloring much more rapidly and with more force. As a
result, the molecules of coloring in the warm water spread out
much quicker.
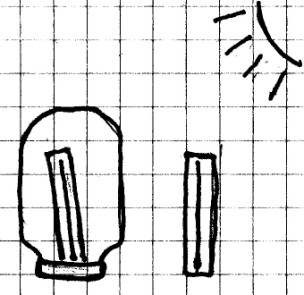
Materials
Needed: A thermometer.
Procedure: Examine
the thermometer. Most thermometers are made of a glass
tube with a very thin hollow center. This tube is sealed
at both ends, and has a bulb at the bottom. This bulb is
filled with a liquid. If the liquid is colored, it is
probably colored alcohol. If it is a silver liquid, it is
probably mercury. The liquid extends up into the tube for some
distance through the hollow tube. The tube is also
usually flattened on one side to make it easier to see the
colored liquid.
Read the temperature on the thermometer. If you don’t
know how to do this, have a teacher or other adult to help
you. Now place the thermometer inside a refrigerator for
a few minutes. Read the thermometer again. Remove
the thermometer and place your thumb over the bulb. Hold
it in place for a few minutes and watch what happens to the
level of the liquid.
What Happened: The
thermometer probably read somewhere between 18-24 ºC (65-75º
F) in the room. When you placed it in the refrigerator,
the temperature dropped, probably to near freezing. When
you placed your thumb on the thermometer bulb, you saw the
liquid rise in the tube as your thumb warmed the bulb.
You have already learned that a liquid will expand when heated
and will contract when cooled. When the liquid in the
bulb got hotter, it expanded, and some of the liquid was
forced up a narrow tube in the glass. When the liquid
cooled, it contracted, and the liquid fell back down the
tube. You saw this as a rise and fall in the
temperature.
Going Further: O.K.,
this seems too simple. You learned this in second grade,
right? Well then, can you use what you know about
molecules in a liquid to explain why the liquid expands and
contracts? Maybe this next experiment will help.
Materials
Needed: Glass bottle with screw top; modeling clay;
clear soda straw; food coloring.
Procedure: Fill the
glass bottle to the top with cool water. Put a drop of
food coloring in the water and shake or stir to mix it
well. Punch a hole in the top of the cap just large
enough for the straw to fit through. Place the straw in
the top of the cap and allow about 3 cm (1 in) to stick out
the bottom. Place a lump of clay around the top of the straw
and cap to seal it. Screw the cap on the bottle tightly.
A little water may go up the straw, but that’s O.K.
Place your hands around the bottle to warm the water, but
don't squeeze. Watch what happens to the water level in
the straw.
What Happened: The
water rose up into the straw as your hands warmed the
water. In your model thermometer, just as in a real
thermometer, the heating of the liquid causes the liquid to
expand and forces it up in the straw or tube.
You already know that water expands when heated. The
reason it does is because the heat energy makes the individual
water molecules vibrate faster. As they do, they tend to
bump into each other more and more, and push each other
farther apart, even though they are still attracted to one
another. As they push each other farther apart, they
take up more space and the water expands.
Going Further: Why
did you need to use a glass bottle instead of a plastic one?
By now, we have done many experiments that show how
solids, liquids and gases all expand when heated and
contract when cooled. We have also seen two exceptions
to that rule. First, we have seen that water will
actually expand at the instant it freezes, but only because
of the shape of it’s molecules. Likewise, we have seen
that solid rubber will contract when it is heated, but
again, it is only because of the springlike shape of its
molecules. These are special cases.
In the last experiment, we
saw that heated water expands because heat makes the
molecules vibrate faster and causes them to push each other
farther apart. This also explains the general rule
that matter almost always expands when heated and contracts
when cooled. The more heat you add to matter, the more
you cause it’s molecules to vibrate. As heat is taken
away from matter, its molecules vibrate less. If the
vibrations get fast enough, they can overcome the attraction
the molecules have for each other. This experiment
will show you how.
Materials Needed: A
group of your friends or classmates (16 is a good number);
thin thread; an open area.
Procedure: Line up in
four rows of four people each. (If you have more, line
up in as near the same number of rows and people in each row
as you can, but it doesn’t have to be exact.) Each person
should tie themselves to the person in front, behind, and on
either side with a 1 meter piece of string. (Only those
in the middle will be tied to four other people. The
ones on the outside will only be tied to two or three.)
Now pretend that your group is an ice cube, and each of you is
a single water molecule in that ice cube.
Move in as close as you can to one another and remain as still
as possible. At this point there is no heat at all in
the ice cube. The molecules are not moving. Next,
pretend that you are being heated. This causes you to
vibrate, so you should begin to move back and forth and side
to side, but be careful not to break any of the strings.
As you begin to move, you will notice that you are moving away
from one another and the “ice cube” is expanding.
More heat is being added, so you should begin to move
faster. At some point, the strings will begin to
break. Now you can move around, but you should hold two
other people’s hands and stay within arm’s length of each
other. As you move, you may change the hands you are
holding. The “ice cube” has now melted, and you are
water in the liquid state. Your attraction for each
other as molecules has weakened with the breaking of the
strings, but you hands represent the attraction the molecules
in a liquid still have for each other.
Even more heat is now being added, so you should begin to move
even faster. You will soon be unable to hold onto anyone
else’s hand, and you will begin moving apart. As you
keep moving randomly, you will actually move farther and
farther apart. Enough heat has now been added to cause
the water to boil and evaporate.
What Happened: You
have just seen how molecules move in solids, liquids and gases
when they are heated. When the molecules are not moving
at all, there is no heat present. This is the point scientists
call “absolute zero” and it is - 273.15 ºC (- 459.67 º
F). Because the molecules cannot move any slower, this
is the coldest temperature possible, and that is why it is
called absolute zero.
As heat was added, the molecules (you) moved faster and
faster. When there was enough heat to cause you to melt,
the heat energy overcame the strong attraction (the strings)
you had to each other. As more heat was added, you moved
faster still, and moved farther apart, but you were still
moving slow enough to hold on to each other, just like
molecules in a liquid. However, enough heat was finally
added that you could no longer hold on to each other, and you
went off in all directions like molecules in a gas.
All molecules of matter behave pretty much the same way.
Materials
Needed: Small container; container about twice as
large as the small container; waterproof thermometer; hot tap
water.
Procedure: Fill both
containers with the hot water. Use the thermometer to
measure the temperature of each.
Now answer this question: If you were to spill both of the
containers of water on yourself, which would be more likely to
hurt you and why?
What Happened: The
temperature of each container should have been the same.
However, if you were to spill both containers on yourself, the
container with more water would have hurt you more.
Temperature is a measure of the average energy of the moving
molecules. The molecules are moving around at the same
average rate or speed in both containers, so about the same
number of molecules are hitting the thermometer bulb in both
containers. As a result, the same amount of heat is
being transferred to the liquid inside the thermometer in each
container, and so the liquid expands at the same rate in
both. Because of this, the temperature is the same in
both containers.
However, if there is twice as much water in the larger
container, there are twice as many molecules moving around,
and there is twice as much total heat energy.
When we
measure temperature, we are measuring the average energy of
the molecules, but when we measure heat, we are measuring
the total amount of heat present. Temperature is
measured in degrees Fahrenheit or Celsius, while heat energy
is measured in calories. So another way of stating our
result is that the temperature of the two containers is equal,
but there are twice as many calories of heat in the larger
container as in the smaller one.
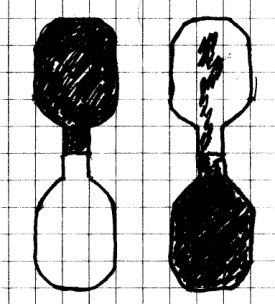
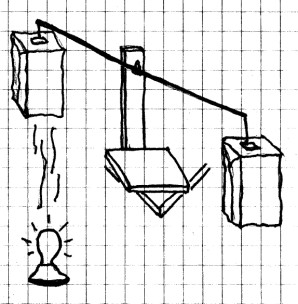
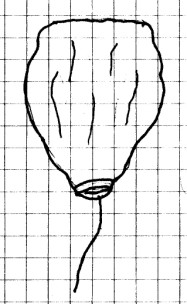
Materials
Needed: Homemade balance; two large paper grocery
bags; lamp; tape; paper clips.
Procedure: Bend two
paper clips into an “S” shape. Tape a piece of string to
each bag on the bottom center and tie the other end of each
string to a paper clip. Place the balance on the corner
of a table as shown. Because the grocery bags are fairly
large, you will probably want to use a meter or yard stick or
a long dowel for the balance arm. Hang each bag on opposite
ends of the balance by the paper clip and adjust the balance
so that it is level. Remove the lampshade from the lamp
and place it underneath one of the bags. Turn the lamp
on and observe what happens. After a few minutes, turn
the lamp off, and again watch what happens.
What To Look For: You
should see the bag over the lamp begin to rise when you turn
on the lamp. When you turn the lamp off, the bag should
return to where it was at the beginning, but it won’t do so as
fast as it rose.
What Happened: You
already know that heated air rises, and this creates a
convection current, so it should not surprise you, then, that
the hot air from the lamp “pushed” the bag above it up in much
the same way as if you were to blow upward into the bag.
But, if you just blew into the bag, when you stopped blowing,
the bag would immediately return to where it was before.
That didn’t happen here.
As this warm air from the bulb moved upward, it filled the bag
with warm air. Warm air is lighter than cold air, since
the molecules are moving faster and are spread farther apart.
In this case, the warm air rose and lifted the bag up with
it. When you turned the light off, the warm air didn’t
come out of the bottom of the bag because it was lighter than
the cooler air below it. Eventually, the warmer air in
the bag was cooled by the surrounding air, and as the air in
the bag got cooler, it became heavier, and it sank.
You have now learned two very important facts about air.
First, air rises when it is heated, and second, heated air
rises because hot air is lighter than the cooler air around
it. Knowing these two very basic facts can help you
understand a lot about how air behaves in nature. Lets
apply what we’ve learned in this last experiment.