The
Science Notebook
The
Science NotebookLight - Part 1
The
Science NotebookHome Terms of Use Safety Contact Us Experiment Pages Downloads Supplies Useful Links!
A beam of light travels at about 186,000 miles per
second. That is equal to over seven times the distance
around the earth in just one second! But what
exactly is light? We know it when we see it, and we
also know that we could not see without it, but that doesn’t
tell us what it is.
In these experiments we will
learn about the nature of light, and hopefully better
understand just exactly what it is.
Materials
Needed: Three small index cards; modeling clay;
flashlight; several books; hole puncher or sharp pencil;
plastic coffee stirrer or thin straw.
Procedure: Place the
three cards together and punch a hole in the middle of each
card at exactly the same spot using the pencil point or the
hole punch. Use three small balls of modeling clay to make the
three cards stand up as shown.
Turn on the flashlight, and place it in front of one of the
cards. The bulb should be even with the hole in the
card. If it isn’t use one or more books to raise the
flashlight. Once it is in place, you cans secure it with
modeling clay if needed.
Now place the second card about 15 cm (6 in) in front of the
first card so that you can see the light through both
holes. Do the same thing with the third card.
When you can see the light through all three holes, run the
stirrer or straw through the holes.
What Happened: When
the cards were lined up so that you could see the light, the
holes were in a straight line, and the stirrer or broom straw
fit easily through all three holes. When light moves away from
an object, it moves in a straight line unless something acts
on it to bend it.
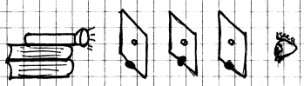
Light rays travel in
straight lines, away from the light source. These next
two experiments show how distance from a light source
affects the appearance of those rays.
CAUTION!
Always be careful to follow all safety precautions when
using fire, and use with adult supervision only! Keep
your candle in an aluminum pie pan, and keep the flame at
least three feet away from anything that can burn, unless
otherwise instructed.
Materials Needed: Comb; candle with safety holder;
sheet of cardboard.
.
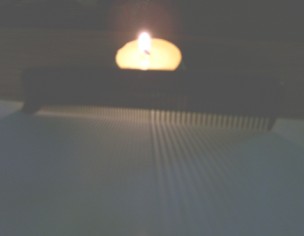
Procedure: Light the
candle. Hold the sheet of cardboard horizontally no
closer than 6 inches from the flame. Hold the teeth of
the comb on top of the cardboard as shown. Notice the
shadows cast by the teeth of the comb on the cardboard.
Now move the cardboard and comb a few feet from the
flame. Notice the position of the shadows now.
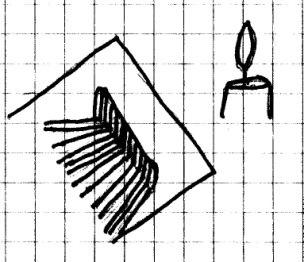
What
Happened: The shadows of the teeth appeared to
spread out in a fan shape behind the comb when the comb was
near the candle. This is because light rays move out in
all directions from the candle flame. As these rays come
in contact with the teeth of the comb, shadows are cast in the
direction of the light rays they block, so the shadows give
you a pretty good picture of the direction of the light rays.
When you moved the cardboard and comb away from the flame, you
still saw some spreading of the shadows, but it was not as
great. As the rays move farther from the light source,
they actually appear to be closer to parallel. If you
could move the comb far enough away, the shadows would appear
to be perfectly parallel, although they don’t ever become
exactly so.
Going Further: Try
this experiment using a light bulb instead of the candle. Are
the results similar?
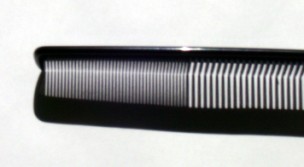
Materials
Needed: Comb; piece of cardboard; sunny day.
Procedure: Go outside
on a sunny day. Hold the comb so that it faces the sun
as shown. Hold the cardboard at right angles to the comb
and observe the shadows cast by the teeth.
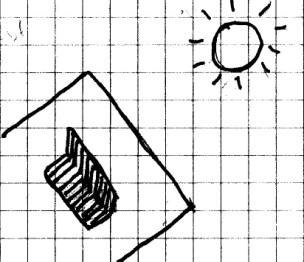
What
Happened: The shadows of the teeth appeared to be
parallel. The sun is about 93,000,000 million miles
away, so you are very far away from the light source. As
a result, the light rays are almost parallel to one
another. In fact, the rays coming from the sun are so
close to being parallel, you can assume they are parallel for
most purposes.
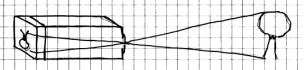
Materials
Needed: Small cardboard box, such as a cereal or shoe
box; waxed paper or thin tissue paper; tape; pin; aluminum
foil; jacket.
Procedure: NOTE:
These directions are for a cereal box. You should adjust
for the type of box you are using.
Cut the top of the box off and discard. Cover this end
of the box with a sheet of thin tissue or waxed paper, and
tape it down. This paper should be kept as flat and
smooth as possible.
Cut about a 2 cm (1 in) square piece from the bottom of the
box. Cut a 4 cm (2 in) square piece of foil and tape it
over the hole. With a straight pin, poke a small hole in
the center of the foil.
Take the box and a jacket to a window on a bright, sunny
day. Place the jacket over your head. Point the
pinhole to the outside, and place the paper side under the
jacket where you can see it. What do you see?
What Happened: The
pinhole allowed only a small amount of light from each point
on the object you were viewing to actually reach the tissue
paper at the back of the box. This formed an image on the
tissue that you could see.
The device you have just made is called a “camera obscura” and
it works something like a real camera. In fact, if you
could place a piece of film where the tissue paper is located,
you would have a very simple film camera. A real camera
also has a glass or plastic lens instead of a pinhole.
The lens can gather more light and focus it so that it will
make a clearer and brighter image than that made by the
pinhole. This is also the same principle behind a
digital camera as well, except that the image forms on a light
sensitive surface instead of a piece of film.
Going Further: Try
changing the size of the pinhole. What difference does
it make? If you have some black construction paper or
spray paint, cover or paint the inside of the box. Does
this improve the image you see?
If you are really ambitious, look up “pinhole camera” in the
library or on the Internet. A pinhole camera works much
like a camera obscura, and is fairly simple to make. It
could also be the centerpiece for a great science project on
photography.
When light rays strike many surfaces, they bounce or ricochet off, much like a billiard ball bounces off the edge of a pool table. When light rays are bounced off of a surface, they are said to be “reflected”. These experiments will show how light is reflected off several different surfaces.
Materials Needed:
Mirror; coffee stirrer or small straw; paper; protractor;
ruler; cardboard; modeling clay.
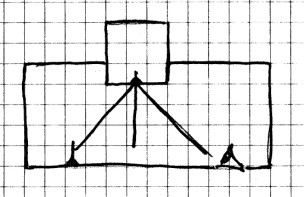
Procedure: Place
a sheet of paper on a tabletop. Position the mirror at the
back edge of the paper as shown. The mirror you use should be
able to stand up straight. If it cannot, use a lump of
clay to make a support for it. Using the ruler and the
protractor, draw a line on the paper that is perpendicular to
the middle of the mirror at the bottom. Use a small
piece of modeling clay, washable marker, or tape to mark the
bottom of the mirror where the perpendicular line ends.
Place the stirrer or straw into a small lump of modeling clay
so that it will stand up straight, and place it a few
centimeters (inches) to the left of the perpendicular line.
Next, use the ruler to draw a line from the base of the straw
to the perpendicular line. Position yourself directly
behind the straw and this line, so that you see the image of
the straw in the mirror directly behind the image of the line
you drew from the straw to the mirror. The line and the
image should be perfectly straight.
Move to the other side of the perpendicular line. Close
one eye and look in the mirror from this side.
Move until you see the straw directly over the perpendicular
line and the mark on the mirror from this side. Place
the ruler at the edge of the perpendicular line so that it
forms a line pointing back to your eye. Make sure that
the image is still over the line as you do. Now draw a
line on the paper along the edge of the ruler.
Use the protractor to measure the two angles formed by the two
lines you drew on each side of the perpendicular line.
What Happened: The
first line you drew was the path that a single ray of light
from the straw took to a particular spot on the mirror, in
this case, the center. When this line was connected to
the perpendicular line, it formed an angle called the “angle of
incidence”. The second line that you drew was the
path of the light beam from that same spot on the mirror to
your eye. When this line was connected to the
perpendicular line, it formed a second angle called the “angle of
reflection”.
You were able to see that light ray in the mirror from the
opposite side of the perpendicular because the mirror
reflected the light ray, or changed its direction. If
you worked carefully, you saw that the angle of incidence was
exactly equal to the angle of refraction. If you move the
straw, both the angle of incidence and the angle of reflection
will change, but the two angles will still be equal to each
other.
Many surfaces reflect some or all of the light rays that
strike them and change their direction. However, a plane
(or flat) mirror is unique because it reflects all light rays
at the same angle, and that angle is just the opposite of the
angle at which light strikes the mirror. As a result,
you are able to see an image in the mirror. Still water
will also reflect light in much the same way and will allow
you to see a reflection, as will a polished flat metal
surface.
If your mirror was thick, you may have noticed that the mark
on the mirror was actually a little in front of its
image. If so, did you need to center the straw with the
mark, or with the image of the mark to get two equal
angles? Do you know why?
Going Further: Can
you design another experiment to measure the angel of
incidence and the angle of refraction?
A periscope
is a device used on submarines that allows the person using
it to see above the surface of the water from below.
In this experiment, we will apply what we have learned so
far about light to make and use a periscope.
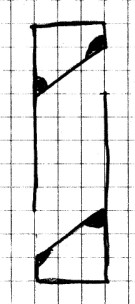
Materials Needed: Two
mirrors; cardboard or paper; scissors; tape; modeling clay.
Procedure: Try to
find two small mirrors such as makeup or compact mirrors that
are exactly the same size. Make a square cardboard tube
about 1 meter (3 ft) long. It should be as wide as the
width of the mirror, but a little shorter than the length of
the mirror. You will eventually tape this tube together,
but don’t tape it just yet.
Cut a square hole near the top of one side of the tube about
the width of the mirror. On the opposite side, cut the
same size hole near the bottom. Using tape and modeling
clay, secure one of the mirrors at a 45º angle as shown, shiny
side down and facing the hole. Then, mount the bottom
mirror, shiny side up and facing the bottom hole. Tape
the tube together. Use a single piece of tape until you
are sure the mirrors are mounted correctly.
Hold the periscope over a fence. You should be able to see
over the fence by looking into the bottom mirror. If
necessary, adjust the mirrors for the best result and tape the
periscope securely.
What Happened: When
the mirrors are at a 45º angle to the tube, light coming into
the top of the periscope is reflected 90º. This causes
it to go down to the bottom mirror, which is also mounted at a
45º angle, but opposite of the first. This reflects the
light another 90º into your eyes, and you see the image
reflected from the top mirror.
This works the same way as a periscope on a submarine, except
that submarine periscopes use prisms rather than mirrors to,
and most also use lenses to magnify and sharpen the
image. (More about prisms a little later!)
Most materials reflect light to some extent, but
some materials reflect light better than others.
Materials Needed: Flashlight;
dark
room with a white or light colored wall; mirror; aluminum
foil; tape.
Procedure: Stand in
the dark room with a flashlight. Stand to one side of
the mirror and shine the light on the mirror. Observe
the reflection of the light.
Tape a piece of aluminum foil on a convenient spot with the
shiny side up. Stand to one side of the foil and shine
the light on the foil as you did with the mirror. Again,
observe the reflection.
Remove the foil, crumple it up and smooth it out again.
Put it back up in the same spot and repeat the last
step. What does the reflection look like now?
Finally, shine the light on the wall at an angle. Do you
see any reflection of this light. (You may have to look
carefully.)
What Happened: The
mirror reflected the light almost perfectly. The smooth
foil did not reflect the light quite as well. The
reason is that the foil is smooth and polished, but not quite
as smooth and flat as the mirror. Thus, the light rays
were reflected, but they were not all reflected in exactly the
same direction. Then, when you crumpled the foil, you
made the foil much less smooth, and the light rays were
reflected in many different directions. You may have
been able to see a “fuzzy spot” of light, but it was not
nearly as clear as the mirror or the smooth foil.
Finally, the white wall reflected light, but it scattered the
light rays in many different directions. If you looked
carefully, you probably could see a fuzzy concentration of
light, but it was even fuzzier than the crumpled foil.
The more light rays are scattered, the less well the surface
will reflect light.
We have seen that rays of
light may be reflected or bounced off of a surface. These
next experiments show us how light rays may be bent.
The process of bending light rays is called “refraction”.
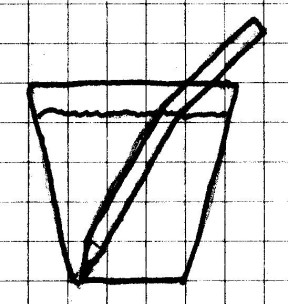
Materials
Needed: Clear drinking glass; pencil; water.
Procedure: Place
the pencil in the glass and allow the top portion of the
pencil to rest on the edge of the glass. Fill the glass
about 3/4 full of water. Look at the pencil through the side
of the glass. What do you see? Move the pencil
upright. Now what do you see?
What Happened: The
pencil
appears to be sharply bent at the surface of the water.
As light rays pass from the air to the water, they are bent or
refracted. Since the image you see comes from light rays
reflected off the pencil from above and below the surface, and
since the water bends the rays below the surface, the pencil
appears to be bent. Only when the pencil was stood
straight up did you see little or no bending.
Going Further: Look
at any distant object through an empty glass. It will
almost certainly look distorted. Glass will also bend or
refract light. How much the light is refracted depends
on the thickness of the glass, how smooth the surface is, and
the shape of the glass. The image may look distorted
because the rays of light are not all bent in the same
direction. In smooth flat glass, such as a window pane,
there is very little distortion, but even here, if you look
carefully, you may see some distortion.
Materials
Needed: Coffee cup with straight sides; coin; water.
Procedure:
Place the coin in the bottom of the cup on the side opposite
from you. Look into the cup from above. Move your
head back until the coin just disappears. Now, without
moving your head, slowly fill the cup with water (or have
someone fill it for you). What do you see?
What Happened: The
coin again came into view as you filled cup. As
light rays passed from the air to the water, they were bent or
refracted. This allowed you to see the coin from an
angle that you could not see it when there was no water to
bend the light. In the same way, when you walk along the
edge of a pond, the refraction of light by water prevents you
from seeing objects where they really are.
Not all objects allow light to pass through
them. We can group objects into three different
categories by how light passes through them.
Materials Needed: Piece
of
clear glass or plastic from a picture frame (or clear plastic
packing material); piece of white paper; piece of
cardboard; flashlight.
Procedure: Place the
flashlight behind the glass or plastic and shine it through
the plastic. Do the same thing with the paper and the
cardboard. Notice what you see in each case.
What Happened: When
you shined the flashlight through the clear glass or plastic,
you were able to see not only the light, but also the
flashlight, and anything on the other side. In other words,
you could see through the glass or plastic. This is
because the glass or plastic allowed all, or nearly all, of
the light to pass through without being refracted. When
an object allows light to pass through without interference,
it is said to be “transparent."
When you shined the light through the paper, you could see the
light from the other side, but you could not see through the
paper. That is because some of the light was allowed to
pass through the paper, but the light that was able to pass
through was refracted, or bent, in many different
directions. The more the light is scattered, the less
clear the image is. An object that allows light to pass
through it, but refracts it in many directions so that you
cannot see through it, is said to be “translucent.”
Many glass shower doors, the glass surrounding most
light bulbs, and “frosted” glass are examples of translucent
objects. Some light can pass through, but it is
scattered, and you can’t see through these objects.
Finally, light could not pass through the cardboard at
all. An object that will not allow any light to pass
through is said to be “opaque”.
Going Further: Try to
identify at least three objects around your home that are
transparent, translucent, and opaque.
So far, you have seen that light rays may be
reflected or refracted. You have already seen at least
one useful object that takes advantage of reflection, the
mirror. We can also use refraction and reflection to
make images larger or smaller. This has many practical
uses. These next few experiments will demonstrate how
reflection and refraction change an image size.
Materials
Needed: A shiny metal spoon; straight pin.
Procedure:
Hold the spoon a couple of feet away from you. Look at
your reflection on the outside of the spoon. Turn the
spoon over and look at your reflection on the inside of the
spoon. Is there any difference?
Hold the point of the straight pin inside the spoon.
What does the reflection look like?
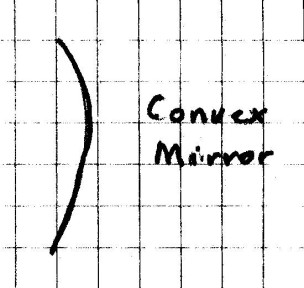
What Happened: The
bowl of the spoon forms a mirror on both the inside and the
outside. The outside of the spoon bowl bulges outward in the
middle. It forms a convex mirror. The image you
saw of yourself was very small. The convex mirror will
reduce the size of an image.
The inside of the spoon bowl is curved inward and forms a
concave mirror. You could see yourself in this spoon,
but your image was upside down or inverted. The image
was also reduced in size. A concave mirror will invert
distant images and will make them appear much smaller.
However, when you placed the straight pin inside the bowl of
the spoon, its image was actually magnified. A
concave mirror may be used to magnify nearby objects.
Materials
Needed: A makeup or shaving mirror that magnifies; a
flat mirror.
Procedure: You will
need to find a makeup or shaving mirror that magnifies the
image of your face when you look into it. Many makeup
mirrors magnify on one side and have a plane (flat) mirror on
the other, so if you can find a friend who has one, ask that
person to let you examine it.
Feel the surface of the magnifying mirror. Can you feel
a curve? Look at the mirror from the side. Can you
see that it curves inward slightly in the middle?
Compare the size of the image of your face when you look in
this mirror to the size of your image in the plane mirror.
Hold the mirror up so that you can look at the image of a
distant object behind you in this mirror. What do you
see.
What Happened: When
you examined the surface of the magnifying mirror, you should
have been able to observe a very slight inward curve toward
the middle. Since a magnifying mirror is curved inward,
it is a concave mirror, just like the inside of the spoon.
However, because it is only slightly curved, it will magnify
clearly to a greater distance than the inside of the spoon.
The image of a distant object appear upside down in this
mirror, as in the concave side of the spoon, or, if the curve
is very slight, it may just appear fuzzy. Which does your
mirror do?
Going Further: Look
into the mirror while slowly backing away. Can you find
the point at which your image becomes inverted (turned upside
down)?
Materials
Needed: A car with right and left rear view mirrors;
a friend.
Procedure: Examine
both side mirrors carefully. Does either mirror have a
curved surface. If so, how does the mirror curve?
Do you see any writing on either mirror? If so, what does it
say?
Sit in the driver’s seat and adjust the mirrors so that you
can see out of both. Have your friend to stand far
enough back so that you can see him or her out of both mirrors
at the same time. If the person can’t move that far back, have
them stay the same distance back, but to move sideways so they
can be seen, first in the driver’s side mirror, and then in
the passenger side mirror. Do you see any difference in the
two images?
What Happened: Unless
the car you are looking at is a very old car, the mirror on
the driver’s side will be flat, and the mirror on the
passenger side will be curved outward slightly. This is
a convex mirror. It will usually have the words,”Objects
In This Mirror Are Closer Than They Appear”, or something
similar printed on it.
Your friend appeared smaller in the concave mirror on the
passenger side than the flat mirror on the driver’s
side. The purpose of this mirror is to reduce the size
of the image so that the driver can actually have a wider
field of view on the passenger side. This allows the
driver to see more of what is behind the car than could be
seen in a plane (flat) mirror. There is a “blind spot”
where you cannot see beside the car through the mirror on that
side, but the convex mirror allows you to see more than a
plane mirror would, and so makes the “blind spot”
smaller. However, a car coming from behind will have a
smaller image in this mirror, and so will appear to be farther
away than it actually is. This could be dangerous, so
car manufacturers print the warning on this mirror. By
the way, we call a flat mirror a “plane mirror” because a flat
surface is sometimes called a “plane” surface.
There are more light experiments on the Light - Part 2 page, or you can
find links to lots more stuff on the Experiments page.