The
Science Notebook
The
Science NotebookLight - Part 2
The
Science NotebookHome Terms of Use Safety Contact Us Experiment Pages Downloads Supplies Useful Links!
While mirrors reflect light, lenses refract (bend)
light. A lens may be made of any clear substance that
has the ability to refract light - even water.
Materials
Needed: Thin piece of clear plastic from the window
of a mailing envelope, a "blister pack," or a report cover;
page from a magazine or newspaper; eyedropper or soda straw;
water.
Procedure: Cut a small
square of the plastic and place it directly on top of the
printed page. Using the dropper or straw, place a small
drop of water on top of the plastic. Observe the shape
of the drop.
Move the drop over some small print on the page. What do
you see?
What Happened: The
water drop beaded up on the plastic creating a curved surface
on the top of the drop. The print under the drop was
magnified.
Water will bend or refract
light. (See
experiments on the first Light page.) When water
takes on a curved shape, as it does here, the water refracts
the light just like a lens. The shape of the water drop
is thicker in the middle than along the edges. The water
drop forms a convex lens.
Going Further: Try
experimenting with different size drops. Do larger or
smaller drops magnify better? If you can get a
microscope slide or clear flat plastic from packaging
material, place a drop of water on it, and hold it just
above a few grains of salt with the water drop directly over
them.
Materials
Needed: A magnifying glass; some small objects to
observe.
Procedure: Examine
your magnifying glass carefully. Use it to observe the
objects you have chosen. What happens as you move the
magnifying glass farther away from the objects?
What Happened: The
common magnifying glass is thicker in the middle than around
the edges on both sides. This type of lens is called
a “double convex lens”. This shape allows both
sides to refract light and magnify. The water drop in the last
experiment was convex on one the top only. The bottom
was flat.
When you brought the lens close
to the object, the object appeared to be bigger when viewed
through the lens. As you moved the lens away from the
object, it appeared to grow bigger still until the image you
saw in the lens became "fuzzy" or out of focus.
A water drop is a very crude lens, but it does
magnify. In this experiment, we will improve the water
drop lens.
Materials Needed: A
short piece of thin wire, such as magnet wire; sharpened
pencil; water; magnifying glass; magazine or newspaper page.
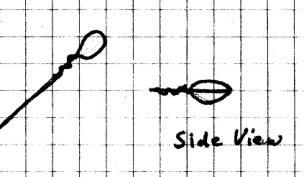
Procedure: Twist one
end of the wire around the pencil point to make a small
loop. Dip this loop into some water to form a drop of
water inside the loop. Use the magnifying glass to
examine the shape of the water drop on the wire.
Look at the print on the page through the water in the
loop. Does it act like a lens?
Shake some of the water off of the loop, and examine it again
with the magnifying glass. What is the shape of the
water drop now? Will it still magnify?
What Happened: The
water lens you have just made was an improvement on the water
drop. The top and bottom of the lens were both
curved. How much they were curved depended on how much
water was in the drop. If the drop had too much water, it was
rounded out, or convex, on both sides, but probably sagged
downward due to gravity. The drop could have been too
thick to see anything clearly. By experimenting, you can
get just enough water on the loop to make a fairly good double
convex lens.
If you shook enough water off so that only a small film was
left, the water lens was thicker on the edges than in the
middle. When a lens is thicker on the sides and thinner
in the middle, it is a concave lens.
Lenses may be either convex, concave, double convex, double
concave, or convex and concave. It all depends on how
the lens is to be used.
Going Further:
Experiment with different size loops and different amounts of
water to see which combination makes the best lens. Keep
a record of your tests.
A water drop may be used to make a very simple, but
surprisingly powerful, microscope.
Materials Needed:
Small piece of thin flat clear plastic from a "blister pack,"
report cover (or you can substitute a microscope slide cover
slip); clear glass jar and lid, such as a mayonnaise or peanut
butter jar; nail; hammer; dropper or straw; water; salt.
Procedure: Wash the
jar and lid thoroughly with warm soapy water. Rinse and
let it dry.
If the lid has a cardboard liner
on the inside, carefully remove it. Then, using the nail
and hammer, punch a hole in the center of the jar lid.
Cut a piece of flat plastic about an inch square, and tape it
around the edge over the hole in the lid. Leave the
center of the plastic clear. Place a small drop of
water on the plastic directly over the center of the hole.
Turn the jar over. Sprinkle some salt on the bottom of
the jar. Carefully move the jar lid over the salt
crystals. Place your eye near the water drop and move
the jar lid up or down over the salt to bring the crystals
into view. What do you see?
What Happened: This
is a practical use for the water drop lens. It will magnify
small objects many times. However, you may have to
experiment with the size of the hole, and of the water drop,
to get the best possible image.
Going Further: Try to
improve your microscope by wrapping the sides of the jar with
dark construction paper and putting a small light source
inside the jar. You can use a small flashlight, or you can
make your own light source using a miniature white Christmas
tree light. (See the Magnetism and Electricity pages)
One property of a lens is its ability to focus or
concentrate light energy.
CAUTION! This experiment poses a
small fire hazard. Think safety, and do this with
adult supervision only!
Materials Needed: Magnifying
glass;
paper; a sunny day; pail of water.
Procedure: Find a
sunny spot on a driveway or other area that is free from
leaves, dry grass, or anything else that can burn. Keep
the pail of water nearby. Hold the flat part of the lens
toward the sun, and hold the paper behind the lens as
shown. You should see a bright spot on the paper.
Move the lens back and forth until the spot is as small as
possible. At this point, you may be able to see that the
bright spot is actually an image of the sun.
Hold the paper in place until it just begins to smoke.
What happens? Dip the paper into the pail to put out any
fire.
What Happened: All of
the energy from the sun striking the entire area of the lens
was refracted by the lens and focused into a small
spot. The distance from the lens to the paper where the
spot is focused is called the “focal length.”
Because all of the energy going into the lens was concentrated
into such a small spot, there was enough energy present to
raise the temperature of the paper so that it was hot enough
to burn.
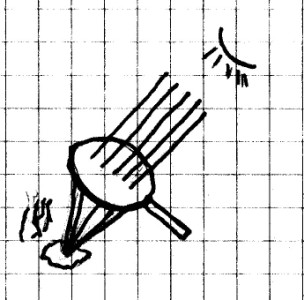
A concave mirror can also focus or concentrate
light energy. In this experiment, we will make a crude
concave mirror from an old umbrella and aluminum foil and
use it to focus sunlight.
CAUTION! This experiment poses a
small fire and burn hazard. Think safety, and do this
with adult supervision only!
Materials Needed: Old
umbrella; aluminum foil; a sunny day.
Procedure:
Open the umbrella. If possible, have an adult to remove
the handle of the umbrella. However, if you can’t safely
remove the handle, just leave it.
Line the inside of the umbrella with aluminum foil. Use
the shiny side and keep the foil as smooth as possible.
Look inside the umbrella. If you have worked carefully,
you can probably see a very crude reflection. You have
just made a crude concave mirror.
Take the umbrella outside and point the shiny inside toward
the sun. Do not look directly inside the umbrella.
Hold a piece of paper over the umbrella and see if you can
find a bright spot. Move the paper back and forth over
the center of the umbrella until you find the brightest
spot. Hold the paper there and see if the paper will
begin to smoke. (If you feel your hand starting to get
warm, move it away!)
If the paper is not hot enough to smoke, place your hand over
this spot. How hot is it?
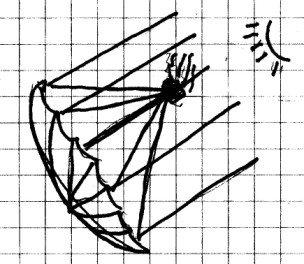
What Happened: There
was a point above the umbrella where the energy was most
concentrated. How hot this point got depends on the
shape of the umbrella and just how smooth the foil was.
Some of these umbrella mirrors can get very hot!
As light fell on the surface of the foil, it was
reflected. Because the foil surface was curved, the
light rays were all reflected at a slightly different
angle. In a well constructed concave mirror, all of the
light will be reflected to a single point, the focal
point. Since all of the energy reflected by the mirror
is focused in this one spot, it can become very hot. In
this crude congave mirror, the light was focused to a
relatively small area, but because the surface was not smooth
and the reflector was not perfect, the light was not focused
to a single point.
A concave reflector is sometimes called a “parabolic
reflector” because if its curved shape. It reflects
energy from the entire surface and focuses it on a small
spot. Satellite dish antennas are parabolic antennas
that focus radio waves just as parabolic mirror focuses light
rays. They concentrate the small amount of radio energy
striking the whole dish into one spot to get the strongest
possible signal.
Going Further: If you
have a good reflector, you may want to use a candy or oven
thermometer to see how hot it is at the focal point. Can
you design a device to hold the thermometer safely in place?
When we see colors we are seeing one or more colors
of light. A beam of white light is actually made up of
different colors of light. We can see these colors by using
the properties of mirrors, glass, water, or other substances
that can reflect or refract light. The most common device
used to do this is the “prism.” A prism is a
triangular shaped piece of plastic or glass that will
refract a beam of light which passes through it. Your
school science lab probably has at least one that you can
borrow. Also, many museum and school stores sell very
inexpensive ones.
Materials
Needed: A prism; a window through which the sun is
shining; a sunny day; white paper; a friend.
Procedure: Locate a
window where the sun is shining. If there are curtains
or blinds on the window, close them so as to get as small a
sunbeam as is possible. Also, you should close as many
other blinds or curtains on other windows as possible, in
order to darken the room. A dark room is not essential,
but the darker the room, except for the single sunbeam, the
better you will be able to see the results.
Hold one side of the prism in the sunlight and look around the
room. You should see a light spot somewhere in the room,
and you should also see a rainbow pattern in another part of
the room. You may have to look carefully for the
pattern, but it will be there. If you don’t see it at
first, move the prism around a bit. If you have
sunlight, you will be able to find the pattern.
Once you have found the rainbow pattern, have your friend to
place the white paper in it’s path. Move the prism and
the paper so as to make the brightest and widest pattern
possible. Study the colors that you see. How many
can you identify?
What Happened: The
glass or plastic in the prism refracts the light going into it
until it reaches the edge of another side. The other
side then reflects some or all of the light out through the
third side. (See diagram) Different colors of light are
refracted at different angles, so the white light separate
into the colors of the rainbow pattern. This rainbow
pattern is called the “visible spectrum.”
If you look carefully, you can see many different shades of
color, but scientists often name seven colors in the
spectrum. You should be able to see them in the
following order: red, orange, yellow, green, blue, indigo (a
bluish purple) and violet (purple). Sometimes, you will
not be able to see each of these colors clearly, depending on
a number of things. The brightness of the light and the
quality of the prism are just two. Also, the colors will
gradually change from one to the other. There are not
sharp bands of color.
However, these colors will always be seen in this same order,
and you can remember the order just by remembering the name
“Roy G. Biv”. Each letter in the name is the first
letter of the color of the spectrum in its proper order!
Going Further: Try
using the prism to view other types of light such as from a
flashlight, an electric light bulb, and a fluorescent
light. Are you able to see a spectrum? If so, how
many different colors do you see?
Materials
Needed: A clear smooth water glass or jar; water; a
sunny window; white paper.
Procedure: This is not
always the easiest experiment to do, and you may not initially
see a spectrum when you do it. The best spectrum will be
produced by a glass container that has smooth sides and a flat
bottom with little or no curve from the side to the bottom,
such as a plain drinking glass, but if you don't have one, try
what you have. You should see a spectrum with most any
clear glass container.
Fill the container with water
about halfway to the top and set it on the edge of a window
sill with about a third of the bottom hanging over the edge of
the sill, Place it so that the sun is shining on
it. When the water is no longer moving, look on the
floor below and behind the container. You should see a
circle of light on the floor and on the edge of that light, a
spectrum. This spectrum may be made clearer by placing a
white sheet of paper on the floor. What you will see and
where you see it will depend on a number of things including
how much water is in the container, how smooth the glass is,
and the angle of the sun when it hits the glass.
Depending on these factors, the spectrum from the water glass
may not be as bright or colorful as the spectrum from the
prism, but you should be able to see that it is there.
If you don't see a spectrum at first, try changing some of the
things shown in "Going Further" below. However, be sure
to vary only one thing at a time, so you'll know what you
changed to make it work. This will work.
What Happened: The
light was refracted as it passed through the rounded surface
of the glass and water. This separated the sun light
into it’s different colors, just as the prism did.
Going Further: Try
different sizes and shapes of clear glass containers.
Also try viewing the spectrum with the sunbeam striking the
glass at different angles, and with different depths of water.
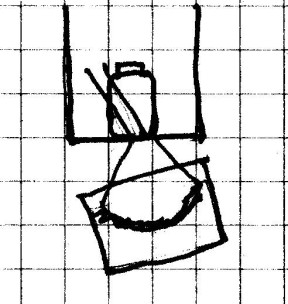
Materials
Needed: A small mirror; a small bowl; modeling clay;
a sunny window.
Procedure: Use a
small ball of modeling clay to make support the mirror in the
bowl at about a 45 º angle as shown. Fill the bowl with
water and place it in the windowsill with the mirror facing
the sunlight. Look on the ceiling for the visible
spectrum. If you don’t see it right away, adjust
the angle of the mirror until you get a good spectrum.
What Happened: The water and the mirror created a triangular
shaped surface that refracted and then reflected the light,
much like the prism. Again, the spectrum may not be all
that colorful, but it should be visible.
Materials
Needed: An old compact disc; a sunny location.
Procedure: Hold the
shiny side of the CD so that it faces the sun. Move it
to one side, and you should immediately see one or more sets
of visible spectra (plural of spectrum).
What Happened: There
are many thousands of tracks in a CD that are used to store
information. Each of these individual tracks acts like a
miniature prism. When combined together they produce a
very brilliant and colorful spectrum.
It is very difficult to see the spectra of light
other than sunlight just using a prism. You need a
dark room and a way to focus the light into the prism.
However, the CD gives a much brighter spectrum, and so can
be used to study these spectra.
CAUTION! Always be careful to follow
all safety precautions when using fire, and use with adult
supervision only! Keep your candle in an aluminum pie
pan, and keep the flame at least three feet away from
anything that can burn, unless otherwise instructed.
Materials Needed: An
old compact disc; flashlight; candle with safety holder; dark
room.
Procedure:
In
a dark room, shine the flashlight at an angle on the CD.
You should see its spectrum very clearly in the CD. Also
look for the reflection of the flashlight on the wall.
Carefully move the CD until you see the spectrum of the
flashlight on the wall. How does it compare to the
spectrum of sunlight?
Repeat this with the lighted candle. Be very careful
when working with the candle!
What Happened: You
should have seen the same colors as in the spectrum for
sunlight, and in the same order. (They always
are.) However, you probably also noticed that the reds
and oranges were more visible than the blue and green end of
the spectrum, particularly with the candle. This is
because the light given off by the flashlight and the candle
has more color from the red end than from the violet end.
Going Further: Try
this with other light sources. If possible, enclose the
light source inside of a box with a hole in it that lets out
only a small portion of the light.
When you see a rainbow in the sky, it has the same
colors as the visible spectrum. In this experiment,
you will make an artificial rainbow.
Materials Needed:
Garden hose with sprayer nozzle; a sunny day.
Procedure: Set the
sprayer to spray as fine a mist as possible. With your
back to the sun, spray the water in front of you. You
should see a rainbow in the mist.
What Happened: You
have already seen how a container of water can act as a
prism. Each drop of water in a rainstorm, or from the
garden hose is in the shape of a ball or sphere. Each
sphere of water acts as a prism to refract light. When
you see a rainbow, you are actually seeing the spectra
produced by many thousands of raindrop prisms.
You may also recall that the glass of water produced a prism,
but that the spectrum was in the shape of a semicircle.
The rainbow has a semicircular shape because the raindrops
that produce it are round as well.
We see objects because light is reflected from
those objects to our eyes. The color of an object
depends on the color or colors of light
it reflects. An apple appears to be red because
when light strikes it, the red portion of the light is
reflected. The other colors are absorbed as heat
energy. This experiment will show that the different
colors of light combine to produce white light.
Materials Needed:
Small hobby motor with battery and battery holder; modeling
clay; new pencil eraser; pliers; straight pin; strong glue;
compass; white cardboard; markers or crayons.
Procedure:
Using your compass, draw a 7 cm (3 in) diameter circle
on the cardboard and cut it out. Use your protractor to
divide the circle into 45 segments of 8º each. Color the
segments as follows:
| Color ****** red orange yellow green blue purple |
# of
Segments
to Color *************************** 5 4 7 7 7 15 |
ALTERNATE METHOD
Use your protractor to divide the circle into six segments as
follows, and color the segment as indicated.
| Color ****** red orange yellow green blue purple |
Degrees
in Segment ************************ 40 32 56 56 56 120 |
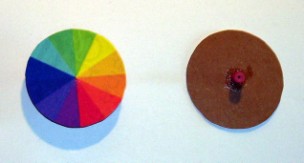
Use the pliers to pull a new
eraser from a pencil. Using the straight pin, punch a
hole from the top all the way through the center of the
eraser. Try to make this hole as straight as possible.
Glue the bottom end of the eraser to the back center of the
cardboard circle and let it dry thoroughly.
Prepare a hobby motor and battery holder. Secure the bottom end of this motor
to a small board with a lump of modeling clay to hold it in
place. Push the end of the eraser over the motor shaft
using the hole you made earlier. It should fit tightly!
Check to make sure it is secure.
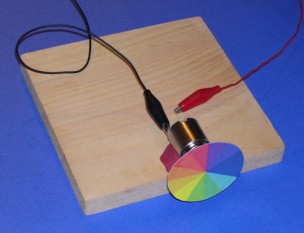
Hook up the battery to start the
motor and observe the colors on the circle.
What Happened: The
colors on the disc blended to white, or nearly white. As
the wheel turned rapidly, the light from all of the colors
were reflected back to your eyes and appeared to blend
together. Since the reflected colors are all part of
white light, it should not be surprising that the disc should
appear white.
Going Further: Once
you have made your own wheels, you can try a
couple wheels that have already been done for you by
clicking on the links below.
How do these compare to the one you did?
Also, try combinations of
colors an see what they combine to produce. For example,
make a disc that is half blue and half yellow. What
color does the spinning disc produce?
Materials
Needed: Crayons or markers; paper.
Procedure: There are three primary colors that may be used to
produce many others when their pigments are mixed
together. Pigments are the materials used to color inks,
dyes or paints. The primary colors that you will be
using are red, blue and yellow.
On a piece of paper, combine two of the primary colors by
making a mark with one of them and marking over that mark with
the other. Notice what color is produced. Fill in
your results on the chart below.
| RED | BLUE | YELLOW | |
| RED | X | ||
| BLUE | X | ||
| YELLOW | X |