The
Science Notebook
The
Science NotebookLiquids - Part 2
The
Science NotebookHome Terms of Use Safety Contact Us Experiment Pages Downloads Supplies Useful Links!
Have you ever seen a small insect walking on the
surface of water in a pond? If you looked carefully,
you may have noticed that the water seemed to bend downward
at the bug’s feet. The bug wasn’t “floating” on the
water. Instead, it was walking on a thin film of
tightly packed water molecules. This thin film is
called “surface tension”. This next series of
experiments explore the property of surface tension of
water.
Materials
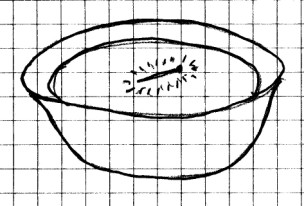
Needed: Small container such as bowl, jar or
glass; straight pin; small piece of paper towel, fork.
Procedure:
Rinse the container with clean water to remove any soap film
that may have been left from washing. Fill the container
almost full of water. Make sure the pin is clean and
dry. Place a piece of paper towel just a little larger
than the pin on the surface of the water. Carefully
place the pin on the paper towel. Push down gently on
the paper towel edges with the fork to make the towel sink,
being careful not to touch the pin.
Remove the pin with the fork. Dry both the pin and fork, but
do not touch them with your hands. Now carefully try to
place the pin on the surface of the water without using a
paper towel, by gently lowering the pin onto the water’s
surface with the fork. This may be a little more
difficult, but it can be done.
What To Look For:
Carefully notice the water around the pin in each case.
What do you see?
What Happened: When
the paper sank, the pin stayed on the surface of the water. If
you looked carefully, you saw that the water appeared to be
pushed downward around the edges of the pin. If you had
a steady hand, you were also able to make the pin rest on the
water without the paper towel. In fact, the only thing
the paper towel did was to hold the pin level on the surface.
In both cases, the pin rested on the surface of the water
because of surface tension. The specific gravity of iron
is far greater than 1, and if it were not for surface tension,
it would sink.
Going Further: Can you
place other objects on the surface using surface
tension? Try a paper clip or a plastic strawberry
basket.
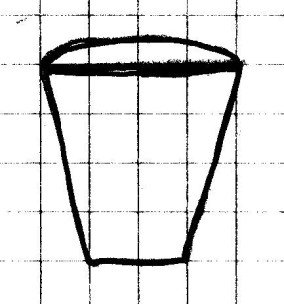
Materials
Needed: Two drinking glasses or similar containers;
dropper or drinking straw; water.
Procedure: A little
water will be spilled in this experiment, so it is a good idea
to do this on a counter top near a sink. You should
probably also have a towel handy to wipe up small spills.
Fill one of the containers all the way to the brim with
water. Put some water in the other container and begin
adding water from this container to the first one by
drops.
If you are using a straw, stick the straw in the water, place
a finger on one end, and remove the straw. With a little
practice, you can drop water one drop at a time by quickly
removing your finger and replacing it. You may want to
practice this first until you get the hang of it.
In either case, keep adding water until water begins to run
down the side of the container. Pay close attention to the
surface as you add water, by looking at the surface at eye
level.
What Happened: You
were able to add a surprising amount of additional water
to the already full glass. As you added water, the
surface began to bulge upward. This bulge upward was
caused by surface tension. The surface tension acts like
a “skin” to hold the water together until the weight of the
water becomes stronger than the surface tension, and causes it
to spill over the side of the container.
Going Further: Try
adding clean paper clips or pennies instead of water drops to
a full container of water. See how many you can add
before the container overflows.
Materials
Needed: Small bowl or similar container; water;
ground pepper; bar of soap.
Procedure: Fill the
bowl about 3/4 full of water. Sprinkle some ground
pepper on the surface. Place a corner of the bar of soap
near the edge of the bowl. What happens to the pepper?
What Happened: The
pepper rested on the surface due to surface tension. Soap
cleans in part by weakening surface tension. When the soap was
placed in the water, it weakened the surface tension
immediately surrounding it, and the pepper was drawn away to
where the surface tension was still strong.
Going Further: Try
this same experiment using baby powder instead of
pepper. Also, what happens if you leave the container
undisturbed for a while?
Materials
Needed: Small bowl or similar container; water;
ground pepper; cooking oil, tooth pick.
Procedure: Fill
the
bowl with water and sprinkle some ground pepper on the
surface, as you did in the last experiment. Dip the
toothpick into the cooking oil and place the oily end near the
edge of the bowl. What happens to the pepper this time?
What Happened: Just as
soap weakened surface tension, so did the oil.
Going Further: Try
this experiment using baby powder instead of pepper.
Does it make any difference?
We can use what we have
learned in the last two experiments to make a neat little
boat powered by weakening surface tension.
CAUTION! Always use sharp objects
such as knives or scissors with adult supervision
only! Hold any sharp point away from your body,
particularly your eyes.
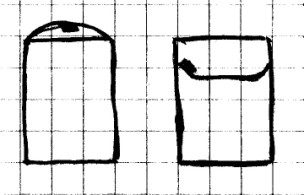
Materials Needed: Thin
cardboard; scissors; soap; tooth pick; cooking oil; bath tub
or sink filled with about 3 cm (1 in) or so of water.
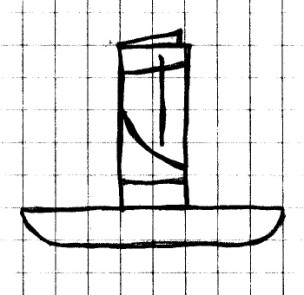
Procedure:
Cut out two small boats from the pattern shown. Use your
fingernail to scoop out a pea sized piece of soap from a bar
of soap. Push this soap into the notch in the back of
one of the boats. Place the boat in the water.
What happens?
Remove the first boat and place the other boat in the
water. Dip the toothpick in cooking oil and place a drop
of oil in the back notch. What happens?
What Happened: Both
boats moved forward through the water because they rested on
the water due to surface tension. Both the soap and the
oil weakened the surface tension behind the boats, and the
stronger surface tension pulled the boats forward.
Going Further: How
long will these boats keep moving in a bathtub or sink?
What will cause them to stop moving?
Materials
Needed: Small bowl or similar container; new rubber
band; bar of soap.
Procedure:
Most new rubber bands are curved at either end and are shaped
a little like a race track or a flattened oval. This is
the type you want to use. Fill the bowl about 3/4 full
of water and place the rubber band on the surface. Touch
the bar of soap in the center of the rubber band. What
happens?
What Happened: The
rubber band spread out into a circle or nearly so. The
soap weakened the surface tension inside the rubber band, but
could not get to the water outside. The stronger tension
on the outside pulled the rubber band outward in all
directions, giving the rubber band the circular shape.
Going Further: You
probably can predict the result without doing the experiment,
but just for fun, try this using cooking oil instead of soap.
Materials
Needed: Small container such as a bowl, jar or
glass; straight pin; small piece of paper towel, fork; liquid
soap such as dish detergent; spoon.
Procedure:
Fill the container almost full with water. Using the
paper towel and fork, place the pin on the surface of the
water as you did earlier. Add a drop of soap to
the surface. Keep adding soap until the pin sinks.
Remove the pin with the fork. Rinse both the pin and fork to
remove the soap. Stir the water gently with a
spoon. Try to rest the pin on the surface. Can you
do it now?
What Happened: When
you added the first drop of soap, the pin may have moved away
from the soap, and you should have expected that to
happen. If the soap dissolved quickly enough, the pin
may have even sunk without any more soap being added. In
any case, two or three drops was probably enough.
Once the soap was mixed with the water, the surface tension
was weakened to the point that you could not rest the pin on
the surface. Soap cleans in part by acting on water to
reduce surface tension which tends to hold dirt.
Going Further: Do this
experiment with cooking oil instead of soap. What is the
difference?
These next experiments will show an interesting
property of water known as “capillary” action.
Materials Needed: Small
container
with straight sides such as a plastic film container or test
tube; paper; tweezers; water.
Procedure:
Fill the container almost full with water. Notice how
the water curves up around the edges. Tear off a small
piece of paper and use the tweezers to float it on the
water. Where does the paper move? Remove the
paper.
Carefully fill the container so that the surface of the water
is exactly level. (A dropper may help you here.)
Again, float a piece of paper and observe where it goes.
Remove the paper.
Finally, fill the container so that the water’s surface is
bulging slightly over the top of the container.
Carefully float another piece of paper and observe where it
goes.
What Happened: When
the water level was below the top of the container, the edge
of the water curved upward due to a property called “capillary
action”, and we will learn more about it in the next two
experiments. When the paper was floated the first time,
the paper was drawn to the highest water level, which was
along the edge.
When the water level was even, the paper was not drawn in any
particular direction.
When the water level was above the top of the container, the
paper was again drawn to the highest point, but this time, the
highest point on the water’s surface was the center.
A floating object will tend to move to the highest point on
the water’s surface.
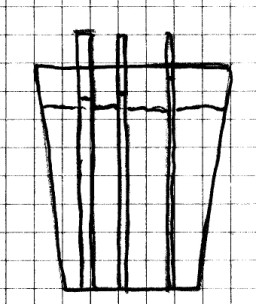
Materials
Needed: Several small tubes of different diameters
(see procedure); clear container such as a glass or jar;
water; food coloring or instant coffee (optional).
Procedure: For tubes
you can use soda straws that are clear enough to see liquid
through, a clear ball point pen barrel, or clear plastic
tubing or glass tubing (borrowed from your school lab).
The important thing is to get at least two different inside
diameters. (The diameter is the width of the tube from
one side to the other. The inside diameter is the width
from one side to the other as measured on the inside of the
tube.)
Fill the container almost full of water. If the tubing
you are using is difficult to see through, you may want to add
a drop of food coloring or a pinch of instant coffee to make
the water easier to see.
Place the widest tubing you have down into the water.
Hold it straight up. Observe the water level inside the
tube. Also notice the shape of the water inside.
Do the same thing for the other tubes you have. If you
like, you can place them all in the container at the
same time to make it easier to compare.
What Happened: You
should have noticed that the water level in the tubes were
slightly higher than the water in the glass. The smaller
the diameter, the higher the water level in the tube.
What you have observed is called capillary action.
Water molecules are attracted to molecules of many different
materials such as glass or plastic, and they tend to be drawn
up the sides of a container made of such materials. This
process of water being drawn up by other materials is called
capillary action. In the case of a tube, the smaller the
diameter of the tube, the higher the water will be
drawn.
Capillary action explains in part how a plant is able to get
water from it’s roots to through the stem and to the top of
the plant.
Materials
Needed: Two glass microscope slides or two small
rectangles of flat clear plastic cut to the same size as a
microscope slide from a “blister” pack; rubber band;
toothpick; clear container at least as wide as the
pieces of glass; water; food coloring or instant coffee
(optional).
Procedure: Place
the two pieces of glass or plastic together, with the
toothpick between them along one edge. Place the rubber
band around the glass plates as shown.
Put about an inch of water in the bottom of the
container. You can and add a drop of food coloring or a
pinch of instant coffee to make the water easier to see if you
want. Place the glass assembly into the water and observe the
water level inside the glass pieces.
What Happened: The
water level between the glass pieces rose as a result of
capillary action. The water level was higher where the
glass pieces were closer together, just as the water in the
previous experiment rose higher in the smaller diameter tubes.
Materials
Needed: Celery stalk with leaves; small jar; water;
food coloring; knife.
Procedure:
Fill the container about 3/4 full of water and add a few drops
of food coloring. If you don’t have food coloring try
using unsweetened tea or coffee that has been cooled.
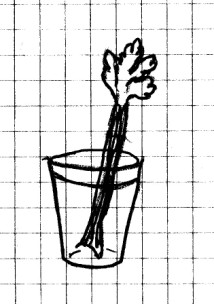
Cut about 1 cm (1/4 in) off the bottom of the celery stalk and
place it in the colored water. Leave it in a well lighted
place for a day. What do you see?
Remove the celery stalk and rinse with water. Cut the
celery stalk about half way up. Examine the cut area.
What do you see?
What Happened: Water
was drawn up into the plant through tiny tubes by capillary
action. The colored water allowed you to see this
clearly. When you cut the celery stalk, you saw colored
areas inside the stem. These colored areas are bundles
of even smaller tubes that are called “vascular
bundles”. These vascular bundles move the water up the
stem of the celery.
Materials
Needed: Two jars; water; dirt; strip of cloth;
support for one of the cans (see procedure).
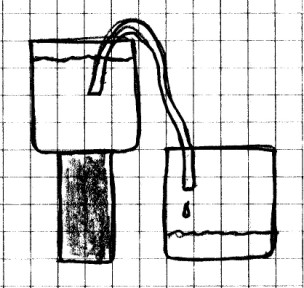
Procedure:
Fill one of the jars about 3/4 full of water. Add
some fine dirt to make the water muddy. Place this jar
on a support such as a brick, a block of wood or several
books. Place the other jar below the first jar as
shown. Put one end of the cloth in the dirty water and
the other end in the empty jar. Watch what happens as
you allow this to sit for a few hours.
What Happened: Water
was drawn up into the cloth by capillary action. The
particles of dirt were not. Once the water got to the
top of the cloth, gravity took over and pulled the water down
into the other can. The water in the bottom can was much
clearer.
Do not drink this water! Capillary action does not
purify the water, so the water is not safe to
drink. It only separates the water from the solid
dirt. If there are any poisonous chemicals dissolved in
the water, or if there are harmful germs in the water, they
will very likely still be there. Other processes are
needed to purify water so that it would be safe to drink.
These next experiments will explore the property of
water that we call evaporation.
Materials
Needed: Dinner plate; water; measuring cup.
Procedure:
Measure 50 ml (1/4 cup) of water. Pour this water into
the plate and place the plate in sunlight. Observe
the plate every 15 minutes or so for the next several hours.
What Happened: You
almost certainly were able to predict what would happen.
After a period of time, the water disappeared from the plate
or “dried up”. This process is known as
“evaporation”. The liquid water doesn’t really
disappear. Instead, it becomes a gas called water
vapor. You can’t see the vapor in the air, but it is
there, and it can be made to appear as we will see later on.
When water is exposed to air, it will usually evaporate, but
it does not always evaporate at the same rate or speed.
How fast water evaporates is affected by four things -
temperature, surface area of the water, wind, and
humidity. Because evaporation is so familiar to you
already, these next experiments may seem very simple at first,
and you may be able to predict what will happen in each
without even doing the experiment. However, don’t let
that stop you. Carefully observing each experiment will
help you understand just how each of these four factors affect
evaporation.
CAUTION!
Always be careful to follow all safety precautions when
using fire, and use with adult supervision only! Keep
your alcohol lamp or candle in an aluminum pie pan, and keep
the flame at least three feet away from anything that can
burn, unless otherwise instructed.
Materials Needed: Two
food tins; water; measuring cup; alcohol lamp or candle with
safety pan.
Procedure:
Measure 50 ml (1/4 cup) water into each of the food
tins. Set one aside. Heat the other one over a
heat source until the water begins to boil. Observe the
water carefully as it is heated. Allow the water to boil
until none is left in the can. Examine both cans.
What Happened: As one
can was heated, you probably saw steam began to form. As
the temperature of the water increased, steam continued to
form as the water began to boil. The water in the can
which was heated evaporated very quickly. In the time it
took to boil all the water away, some small amount of water
evaporated from the other can, but almost certainly not enough
to notice. Generally, raising the temperature of a
liquid will increase the rate at which it evaporates.
Materials
Needed: A small food tin such as a soup can; dinner
plate; measuring cup or beaker; water.
Procedure: Place 50 ml
(1/4 cup) of water into the food tin. Place another 50
ml (1/4 cup) of water on the dinner plate. Place both in
a warm sunny place and observe each container about every 30
minutes or so, until all of the water has evaporated from one
of the containers.
What Happened: The
water in the dinner plate was the first to evaporate. In
fact, it probably evaporated much more quickly than the food
tin. Even though the same amount of water was in both
containers, the surface area of the water (the part of the
water that was exposed to the air) in the plate was much
greater. This greater surface area allowed much more
water to be in contact with the air at one time. Since
more water was exposed to the air in the plate at one time
than in the tin, the water in the plate was able to evaporate
much faster.
Materials
Needed: Two food tins; two identical wash cloths;
measuring beaker; water; electric fan; clothes pins; string.
Procedure: Fill each
food tin with 50 ml (1/4 cup) of water. Place one wash
cloth in each food tin and allow each to soak up all of the
water in it’s tin.
Make a clothesline in a bathtub or over a large sink using the
string.
Hang the two wet wash cloths on the clothesline. Place
the electric fan so that it will blow directly in front of one
of the cloths, but will not blow on the other. Turn the
fan on and observe each cloth about every 10 minutes until at
least one is dry. Which is the first to dry?
What Happened: The
cloth in front of the fan dried much more quickly. A
current of moving air increases the rate of evaporation by
moving the water vapor away from the cloth and allowing the
water left in the cloth to evaporate at a faster rate.
Going Further: Why did
you need two identical wash cloths?
Materials
Needed: Two food tins; two identical wash cloths;
measuring beaker; water; clothes pins; string; damp
bathroom; another drier room (see Procedure).
Procedure: Fill each
food tin with 50 ml (1/4 cup) of water. Place a wash
cloth in each food tin and allow the cloth to soak up all the
water in it’s tin.
Hang one of the cloths in a damp bathroom where someone has
just taken a shower. Leave the door closed. Hang
the other cloth in another room in the house some distance
away from the bathroom. Observe each cloth every 15
minutes or so until one is completely dry. Which dries
first?
What Happened: The
cloth that was left in the drier room should have dried more
quickly than the one in the damp bathroom. The humidity,
or amount of water vapor already in the air, was much greater
in the bathroom than in the other room. When you
take a shower, some of the warm water evaporates into the air
and raises the humidity. The more water vapor there is
in the air, the less additional vapor it can hold, so it takes
longer for the cloth to dry in the humid air in the
bathroom. This makes sense if you think about it.
Things dry faster in drier air.
Let’s sum it all up.
You can increase the rate (or speed) of evaporation by (1)
raising the temperature of the water, (2) increasing the
surface area of the water, (3) creating an air current
around the water, or (4) evaporating the water in drier air.
We have seen that we can put
water into the air by the process of evaporation, but can we
get water out of the air? We sure can, as these next
two experiments will show.
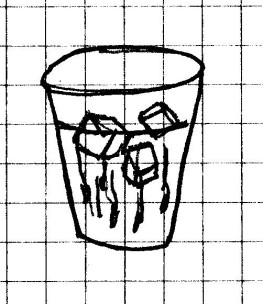
Materials
Needed: Glass container; ice; water.
Procedure: Fill a
glass container with ice and water. Allow it to set for
a few minutes and observe the outside of the glass. What
do you see?
What Happened:
Droplets of water formed on the outside of the glass
container. The air surrounding the glass was cooled by
the ice and water inside the glass. As the air
temperature surrounding the glass dropped, the air was forced
to give up some of it’s water vapor. The water vapor
turned into the liquid water you saw on the outside of the
glass. The process of water changing from a gas (water
vapor) to a liquid is called “condensation”.
Going Further: You may
be tempted to think that this water came from inside the
glass. To prove to yourself that it did not, repeat this
experiment, except use you favorite soft drink instead of
water. Taste the water that forms on the outside of the
glass. Do you taste any of the soft drink?
CAUTION!
Always be careful to follow all safety precautions when
using a stove, and use with adult supervision
only!
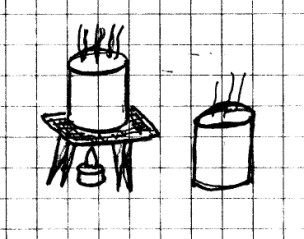
Materials Needed:
Large pot; frying pan; ice; water; oven mitts; stove.
Procedure: Fill the
large pot about 1/3 full of water. Place it on the stove
and allow it to come to a boil. While the water is
heating, place a layer of ice cubes in the frying pan and just
cover them with water. When the water in the pot is
boiling, carefully hold the frying pan about a foot over the
top of the pot. Notice what happens on the underside of
the frying pan.
What Happened: As the
water boiled, it produced water vapor. When that water
vapor came in contact with the cool underside of the frying
pan, the vapor condensed and formed drops of water which fell
back into the pot.
When the temperature of the air drops, the water vapor in the
air will condense into tiny droplets. If this happens
high in the air, you see these droplets as clouds. These
droplets are suspended in the air by air currents inside the
cloud. When these droplets bump into each other, they join
together and become heavier. Eventually, they become so
heavy that the force of gravity is greater than the air
currents, and they will fall as rain or snow.
If the water vapor condenses near the ground, you see it as
fog. You have probably noticed that fog usually forms in
the early morning when the air has cooled rapidly overnight.
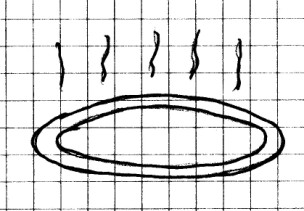
And one other thing. The
the visible wisps you see coming off the boiling water
are not water vapor. Water vapor is invisible.
What you see are tiny droplets of water thrown off
by the boiling water that are carried upward with the water
vapor by convection currents. These droplets will
quickly disappear as they also evaporate and become water
vapor.
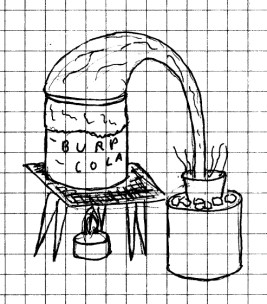
In an earlier experiment, you may recall that you were able to clean dirty water by using capillary action. However, capillary action may only be used to separate water from solid particles like dirt. If you want to separate water from another substance which has been dissolved in it, such as salt, capillary action won’t work. However, it is possible to separate the two by combining evaporation and condensation in a process called “distillation”. In this experiment, you will construct a simple still to separate water from food coloring which has been dissolved in it.
CAUTION! Always be careful to follow all safety precautions when using fire, and use with adult supervision only! Keep your alcohol lamp or candle in an aluminum pie pan, and keep the flame at least three feet away from anything that can burn, unless otherwise instructed.