The
Science Notebook
The
Science NotebookLiquids - Part 1
The
Science NotebookHome Terms of Use Safety Contact Us Experiment Pages Downloads Supplies Useful Links!
A liquid is matter that has a definite volume, but
not a definite shape. You can measure a liter of
water, and no matter what kind of container you pour a liter
of water into, it will always be a liter in volume, but it
will always take the shape of the container into which it is
poured.
Liquids are all around us,
particularly the most common liquid of all, water. In these
experiments, we will investigate some of the properties
of liquids. Because water is the most common liquid,
many of these experiments will use water to explore those
properties.
CAUTION!
Use only batteries for this experiment! Never use
household current!
Materials Needed:
Clear glass or plastic container; two AA, AAA, C or D cells; homemade battery holder; insulated wire;
salt; water.
Procedure: Cut two
pieces of wire about 30 cm (12 in) long, and remove about 1 cm
(½ in) insulation from each end. Assemble one end of
each wire into a homemade battery holder with two cells.
Do not allow the free ends of the wires to touch each other.
Fill the container with water and dissolve about a teaspoon of
salt into the water. Place the two wires into the water
close to each other, but do not allow them to touch.
What do you see?
What Happened: You
should have seen bubbles begin to form at the end of each
wire, particularly on the negative side.
Water is a chemical compound made of two parts hydrogen and
one part oxygen. Hydrogen and oxygen are both gases.
These two gases combine to make the liquid water. The
electrical energy splits the molecules of water into the
hydrogen and oxygen that make up the water. Adding the
salt to the water allows the electricity flow through the
water more efficiently, which allows the water molecules to be
split up more rapidly. (Pure water does not conduct
electricity very well.)
Going Further: You
might want to try this experiment without salt, and using
different amounts of salt in the water to determine how much
difference it makes in how fast the bubbles are formed.
CAUTION!
Always use sharp objects such as knives or scissors with
adult supervision only! Hold any sharp point away from
your body, particularly your eyes.
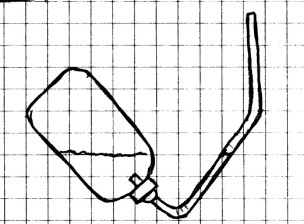
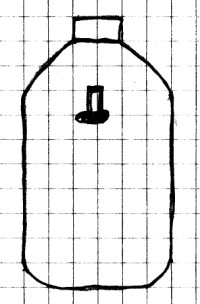
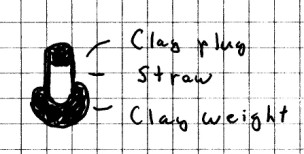
Materials Needed: Small
plastic
soft drink bottle with cap; nail; clear plastic tubing or two
clear flexible drinking straws and tape; modeling clay; water.
Procedure:
If you are using two straws, push one straw inside the other
and tape them together as shown. You may need to cut a
small slit in one of the straws to join them together.
Wrap a couple of turns of tape around the straws to make them
watertight.
Punch a hole in the bottle top with the nail. Using the
nail or a pair of scissors, make the hole large enough to
allow the straw or tubing to fit through it
snugly. Push about 3 cm (1 in) of the straw or
tubing through the top, and seal the top with modeling
clay. Punch a hole near the bottom of the bottle using
the nail.
With your finger over the hole, fill the bottle about half
full with water. Screw the top with tubing on the bottle
and carefully turn it and the tubing over. Now remove
your finger from the hole. Raise and lower the container
and move the tubing around. As you do, observe the level
of the water in the bottle and in the tubing.
What To Look For: What
happens if you lower the tubing below the level of the water
in the bottle?
What Happened: As you
shifted the bottle and straw tube, the water level in
both was the same. If the end of the tubing was
allowed to drop below the water level in the bottle, water
came out of the tube. A liquid will always seek the
lowest level possible.
Going Further: Why did
you need to punch a hole in the bottle? If you place a
piece of tape or your finger over the hole and repeat the
experiment, what difference, if any, does it make?
(HINT: Check out the
experiments on this Gases
page.)
The next few experiments will explore how and why
some objects float and other objects sink.
Materials
Needed: Graduated cylinder; water; small rock.
Procedure:
A homemade graduated cylinder will
work just fine, or you can borrow one from your school
lab. Either way, the rock you use must be able to fit
inside the cylinder.
Fill the cylinder about half full of water. Measure the
water level and write this number down. (Always read the
water level from the lowest point.) Carefully lower the
rock into the water and let it sink to the bottom. Read
and record the water level again. Subtract the first
reading from the second.
What Happened: An
object that sinks will displace it’s own volume in
water. (Displace means “push out of the way.”) If your
rock displaced 7 ml of water, then it’s volume is 7 ml.
You will remember that 1 ml equals 1 cubic centimeter, so you
can also say that the volume of this rock is 7 cubic
centimeters. (Cubic centimeters may be abbreviated “cc” or “cm3".)
This is the first part of
Archimedes Principle: An
object that sinks displaces it’s own volume in water.
In the last experiment, you saw that an object that
sinks will displace its own volume in water. What about an
object that floats?
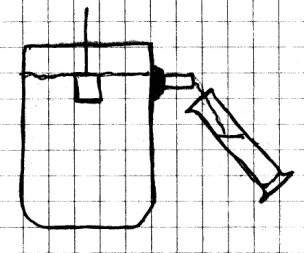
Materials Needed: Small
block
of wood such as a baby block; plastic soft drink bottle;
straw; modeling clay; scissors; nail; graduated cylinder;
centimeter ruler; homemade
balance (or school scales); paper or light plastic cup.
CAUTION! Always use sharp
objects such as knives or scissors with adult supervision
only! Hold any sharp point away from your body,
particularly your eyes.
Procedure:
Carefully cut the top of the soft drink bottle below the
curved part. Near the top of the cut, punch a small hole
in the side of the bottle and enlarge it so that the straw
will fit snugly through it. Cut about 15 cm (6 in)
length of the straw and fit it through the hole from the
outside at a right angle as shown. Seal the straw around
the opening with modeling clay. Carefully trim the straw
on the inside of the bottle so that it is as close to the
inside edge as possible.
Set up the balance with two cups and ensure the arm is level.
(If you are using a scale with a single pan, you will
only need one cup.)
Measure the length, width and height of the block.
Calculate the volume in cubic centimeters using the formula
from the chapter on measurement. (V = L x W x H)
Fill the bottle until water begins to flow out of the
straw. Allow this water to flow out. Hold the graduated
cylinder under the straw while lowering the block into the
water. Catch the water that is displaced and flows from
the straw. How much water is displaced? Is it the
same amount as the volume of the wooden block?
If you are using the balance, dry the wooden block and place
it on one side of the balance. Place the water in the
cup on the other side. What happens to the balance?
If you are using a school balance, weigh the block, and then
weigh the water. If you are using a scale with a
single pan, first weigh the block. Then, remove the
block and weigh an empty cup. Next, pour the water
you collected into the cup and weigh it.
Finally, subtract the weight of the cup from the
weight of the cup and water to get the weight of the water.
Next, refill the bottle so that water is again level with the straw. Hold the graduated cylinder under the straw to catch the water, and again place the block in the water, but this time, use a small nail to push the block down until it is completely submerged. Make a note of the volume of water and its weight.
What
Happened:
When the block was floated, the volume of water
displaced was less than the volume of the block.
However, the weight of the water displaced should have
been equal to the weight of the block. When the
block was completely pushed under the water, the volume of the
water dispaced should have been equal to the volume of the
block.
This is
the second part of Archimedes Principle: For any object that
floats, the object will sink into the water until it has
displaced its own weight in water.
One other thing. It is not
absolutely necessary to weigh the water if you know its
volume. That's because 1 ml of water has a mass of one
gram. That is explained in a bit more detail on the Measuring
Weight and Mass page.
Have you ever tried to swim down to the bottom of
deep swimming pool? Did it feel like something was
pushing up on you? The force you felt was the “buoyant
force” of the water. This may be described as the
“floating force” of the water, and it is the upward force
exerted by water against the downward pull of the force of
gravity. This force may actually be measured.
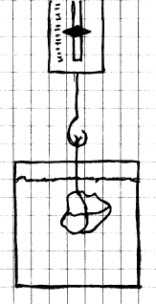
Materials Needed: Spring
or
rubber band scale; small rock or metal object; string;
container filled with water.
Procedure:
The spring
or rubber
band scale on the Measuring Weight and Mass page
may be used for this experiment. If you prefer, you can
borrow a spring scale from your school.
Tie a string to the rock and hang the rock on the scale.
Weigh the rock and write down this weight. Leave the
rock attached to the scale, but submerge the rock in a
container of water. The rock should be completely under
water, but not touching the bottom of the container.
What is the weight on the scale now?
What To Look For: The
reading on the scale should be less when the rock is under
water.
What Happened: Water
exerts a force pushing upward on the rock. This is the
buoyant force of the water. If the rock weighs 23 grams
when weighed in air, but only 11 grams when weighed in water,
then the buoyant force is equal to the difference in that
weight. 23 g - 11 g = 12 g. Gravity is pulling
down with a force of 23 grams, but the water is pushing up
with a force of 12 grams. This causes the weight to
appear to be only 11 grams. However, since the weight of
the object is not completely canceled out by the buoyant
force, the object still sinks.
Going Further: Can you
figure out a way to do this experiment using the homemade balance?
Also, the next time you go for a swim, try picking up a heavy
object such as a brick. Notice how heavy it feels.
Then, try the same thing with the brick under water.
Does the buoyant force make it feel lighter?
As you have seen, buoyancy
is the upward push of water on an object.
Let’s see how this works with an object that floats.
Materials Needed:
Balloon; sink or bathtub filled with water.
Procedure:
Blow up the balloon and pinch it shut, but do not tie it
off. Push the balloon completely under the water.
Can you feel the buoyant force of the water pushing up?
While keeping the balloon under water, slowly begin letting
air out of the balloon. Do you feel any change in the
buoyant force?
What Happened: The
force pushing the balloon upward was very strong in the
beginning, but as you let the air out of the balloon, it grew
weaker.
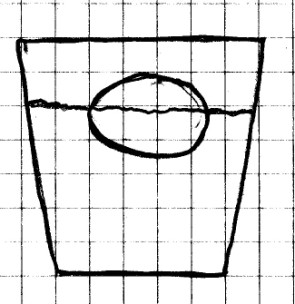
Materials
Needed: Small glass container such as a small bowl
or baby food jar; sink or bathtub filled with water.
Procedure:
Place the empty container in the water. Does it
float? Gradually add water to the container until it
sinks.
What Happened: As
long as the buoyant force is greater than the weight of the
container and it’s contents, the container will float.
When the weight of the container is increased by adding water,
it sinks lower. The buoyant force pushing upward doesn’t
change, but the force of gravity pulling down increases.
When the weight, or force of gravity pulling downward, is
greater than the buoyant force, the container sinks.
Going Further: Try several
different plastic containers. Can you sink them?
Why or why not?
Time for a little math. Now don’t
panic! The math is easy, and what you are going to
calculate is a very useful number called “specific
gravity”. But if you do need any help with the math,
get your math or science teacher to help you out.
Materials Needed:
Graduated cylinder; several small objects, including some that
float and some that don’t; scale or balance.
Procedure:
Weigh each object in grams and record the weight. (If
you are using the homemade
balance, weigh to the nearest gram.)
Use the graduated cylinder to determine the volume of each
object. Fill the graduated cylinder about half full of
water and record the water level. Then carefully lower
the object into the cylinder. If the object sinks,
record the new water level. If the object floats, use a
pencil point to push the object completely under the water and
then record the water level. Subtract the first reading
from the second to get the volume of the object in ml.
(Remember, the submerged object displaces it’s own volume of
water.)
Next calculate the specific gravity. To do this, you
divide the weight of the object in grams by it’s volume in ml
(or cubic centimeters).
Suppose you have a rock that
weighs 80 grams and has a volume of 40 cubic
centimeters. It’s specific gravity would be calculated
like this:
To help you do this experiment, make a table like the one
below to record your results:
| Object | Does it float? | Weight (grams) | Volume (ml) | Specific gravity |
| Rock* | No | 80 | 40 | 2 |
What
To Look For: How does the specific gravity relate to
whether the object floats?
What Happened: Objects
that float in pure water have a specific gravity of less than
1. Objects that sink in pure water have a specific
gravity of more than 1. The specific gravity of pure
water is exactly 1.
Going Further: Can you
calculate the specific gravity of an ice cube? Is it the
same as liquid water?
Materials Needed:
Clear container such as a drinking glass; water; salt; raw
egg.
Procedure:
Fill the container about 3/4 full of water. Lower the
egg into the water. Does it float or sink? Remove
the egg.
Next, dissolve as much salt into the water as you can.
Try floating the egg again. What happens?
What Happened: The egg
sinks in pure water, but it floats in salt water. The
specific gravity of the egg is slightly greater than 1, so it
sinks. A solution of salt water has a higher specific gravity
than pure water, so if you add enough salt, the specific
gravity of the salt water will become greater than that of the
egg. Since the egg has a lower specific gravity than the
salt water, it floats.
Going Further:
Can you calculate the specific gravity of the egg? Can
you apply what you have learned to calculate the specific
gravity of the salt water?
We can apply what we’ve learned so far to make a
model that will show us how a submarine works.
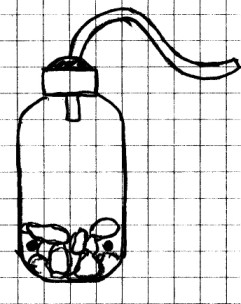
Materials
Needed: Plastic drink bottle with cap; modeling clay;
plastic tubing or flexible drinking straws and tape; nail;
small rocks or gravel; rubber bands or duct tape; bath tub or
swimming pool.
CAUTION! Always use sharp
objects such as knives or scissors with adult supervision
only! Hold any sharp point away from your body,
particularly your eyes.
Procedure:
Use the nail to punch a hole in the cap. Using the
scissors, enlarge this hole to allow the tubing or a straw to
fit snugly. If you are using flexible straws, join
several together with tape. Place one end of the tubing
or straws into the bottle cap and seal with modeling
clay. Use the nail to punch small holes in both sides of
the bottle and place tape over these holes for the time
being.
Place rocks or gravel in the bottom of the bottle and place
the cap and tubing assembly on the bottle. You
should add or take away gravel until the top of the bottle
just floats just at the surface.
Now remove the tape from the holes in the lower part of the
bottle, and place your thumb over the end of the straw or
tube. Place the submarine in the water and release your
thumb. What happens? Replace your thumb.
What happens now? Slowly blow into the straw or
tube. What do you observe?
What Happened: When
you removed your thumb, the air was able to escape from
the bottle and water was able to come into
the bottle. This increased the weight of the
submarine and it began to sink. By forcing air into
the bottle, you forced water out, and the weight of the
submarine decreased. This allowed your submarine to surface.
Going Further: A real submarine works in much the same way. The top of the bottle is similar to the part of the submarine where people live and work. The bottom portion of the bottle is similar to the ballast tanks on a real submarine. These tanks have air forced in or out of them to raise and lower the sub.
You can make a model that is a bit more realistic by taping two bottles together on their sides. The top bottle should be sealed by leaving the cap on. The bottom bottle should be constructed as above. except that you will probably need more rocks to get the two bottles to sink.
The top bottle represents where
the crew works, while the bottom bottle represents the ballast
tanks.
Materials Needed:
Glass medicine dropper (or clear soda straw and modeling
clay); drinking glass; 1 or 2 liter plastic soft drink bottle
with cap; water.
Procedure: This
experiment is a little easier to observe and understand
if you can find a glass medicine dropper. If you don’t
have one around the house, you may be able to borrow one from
your school lab or purchase one from your pharmacist. They are
also available at many school supply stores and hobby
shops. However, if you can’t get a glass medicine
dropper, you can make a substitute using modeling clay and a
clear straw.
If you are using a medicine dropper, fill the
dropper with water until it just barely floats in a glass
of water. Otherwise, cut a 5 cm (2 in) piece from the
soda straw and plug one end with modeling clay. Place
another lump of clay around the other end, but leave the straw
open at that end. You will need to put just enough clay
on so that the straw barely floats in the glass.
Fill the bottle completely with
water. Place the dropper or straw in the bottle and
screw the cap on tightly. Place the bottle on a table
top or other flat surface and squeeze the sides. What do
you see? What happens to the water level inside the
dropper or straw?
What Happened: When
you squeezed the sides of the bottle, you increased the
pressure inside. Since a liquid cannot be compressed,
only the air inside the dropper or straw was compressed.
This forced more water into the cap or dropper and increased
it’s weight, causing it to sink. When pressure on the
outside of the bottle was released, the cap or dropper rose
again. If you used a dropper, you could easily see the
water level rise inside when pressure was increased and see it
fall as pressure was decreased.
You have already learned quite a lot about
buoyancy. You already know that when you swim to
the bottom of a deep swimming pool, the water is trying to
push you back up. You also feel the pressure of the
water that surrounds you. The deeper you go, the
greater that pressure becomes. The next few
experiments will explore water pressure.
In order to study water pressure, you will need to
make a device to help you measure that pressure. Such
a device is called a manometer. The one you will make
will not measure the exact water pressure, but it
will show changes in pressure. You will need it
for several experiments.
CAUTION! Always use sharp objects
such as knives or scissors with adult supervision
only! Hold any sharp point away from your body,
particularly your eyes.
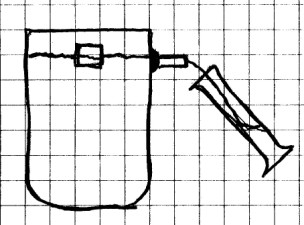
Materials Needed:
Small plastic soft drink bottle with cap (see procedure);
scissors; balloon; clear tape; rubber band; nail; modeling
clay; about 1 meter (39 in) of plastic tubing (from the
hardware store); ruler; small piece of wood.
Procedure: Cut
the top of the bottle to make a funnel. Trim any rough
or sharp edges. Place a strip of tape all around the cut
part. Cut off the neck of the balloon to make a sheet of
rubber and stretch it across the cut part of the bottle.
If you are using a round balloon, the rubber should seal
itself around the funnel. Make sure that the rubber is tight
across the opening. Don’t worry if the funnel is a
little bent. It won’t hurt anything. Seal your lips over
the mouth of the bottle and blow gently to insure that the no
air is escaping from the balloon and funnel.
Use the nail to punch a hole in the bottle top. Enlarge
this hole with the scissors so that it is large enough for the
plastic tubing to fit snugly. Insert about 1 cm
(1/4 in) of the tubing into the top of the cap and seal around
the top with modeling clay. The funnel you have just
made is the sensor portion of your manometer. A sensor
in any device that detects or “senses” changes. Do not screw
the cap onto the funnel just yet.
Press a lump of clay onto the small piece of wood and insert
the ruler into the clay lump. Tape the tubing to the ruler as
shown. There should be about a 15 cm (6 in) loop at the
bottom. Use a dropper to add water to the open end of
the tube at the top of the ruler. This water may be
colored if you like. You should add water until it is about 5
cm (2 in) from the bottom of the loop on each side. You
may need to tap the tube or puff gently into the tube to get
rid of any air bubbles.
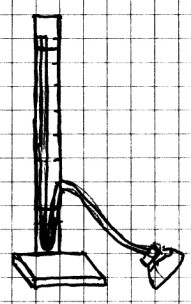
Place the cap on the bottle
assembly. Gently press the balloon. The water
level should rise on the long side of the tube as you place
pressure on the outside of the balloon. The
manometer detects changes in pressure when water presses in on
the sensor. As it does, this pushes on the air inside,
which in turn, forces air up the tube and to the loop.
The air pushed up the tube from the sensor pushes the water up
the other side of the tube. The higher the water level
on this side of the tube on the other side of the loop, the
greater the pressure. When you use the manometer, you
will use the numbers on the ruler only to let you know how
much higher or lower the water level is raised. You can
use either inches or millimeters because the numbers do not
tell you the actual pressure, only the change in pressure.
If your manometer does not work properly, check your work to
make sure everything is tightly sealed and that you have
assembled everything correctly.
Materials
Needed: Manometer from the last experiment; bucket of
water.
Procedure:
Lower the bottle part of your manometer into the water.
As you slowly move it to the bottom, notice what happens to
the water level in the tube.
What Happened:
Pressure increased with depth of the water. This is a
very important characteristic of water. The pressure exerted
by water always increases as the depth increases. This
is very important to people who build submarines. The
outside of a submarine must be made extremely strong so it
will not be crushed by the pressure of deep water.
Materials
Needed: Same as the last experiment.
Procedure:
Submerge your bottle sensor about half way into the water and
note the reading on the manometer. Move the sensor
around at that depth. Do you see a change in
pressure? Move your sensor near to the bottom of the
bucket. Again, move the sensor around.
What Happened: You
should not have seen any significant change in pressure as you
moved the sensor around the in either the middle of the bucket
or near the bottom. (You might have noticed a little bit
due to the size and shape of your bottle sensor.) This
shows that the pressure at a particular depth is the same from
the bottom, sides and top. When you moved the sensor
near the bottom, the pressure increased, but it should not
have changed all that much as you moved the sensor around at
that depth either.
Materials
Needed: Manometer; meter stick; bucket of water;
sink; bathtub; swimming pool.
Procedure: Pick a
depth to measure pressure between 15 and 30 cm (6 and 12
in). Use the meter stick to measure the depth and
measure pressure at this depth in all of the containers.
Is there any difference?
What Happened: The
pressure should have been the same in all of the containers at
the depth you chose. The pressure of water at a
particular depth is not related to the size of the body of
water. The pressure at 30 cm (12 in) is the same in a bucket,
a bathtub, or a lake.
Materials
Needed: Large food tin or similar container; salt;
dish detergent; water; manometer; ruler to measure depth.
Procedure:
Fill the container about 3/4 full of water. Carefully
note the water’s depth. Measure the pressure at a convenient
depth, about 2/3 of the way down. Record the depth
and the pressure.
Dissolve as much salt as you can into the water. Again,
measure the pressure at the same depth. Is it the same?
Record your results.
Empty the container and rinse. Refill it with water to
the same level as before. Add some dish detergent to
make a very soapy solution. Measure the pressure at the
same depth as you did with the plain water and the salt
water. How does it compare with the other two.
What Happened:
Dissolving substances in water will affect the amount of
pressure the water exerts.
Materials
Needed: Three square or rectangular plastic
containers with screw caps such as a 1 liter (1 quart)
milk jug; nail; strong string; monofilament nylon fishing
line; paper clip or button; water; sink or bathtub. (If you
don’t have a rectangular container, with a few changes, you
can probably use a cardboard milk carton instead.)
Procedure: Using a
nail and hammer, punch a hole in the center of the plastic cap
of one of the containers. Run a 60 cm (2 ft) piece
of string through the hole in the cap and tie the end under
the cap to the paper clip or button.
Next, punch two holes near the top of the container.
This will allow air to enter the container. Then, punch two
holes, one hole near the left hand end of each of two opposite
sides as shown.
This next part should be done over a sink or bathtub!
While holding your fingers over the two holes at the bottom,
fill the container with water and screw the cap back on.
Hold the container by the other end of the string. (You
can loop the string around your hand a couple of times if you
need to.) Uncover the bottom holes.
Repeat this experiment using the same type of container, but
punch the holes on the right hand ends instead of the
left. Does it make any difference in either the
direction or speed of the spin?
To help you understand why there might be a difference, try
suspending the third container full of water with no hole in
it. Does this container spin?
Now replace the string with
nylon fishing line and repeat this experiment. Do you
see any difference?
What Happened: Both
containers with holes began to spin as water pressure forced
water out of the holes. (NOTE: If they did not begin
spinning on their own, you might need to repeat the
experiment, giving the jug a slight push above one of the
bottom holes in the direction away from the running water.)
As the water level in each container dropped, the
pressure decreased, and the spinning eventually slowed
down.
A good scientist always has to be careful to ensure that there
are no unexpected influences in an experiment. When you
suspended the third container, you probably saw that it spun
around slowly for a little while. If you examine the
twine you are using carefully, you will notice that it is made
of several threads twisted together. The weight of the
water in the third container pulled down on the string and
began to untwist it.
When the first container spun one way, it tended to untwist
the threads, and the rate or speed at which the container spun
was increased by this untwisting. However, when the
container spun in the other direction, it twisted the threads
tighter, and the container did not spin as fast. Also,
when the container is nearly out of water, it stopped
spinning, and you probably noticed that the container began
spinning in the opposite direction as the twine
untwisted.
You should not have seen the twisting or untwisting when you used the nylon fishing line since it is usually made of a single strand that is not twisted. "Monofilament" means single strand.
Going Further: This is the same principle that is used in making lawn sprinklers that spin or move back and forth. Examine one to see whether you can figure out how it works.
If you want to know more about liquids, don't stop
here. Take a look at our Liquids
- Part 2 page.