 The
Science Notebook
The
Science NotebookExploring Measurement - Volume
The
Science NotebookHome Terms of Use Safety Contact Us Experiment Pages Downloads Supplies Useful Links!
When we measure volume, we measure just how much space something takes up. Just as with length, our English system of measurement has many different units for volume, everything from ounces to barrels. The many units used to measure volume in the English system are all different, and they don’t really relate to one another all that well. We probably don’t give all these different units too much thought because we are so used to using them. But trying to convert from one unit of measure to another can be a real nightmare!
A Look at English Units of Volume
Materials
Needed: English weights and measures conversion chart
(found in many math books, encyclopedias or dictionaries, or
online); dictionary.
Procedure:
For each of the following English units, use a conversion
chart to find out the number of units in the second column
that are equal to one unit in the first column. You may
not be able to find all of these, but find as many as you
can. You may wish to get an older student, teacher, or
parent to help you.
| Unit of Measure | Equals |
| 1 Ounce | _____ Drams |
| 1 Teaspoon | _____ Drams |
| 1 Tablespoon | _____ Teaspoons |
| 1 Cup | _____ Tablespoons |
| 1 Pint | _____ Cups |
| 1 Quart | _____ Pints |
| 1 Gallon | _____ Quarts |
| 1 Peck | _____ Quarts |
| 1 Bushel | _____ Pecks |
| 1 Hogshead | _____ Gallons |
| 1 Barrel | _____ Gallons |
What
To
Look For: There are many different ways to convert
from one unit to the next, and there are many more English
units that are not shown here. To make matters worse,
some of these units, such as the gallon, are not the same size
in all countries.
Going Further: All of
the above units were invented because people needed a standard
way to measure things. Often, people just picked a
certain amount and set it as the standard. You can do
the same thing.
Suppose you have five friends and a large bowl of
peanuts. You want to divide the peanuts evenly, but you
don’t have any kind of measuring cup, and you certainly don’t
want to count out individual peanuts! So you grab a
small paper cup, and start scooping out peanuts for your
friends one paper cup at a time. You have just created
your own unit for measuring volume, the peanut
cup!
All these units can be confusing, but there is an
easier way! In either the English or the metric
system, we can measure volume is by relating it to a
standard used to measure length. In this experiment,
we are going to measure the volume of a small box using one
of the English units of length, the inch.
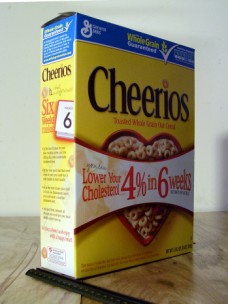
Materials Needed: Ruler;
shoe
box, cereal box, or other small box.
Procedure: Measure the
length, width and height of the box to the nearest inch.
Now multiply the length times the width times the
height. Your answer will be the volume of the box
expressed in a unit of volume called “cubic inches.”
What To Look For:
Suppose your box was 6 inches high, 5 inches wide, and 9
inches long. You would multiply 6 times 5 times 9.
Your answer would be 270. This means that the volume of
the box is 270 cubic inches. Another way of looking at
this is that if you had a bunch of blocks that measured one
inch on every side, you could fit 270 of those blocks into
this box. A block that is 1 inch on all sides has a
volume of 1 cubic inch.
What Happened: Don't
panic, but you have just used math to figure the volume of a
box. You used something called a “formula” to do
this. The formula used to figure the volume of any box
shaped object is “volume equals length times width times
height”. We can use abbreviations to write this formula
as follows:
For any box shaped object…
...where V = volume, L = length,
W = width, and H = height
Try measuring the volume of some other small boxes or box
shaped objects.
Going Further: Larger
box shaped objects could be measured using other English
units. For example, the volume of your room could be
measured by measuring the length, width and height of the room
in feet and using the formula above. The volume would
then be measured in cubic feet. Can you use a yard stick
or tape measure to calculate the volume of your room in cubic
feet?
The problem is that most objects we want to know the volume of
are not box shaped. If we are going to use cubic inches,
feet, yards, or any other unit, we’re going to have to find
another way to measure their volume, and we’ll do just that, a
little later. But first, let’s see how the metric system
handles volume.
CAUTION!
Always use sharp objects such as knives or scissors with
adult supervision only! Hold any sharp point away from
your body, particularly your eyes.
The metric system does away
with all of the different units of volume used in the
English system, and instead, uses only one unit to measure
volume. That unit is called the “liter”.
Materials Needed:
Meter stick or metric ruler; stiff cardboard such as poster
board; scissors or hobby knife; tape.
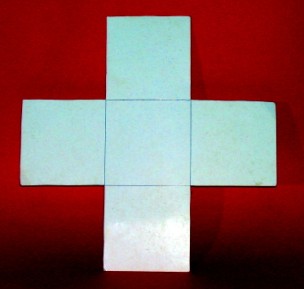
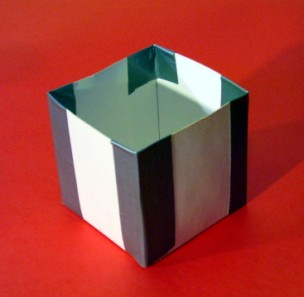
Procedure:
Using
the meter stick, draw the pattern shown above. Make sure
that each square is 1 decimeter (10 cm) on each side. Now cut
out the pattern on the solid lines and fold along the dotted
lines to make a box that is 1 dm (abbreviation for
“decimeter”) on each side. Tape the sides as shown. Save
this box for the next experiment.
What
To
Look For: Since we know that the length of each side
is 1 decimeter, using the formula from the previous
experiment, we can calculate the volume of this box using the
formula we just learned:
What
Happened: The metric system defines 1 cubic
decimeter as 1 liter, so the volume inside this box is equal
to 1 liter. Most smaller volumes may be measured in
liters, or in portions of a liter, as we will see.
More on Metric Units of Volume
Materials
Needed: The box from the last experiment; a ruler
that measures centimeters.
Procedure:
Measure each side of the box in centimeters. Use the
formula for the volume of a box shaped object (V = L x W x H )
to calculate the volume of this box in cubic centimeters.
What Happened: Each
side was 10 cm long. When you plug the numbers into the
formula and do the math, you get:
This means that 1 liter also equals 1000 cubic
centimeters. Since the size of the box did not change,
it also means that 1000 cubic centimeters equals 1 cubic
decimeter.
Now that we know how the liter came about, we need
to get some idea of just how much a liter is.
Materials Needed: A
container that will measure one liter; a container that will
measure one quart; box from the last two experiments; plastic
food wrap or plastic bag (such as a grocery bag; water.
Procedure:
Many home measuring cups that hold two cups will also have a
metric scale. On the metric scale you should see a ½ liter
mark. Obviously, two of these would equal 1 liter.
If you don’t have such a measuring cup at home, borrow a
container from your school science lab that measures 1
liter. Your teacher can help you with this. If you
can find a quart jar used for home canning, this will be
marked to measure 1 quart, and it may even have a metric scale
that shows 1 liter as well.
Using your measuring device, measure out one liter of
water. Pour this water into the quart container. Notice
how much water is in the jar. Is it more or less than a
quart?
Place the plastic wrap or bag inside the cardboard box.
Make sure that there are no holes in the plastic and fit the
plastic as near to the edge as possible. Measure another
liter of water and carefully pour this water into the
box. Does it just fill the box?
What Happened: When
you poured the liter of water into the quart jar, you saw that
a liter is just a little more than a quart. Also, if you
measured carefully, you saw that your 1 cubic decimeter box
held exactly 1 liter. This proves what you learned in
the last experiment: 1 liter equals 1 cubic decimeter or 1000
cubic centimeters.
An important piece of lab equipment is a beaker
used for measuring liquids. From time to time you will
find it useful to have such a beaker for your
experiments. By working carefully, you can make a
measuring beaker for almost nothing that will be every bit
as good for your purposes as one you could buy. It
will also help you to understand how the liter is used as a
standard of measurement.
Materials Needed:
Clear plastic jar such as a peanut butter jar; a measuring
beaker (borrowed from school) or a measuring cup graduated in
milliliters (ml); a waterproof marking pen; masking or duct
tape; waterproof pen.
Procedure: A liter may
be divided into 1000 equal parts. Each part is called 1
milliliter and is abbreviated 1 ml. A liter may also be
divided into 100 equal parts (centiliters), or 10 equal parts
(deciliters). (If you checked out the Measuring Length page. you’ve
seen these prefixes before.) However, for almost all
measuring of small amounts, milliliters are used, and that’s
what you’ll use to make the scale for your measuring cup.
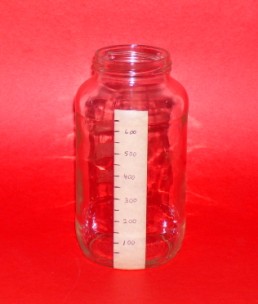
You should find a jar that has smooth straight sides if at all
possible. Although you can use a jar that doesn’t have
smooth sides, one with straight sides will be easier to
read. Place a strip of tape along the side of the jar
from top to bottom. Using the measuring beaker or
measuring cup, measure out the smallest amount shown on the
markings for the beaker or cup (probably 50 ml) and pour the
water into your jar. Carefully make a mark on the edge
of the tape that is exactly even with the level of the water
as shown. Repeat this process until the jar is almost
full. A typical “family size” peanut butter jar may hold
about 500 ml, but yours may hold more or less, depending on
the size.
Now go back and mark the amounts on the tape. If your
marks are close together, you may only want to place the
amount beside every other mark. For example, if each
mark was 50 millimeters, you might not write anything beside
the 50 ml mark, but would write 100 ml beside the second mark,
200 ml beside the fourth mark, and so on. It all depends
on how much room you have and how much your container
holds. If you have a steady hand, you may make your
marks directly on the plastic instead of using tape.
This will make the beaker much easier to clean, and you won’t
have to worry about the tape coming off if it gets wet.
The process of using a known standard to create another
measuring device is called “calibration”. Any measuring
device you make will have to be compared to a known standard
(in this case the measuring cup or graduated beaker) to make
sure that it accurately measures what you want it to
measure. You have just calibrated your measuring beaker
by using the measuring cup or the beaker from school.
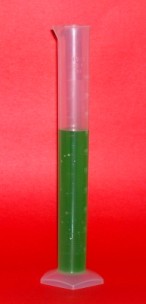
A graduated cylinder is a tall glass or plastic
cylinder which is used to accurately measure small amounts
of liquids. It is much more accurate than a measuring
beaker, and is therefore, usually more expensive.
While you can buy smaller and relatively inexpensive
graduated cylinders at many school supply stores, it isn’t
likely that you would want to buy one for you home
laboratory. However, if you find the right container,
a graduated cylinder is fairly easy to make as you will soon
see, but you will need to borrow a graduated cylinder to
calibrate your homemade one.
Before you make your own
graduated cylinder, you will first need to learn how to use
one properly.
Materials Needed: Graduated
cylinder;
water; medicine dropper.
Procedure: Borrow a
graduated cylinder from your school, or use one there during
your free time. Look at it carefully. You will
notice that it has a series of lines that go all the way
around the cylinder. These lines are called
graduations. That is how this device gets the name
“graduated cylinder”.
On most cylinders, each line equals 1 milliliter, but if you
aren’t sure, ask your teacher. Once you know how the
cylinder is marked (or graduated), reading it is easy.
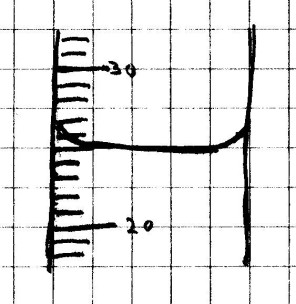
It is just like a measuring cup except for one thing.
Add some water to the cylinder and bring your eye level even
with the surface of the water. If you look carefully,
you will see that the surface of the water curves up slightly
along the edges and down in the middle. The edge of the
surface can be as much as a milliliter above the bottom.
These cylinders are made so that when you observe the water
level, you should read the line nearest to lowest level of the
water.
Now practice measuring different
amounts of water until you get the hang of it.
First, just add different amounts to the cylinder and read how
much is there. Do this four or five times. Then,
measure out the following amounts: 5 ml, 8 ml, 17 ml, and 34
ml. You may want to have your teacher or an older
student check behind you. You may also want to use a small
medicine dropper to help you add or remove small amounts of
water.
Materials
Needed: Small container of water; medicine dropper or
plastic pipette; graduated cylinder; paper and pencil.
Procedure:
Take up some water in the medicine dropper or pipette.
Carefully begin adding water to the graduated cylinder, drop
by drop, counting the drops as you go, until you get exactly 5
milliliters (ml). Remember to read from the bottom of the
water level! Write the number of drops required to do
this. Divide the total number of drops by 5 to get the number
of drops in 1 ml. Write this number down so you
can refer back to it later! This is a useful way to measure
small amounts of liquid, so save this dropper or pipette to
use later. (You need to always use the same dropper or
pipette because the size of the drops from a different one may
be larger or smaller.)
Going Further: You may
be wondering why you just didn’t count the number of drops in
1 ml. You could do that, but sometimes, when you are
dealing with very small amounts, your measurement will be more
accurate if you measure out a larger amount and then divide as
you did here. Do you know why?
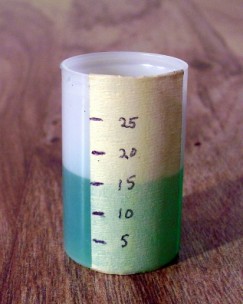
Materials
Needed:
Translucent or clear 35 mm film canister or plastic
medicine bottle; graduated cylinder (borrowed from school);
water; fine tip permanent marker or pencil; duct tape or
masking tape.
Procedure: The
container you choose should allow you to see water from the
outside. If you are to accurately measure milliliters,
the sides of the container must also be straight. Place a
strip of tape from top to bottom on the outside of the
container. Using the graduated cylinder, measure out 5
ml of water and pour it into the container. Draw a thin
line on the tape. The top of the line should be even with the
surface of the water. Repeat this process until the
bottle is almost full. Number each mark 5, 10, 15 and so
on.
Then, using a ruler, divide the spaces between each mark into
5 equal parts. Each mark will represent 1 ml. If you
have a steady hand and you are using a permanent marker, you
can eliminate the tape and make your marks directly on the
container. Your graduated cylinder is now ready to
use.
Going Further: By
making the measuring beaker and the graduated cylinder, you
have learned the basic principle behind making many useful
measuring devices. You can now use your imagination and
whatever you have on hand to make any other measuring
containers you might need.
Understanding how to measure volume is a
useful tool in science, Measurement is so important in
science that you should check out our page on Measuring
Length if you haven't already done so, as well
as our page
on Measuring Mass.