The
Science Notebook
The
Science NotebookExploring Measurement - Weight and Mass
The
Science NotebookHome Terms of Use Safety Contact Us Experiment Pages Downloads Supplies Useful Links!
You have seen how length and volume are measured in
both the English and metric systems of measurement. In
the next few experiments you will see how weight and mass
are measured, and why the two are not the same.
Materials
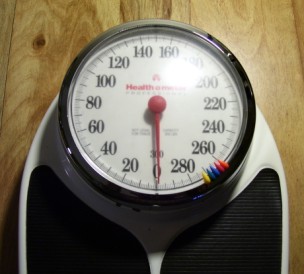
Needed: Set of analog bathroom scales. (There
are basically two types of bathroom scales - analog and
digital. Analog scales usually have a pointer that moves
around a scale with numbers and lines, or a fixed line under
which the number scale will move. As you put more pressure on
the scales, the weight that is shown will change. The analog
scale will look something like the
illustration.
A digital scale, on the other hand, will show weight using a
display of numbers - digits - and in some cases it won’t
display a weight until you stand still on it for a few
seconds. (The digital scale may also have a switch that will
allow you to see your weight in either pounds or kilograms.)
Most newer scales are digital, so you may have to look around
to find an analog scale.
Procedure: Step up on
the scales. How much do you weigh?
What To Look For: What
do
you feel when you step up on the scales?
What Happened:
When you stepped up on the scales, you probably felt the
scales go down slightly. Most bathroom scales have a
spring or other device underneath that is compressed when you
step up on the scale. You also saw the pointer move from
zero to your weight. The heavier the person or object on
the scale is, the more the spring is depressed, and the
farther the pointer or scale will move.
In the U.S., this type of scale will almost always be divided
into pounds, but some analog scales may also have a second set
of marks and numbers for kilograms as well.
Going Further:
Why is the spring compressed when you step up on the scale?
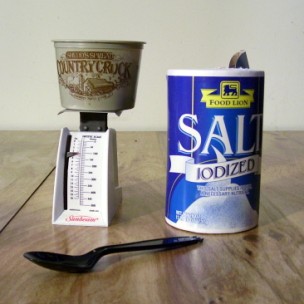
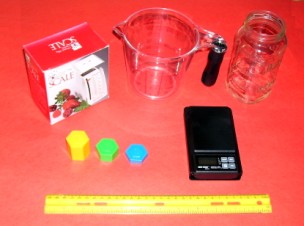
Materials
Needed: A small kitchen or diet scale; salt.
Procedure: Examine the
scale you are using. Press down on the scale. Do you
feel something inside the scale compressing?
If you don’t know how to use this scale, have an adult show
you how. Measure out 55 grams (2 ounces) of salt. If you
are careful to use only a clean bowl, you may return the salt
to its container when you are done.
What To Look For: You
should notice that the diet scale has a spring or possibly a
metal strip inside that is compressed when you push down on
the top of the scale. Even if you can’t see it, you can
feel it when you press down.
What Happened:
When you weighed the salt, as more salt was added to the bowl,
the spring inside the scale was compressed further, and the
pointer on the scale moved down. The kitchen scale works
on exactly the same principle as the bathroom scale in the
last experiment.
With both scales, the object being weighed causes the spring
to compress because gravity is pulling on the object being
weighed. In fact, when we measure weight, we are
actually measuring how much force is being exerted on the
object by gravity. In order for an object to have
weight, it must be “pulled on” by gravity.
We can use what we have learned so far about weight to make
our own devices to measure weight. In the two
experiments that follow, you will make devices that will weigh
small amounts. What each device has in common is that it
measures weight by measuring the pull of gravity on an object.
CAUTION!
Always use sharp objects such as knives or scissors with
adult supervision only! Hold any sharp point away from
your body, particularly your eyes.
Materials Needed:
Corrugated cardboard box (such as a copier paper box); several
rubber bands; paper clips; weights (may be borrowed from
school or made by using a kitchen scale); duct tape; string;
scissors; plastic margarine or similar cup; strip of thin
cardboard or paper.
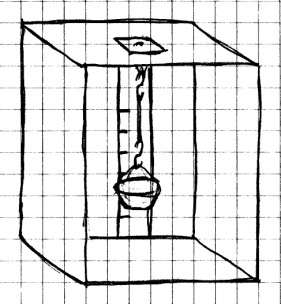
Procedure: Turn the
box on one end as shown. Put about a 5 cm (2 in) square
piece of duct tape on top of the box in the center and punch
two holes about 3 cm (1 in) apart near the center. Tie a small
loop of string through the holes and put another piece of tape
over the holes and string for extra strength. Next, bend two
paper clips into an “S” shape by folding the inside loop back,
and hang one end of one of the paper clips onto the loop of
string. Hang a rubber band on the other end of the paper clip.
Make a small bucket out of the margarine cup by punching two
holes near the top edge and tying a piece of string through
the holes. Hang this bucket on one end of the second
paper clip and hang the other end of this paper clip on the
rubber band.
Cut a cardboard or paper strip about 5 cm (2 in) wide and as
long as the box is tall. Tape this strip in the back of
the box directly behind the cup. With the cup empty,
mark the paper even with the top edge of the cup “0".
Next, begin adding weight to the cup, 100 grams (g) at a
time. (If you can’t borrow weights from school, use a
diet scale. Place a small container on the scale, and
add salt or sand until you get the weight you need.)
Each time you add another 100 grams, make another mark even
with the top edge of the cup. Keep adding weights until
the cup is near the bottom of the box. If your rubber
band doesn’t stretch enough, you may need to use a thinner
rubber band. If it stretches too much, either use a
thicker rubber band or put two rubber bands together.
When your rubber band has stretched to the bottom of the box,
remove the paper strip. Label every mark with the weight at
that mark, and make three smaller equally spaced marks between
each mark. Each of these marks represents 25 g.
Replace the paper strip in the box. Check your 100 gram
weights again to make sure that you have put the strip back
exactly where you had it the first time, and adjust it as
needed.
Your rubber band scale is now complete.
Going Further: Depending
on the size of your box and the size of the rubber bands you
use, you can make scales to measure in almost any range you
want.
CAUTION!
Always use sharp objects such as knives or scissors with
adult supervision only! Hold any sharp point away from
your body, particularly your eyes.
A rubber band scale will be
fairly accurate, but only for a short time. Eventually the
rubber band will begin to stretch and wear out. A better
scale may be made by substituting a metal spring for the
rubber band. Such a scale will be just as accurate,
and because the spring is made of metal, it will last much
longer.
Materials Needed: Three
pieces
of wood; nail; small spring from a hardware store; small eye
screw; wire or string; small plastic container or food
tin; weights; scissors or hobby knife; cardboard.
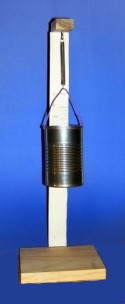
Procedure: The size
of the items you use will depend on the size of your spring,
but you should use the picture to help you put your scale
together. You will need to find a spring that stretches
fairly easily. If you can visit a hardware store, ask to
see their small springs, and pick out one or two to use for
this experiment.
Punch two holes in your container, one on each side near the
top. Then, using the wire or string, make a small handle
for the container.
Next, make the scale support. The back should be a
little longer than the length of your spring when it is fully
stretched out, plus the size of your plastic container and
handle. The top should be a little longer than the width
of your container. The bottom piece should be large
enough to support you scale. Nail these three pieces
together. Screw the eye screw into the underside of the
top piece in the center. Cut a strip of cardboard
about 3 cm (1 in) wide and as long as the back support.
Tape or thumbtack this strip onto the back support.
Hang one end of the spring on the eye screw and hook the other
end onto the container handle. Your scale is now ready
to calibrate using 100 gram weights just as you did with the
rubber band scale in the last experiment.
Going Further: As with
the rubber band scale, depending on the size of your spring,
and how strong it is, you can make scales to measure many
different weights.
CAUTION!
Always use sharp objects such as knives or scissors with
adult supervision only! Hold any sharp point away from
your body, particularly your eyes.
A homemade balance can be
used in many experiments, and is surprisingly accurate for
measuring small amounts.
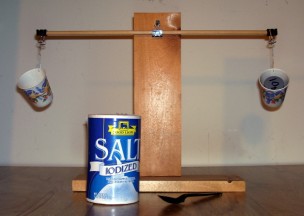
Materials Needed:
Two small boards (about 12 in or 32 cm long and 3-4 in or 8-10
cm wide - exact sizes aren’t all that important), three
small nails; wooden ruler or dowel 12 to 18 in or 32 to 48 cm
long; three binder clips; two paper clips; two paper cups.
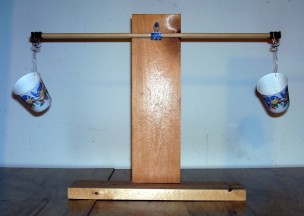
Procedure: Nail
one of the boards to the other as shown above. Use two
nails so that the boards will not slip. Nail the third
nail about an inch (or 3 cm) or so from the top of the upright
board. This nail will be used to support the balance
beam.
Next, fasten a binder clip on each end of the dowel or
ruler. Fasten the third binder clip to the middle of the
dowel or ruler on the opposite side of the other two clips.
Now take the two paper clips and bend the inner loop of each
one back to make an S-shaped hook. Punch a small hole
near the top of each paper cup and run one end of each paper
clip hook through each cup. Hang the dowel or
ruler on the nail by the middle of the clip. Then, hang
each cup by the S-shaped hook onto the wire portion of the
binder clip at each end of the dowel or ruler.
What To Look For: The
balance arm will see-saw back and forth for a few
seconds. When it stops swinging, the balance should be
level. If it isn’t, move the ruler or dowel along the
middle binder clip until both sides balance.
What Happened: When
you adjusted the balance, you made the weight on each side
of the balance beam equal. Now, if you place
something in one of the cups, that side of the balance will go
down. If you put the same weight in the other cup, the
balance will again be level. Try it with a few coins on
each side. When we make weights in the next experiment,
we will use this principle to actually weigh objects with our
balance.
Going Further: You can
improve your balance by using small eye screws from the
hardware store instead of the binder clips on each end.
You can also substitute small metal or plastic cans for the
paper cups. In addition, you might also want to make a
pointer for your balance by using a small straw or coffee
stirrer. You can glue or tape it to the middle binder
clip at right angles to the ruler or dowel. This pointer
will make it easier for you to see small changes in the
balance arm.
CAUTION!
Always use sharp objects such as knives or scissors with
adult supervision only! Hold any sharp point away from
your body, particularly your eyes.
Materials Needed:
Aluminum foil; scissors; small film canisters or plastic
bottles; sand; weights (1, 5, 10, 25, and 50 grams) and your
homemade balance or a beam balance or scale for measuring
small amounts.
Procedure: Most
people don’t have balance weights or a balance or electronic
scale at home, so you’ll probably need to borrow weights from
your teacher, or make your weights at school.
If you use a triple beam balance or electronic scale, ask your
teacher to show you how to use it. Once you have learned
how to measure using this balance or scale, cut a square of
aluminum foil about 16 cm (6 ½ in) on each side. The
foil square should weigh a little more than a gram, depending
on how thick it is. If it doesn’t weigh at least a gram,
cut a larger piece. Once you have a piece that weighs a little
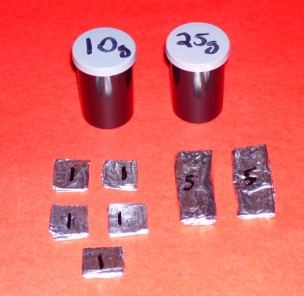
more than a gram, make a note of the size. Now,
carefully trim away foil until the piece weighs exactly one
gram. Fold the foil into a small square and label it 1
g. Make four more 1 g weights the same way.
To make the five gram weight,
you’ll need to cut a piece of foil about five times larger
than the one gram sheet. If you cut a piece about the
same width and a little more than five times longer, it should
weigh a little more than 5 grams. Once you have the
right size, again carefully weigh and trim the foil until it
weighs exactly five grams. Fold the foil as with the 1 g
weights and label it 5 g. Make at least two more 5 g
weights. Repeat this to make at least two 10 gram
weights.
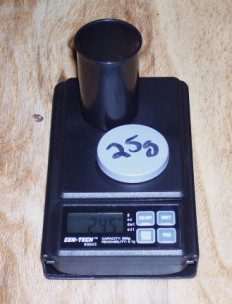
For the 25 and 50 gram weights, you will need to use film
canisters (or other small plastic containers) and sand.
Place the canister and the lid on the balance. Add sand
to bring the weight up to 25 grams. Put the lid on the
canister and label it 25 grams. Do the same thing to
make at least one 50 gram weight.
If you use your homemade balance and weights borrowed from
school, follow the same procedure as above. Make sure
that the arm of your balance is level. Then, place the
standard weight on one side of the balance, and your foil on
the other. Trim the foil as instructed above. For the
larger weights, put the weight on one side and the bottle with
lid on the other. Add sand or salt until the arm
balances. When it does, you have the right weight.
If you don't have access to
weights, you can go online to find out how much the bills and
coins in your country weigh. The weights are usually
very accurate so that you can use the them as weights. For
example, in the United States, all new paper bills weigh 1
gram each, regardless of denomination. All pennies made after
1982 weigh 2.50 grams, and nickels weigh 5 grams each. You can
use combinations of these with your balance to construct your
own weights as described above.
What To Look For: You
probably noticed that it takes some patience to make the
weights just right. However, the more careful you are in
making your weights, the more accurate your balance will be.
What Happened:
If you made all the weights, you will be able to weigh a small
object up to 100 grams on your balance.
Going Further: Many
other materials can be used to make weights. You might
try paper or plastic instead of foil. For larger weighs,
you could use modeling clay, BB’s, or small nails, screws,
bolts, nuts, etc., instead of sand. Also, if you don’t have
film canisters, you can use most any small plastic bottles
with lids. You can also make larger weights, either by
following the procedure above, or by using your homemade
weights and balance. Just be careful not to make weights
heavier than your balance can support.
Materials
Needed: Several small objects, such as coins, keys,
nuts, bolts, checkers; table salt or sand; balance and
weights.
Procedure:
First, make sure your empty balance is level. To find
out how much one of your small objects weighs, place it in one
of the balance cups. Then, begin placing weights in the
other cup until the balance is level. The weight of the
object will be equal to the total of the weights you
added.
If it is not exactly level, (and it probably won’t be) add
weights until the weight side is slightly higher than the side
with the object. When this happens, adding one more gram
weight should tip the weight side just below the side with the
object. If 6 grams places the weight side just above the
object side, and 7 grams places it just below, the object
weighs between 6 and 7 grams.
Try weighing all the objects you have gathered to within a
gram.
To weigh out a certain amount of sand, salt, or other
substance, again make sure the empty balance is level. Then to
weigh, say 12 grams of salt, place weights equal to 12 grams
in the weight cup. Slowly add salt to the cup on the
other side until the balance is level. You will then
have 12 grams of salt.
Try weighing out different amounts of sand or salt.
What To Look For: Most
objects won’t weigh exactly a certain number of grams, and
your balance is accurate only to the nearest gram.
However, when you use your balance to weigh out a certain
amount of a chemical such as salt, it is possible to get much
closer to the exact weight.
What Happened: When
you weighed objects, you probably noticed that some, if not
most, of the objects wouldn’t balance exactly. In other
words, the weight side would still be a little above or below
the side with the object on it. When that happens, the
weights that most nearly make the balance level is closest to
the actual weight of the object. In other words, you can
weigh to the nearest gram.
Going Further: Try
making ½ gram or smaller weights.
Materials Needed: Your
mind.
Procedure: You have
seen pictures of astronauts as they appear to float and tumble
around in space. Imagine that you are one of these astronauts
aboard the International Space Station. You’re
having a great time, aren’t you?
As an astronaut, you are “weightless” because gravity doesn’t
appear to have any effect on you. It actually does, but
a spacecraft in orbit moves at exactly the right speed and in
the right direction to just balance out the force of gravity,
and so you appear to be weightless and able to “float” from
one place to another. Believe it or not, you are not
actually floating. Instead, when you are in orbit, you
are constantly falling - in a circle. This is because
you are going forward fast enough (about 17,500 miles per
hour) that although gravity is pulling you back to earth, you
can never actually fall back to earth. This is so
because you are also moving forward at a fast enough speed so
that even though you are falling, you will not reenter the
atmosphere and hit the earth. Not only are you
constantly falling, but everything else around you is as
well. Because of this, you, and everything around you,
appears to be weightless.
If you attempt to step up on a bathroom scale aboard the Space
Station, you will not register any weight on the scale.
This is because the force of gravity is being canceled out by
the falling of both you and the scale, so gravity cannot
“pull” you down.
Yet you are not any smaller. Even though you are
weightless, the amount of “stuff” you are made of is
unchanged. Living in space will cause you lose all of
your weight, but it won’t make you one bit smaller!
Now suppose you are leaving the Space Station on an
experimental spacecraft to go to the moon. The gravity
of the moon is only 1/6 that of the earth, so you would
only weigh 1/6 as much on your bathroom scales. Still,
how much there is of you, as well as your size, would not
change.
When we measure weight here on earth, what we are really
measuring is the “mass” of an object, or how much “stuff” it
has. We can use weight here on earth because everywhere
you go, gravity is almost the same. The farther away you
go from the center of the earth, the less the force of gravity
affects you. You would weigh slightly less on the top of
Mount Everest than you would at the beach because you are
slightly farther from the center of the earth there.
However, the difference between your weight at the beach and
Mount Everest doesn’t amount to all that much. So long
as you stay on earth, weight is a pretty good indicator of
your mass.
That’s why, when we talk of measuring weight, we are usually
actually talking about measuring mass, and we often mix units
for measuring the two. Even though the difference
between weight and mass isn’t all that important as long as
you are on earth, you should keep in mind that there is a
difference. Weight depends on the pull of gravity, and
is a measure of the force of gravity on an object. It changes
as the force of gravity changes. Mass, on the other
hand, does not change with a change in gravity. It is an
accurate measure of how much there is of an object, regardless
of the how little or great the force of gravity is.
You have already seen that the English system of
measurements for length and volume can be pretty
confusing. The system for measuring weights can be as
well. It may not seem quite as confusing because there
are only three units for weight that we use regularly,
although there are many more.
Materials Needed: Diet
scale; salt or clean sand; paper; small light plastic bowl
(such as a whipped topping container).
Procedure: Measure out
one ounce of salt or sand. Pour it onto a piece of
paper. How heavy does it feel?
Next, measure out 16 ounces of salt or sand and place it into
the plastic bowl. How heavy does it feel? If the
scales won’t measure 16 ounces at one time, measure a few
ounces at the time until you have measured 16 ounces.
What Happened: You
almost certainly realize that you have just weighed out a
pound of salt or sand, since there are 16 ounces in a
pound. Pounds and ounces are the basic units we use to
measure smaller weights in the English system.
For larger weights, we use tons, and there are two kinds - the
short ton and the long ton. A short ton is most often
used and it equals 2,000 pounds. The long ton is 2,240
pounds.
For weights smaller than an ounce, the English system uses
units like grains, scruples and drams, although you don’t see
them used much anymore. Can you find out how much each of them
is equal to?
All of these units are actually units of weight. There
are also units to measure mass in the English system, but we
will not bother with them just now.
If you look at a table of English measures for weight, you can
see that there is no easy to remember pattern for keeping
track of them. The metric system makes measuring weight
much easier, as we will see.
The basic unit of mass in the metric system is the
gram. It is not a very large quantity, but as we will
see, just like the basic unit for volume - the liter - it is
based on the meter
Materials Needed:
Homemade balance or school balance; film canister or pill
bottle (two of the same kind if you are using the homemade
balance); medicine dropper; water.
Procedure: If you
have visited the Measuring
Volume page, you may have learned how to measure
small amounts of water by counting the number of drops in 1
milliliter. If not, go there and take a look at
the Measuring
Small
Amounts With a Medicine Dropper experiment.
Determine how many drops of water are in a ml and write
it down. You will need that information for this experiment.
If you are using the homemade balance, place an empty film
canister or pill bottle in each cup, and adjust the
scale so it is balanced. In one container, measure out 1
milliliter of water by drops. Next, add a 1 gram weight
to the other side of the balance. What happens?
If you are using a school balance, you may need a teacher to
show you how to use it. First, weigh an empty canister
or bottle and write down the weight. Next, add 1
milliliter of water to the canister and weigh it again.
How much does the weight increase?
What Happened: In each
case, 1 ml of water should have weighed one gram.
Depending on how accurate the balance and your measurements
were, you may have been off just a little, but the weight
should be very close. Remember that the milliliter is
one cubic centimeter, and that the centimeter is 1/1000 of a
meter. Since the milliliter is based on the meter, and
since one milliliter of water weighs one gram, you should see
that the basic unit for weight - the gram - is also based on
the meter.
Everything you weigh in the metric system may be weighed in
grams, fractions of grams, or multiples of grams. Very
small objects are weighed in milligrams (1/1000 of a gram),
while larger objects, such as people may be weighed in
kilograms. 1 kilogram is equal to 1000 grams and is
about 2.2 pounds. You’ve seen the two prefixes, milli-
and kilo-, before. Using the metric system to weigh
things only requires you to know the one unit, grams, and
these two prefixes. You don’t have to constantly convert
from ounces to pounds, or from pounds to ounces. Aren’t
you glad?
Going Further: Since 1
ml weighs 1 g, how much would 1 liter of water weigh?
Try weighing a liter of water to see if you are correct.
Don’t forget to weigh the empty container first!