Morse code has been around for
over a hundred years. For many years before people could
talk with one another using a telephone or radio, many depended on
sending and receiving messages using a code of dots and dashes
known as Morse code. This code was invented by the inventor
of the telegraph, Samuel Morse, and its first use was to send and
receiving messages over long distances using the telegraph.
People quickly realized that Morse code could also be sent my
using flashing lights or signal flags, and ships at sea quickly
began using it to communicate with each other, as did the
military.
And when radio was first invented, the only means of communication
by radio was Morse code as well. It would take several more
years to figure out how to send and receive voices over the air.
But even long after voices could be sent by radio, people
still used Morse code to send in receive messages on land and sea,
as well as in the air. Morse code was often used because the
signals could be heard much farther than voice communications, and
with simpler equipment.
But as radio communication equipment improved, Morse code was
used less and less, and today it has largely been abandoned in
favor of digital signals that can be sent much faster and can
carry much more information.
But Morse code is not entirely dead. It is still used and
enjoyed by amateur radio operators (also known as "hams") around
the world. For many years, one of the requirements of a ham
radio license was the ability to send and receive Morse code, but
in the last few years, most countries have dropped the code
requirement. Still, although hams are no longer required to
learn Morse code to obtain an amateur radio license, many still
take the time to learn it on their own. These hams regularly
enjoy communicating using Morse code. In addition,
there are still some individuals and outdoor groups who use Morse
code to communicate with each other using flashing lights or by
"wigwagging" signal flags.
Maybe you think it would be fun to try your hand at communicating
with Morse code, but you are put off by the fact that Morse code
might take some work to learn. Well, let
The Science Notebook staff
let you in on a little secret. It is a little hard to learn,
but not as much so as you might think. And just think of the
fun you can have communicating once you do!
To give you an idea of how much fun you can have with Morse code,
we're going to show you a code known as "tap code" that you
can begin using right away! Once you have learned to use tap
code,
The Science Notebook
hopes it will encourage you to learn Morse code! The
tools to learn Morse code are available right here, and they are
free!
What
Is Tap Code?
Tap code was used by American prisoners of war during the Vietnam
War to communicate with one another inside POW camps when talking
was not allowed. Although American POWs were punished, and
sometimes severely, for talking with one another, they were able
to keep track of what was going on inside the camp by means of tap
code without their guards knowing what they were up to.
Tap code is very easy to learn, and it can be sent and received
using many diferent methods including tapping (naturally), a
simple telegraph, radio, flashing lights, and flags, just like
Morse code. In addition, you can use hand signals, and
probably many other ways as well!
So How Does Tap Code
Work?
Special thanks to Nyle, K7NS, for
suggesting an important correction to this material!
The tap code is based on a 5×5 grid of letters, representing all
the letters of the alphabet, with C and K sharing the same
code. Each letter is represented by two numbers. Take
a look at the chart below:
Tap
Code Chart
|
1 |
2 |
3 |
4 |
5 |
| 1 |
A |
B |
C/K |
D |
E |
| 2 |
F |
G |
H |
I |
J |
| 3 |
L |
M |
N |
O |
P |
| 4 |
Q |
R |
S |
T |
U |
| 5 |
V |
W |
X |
Y |
Z |
Notice that there ia a number at the top of each column
on the chart, and a number for each row on the left side of
the chart. The code for each letter is found by first
locating the letter you want to send. The code for that
letter consists of two numbers. The first number is the
number in the
row to the left
of the letter, and the second number is the number in the
column above the letter.
For example, the two digit code for the letter "W" is 5-2.
(The dash is there just to show the space between the two
numbers.) The first number (2) is number in the row above
the W, and the second number (5) is the number in the column to
the left of the W.
The order is
ROW first, and COLUMN second!
You can decode tap code as it as it is being sent using the above
chart if the person is not sending too fast. You can also send tap
code by any of the same methods you could use to send Morse
code. However, the main disadvantage of tap code is that it
takes longer to send each letter than it would in Morse code, but
you can even work around that to some extent.
Sending And
Receiving Tap Code
To send a tap code for the letter "W", you would tap five times,
pause, and then tap twice, like this:
"tap tap tap tap
tap (pause) tap tap"
Using dots to represent taps, the code for "COME HERE" would be:
| C |
O |
M |
E |
|
H |
E |
R |
E |
| 1-3 |
3-4 |
3-2 |
1-5 |
pause |
2-3 |
1-5 |
4-2 |
1-5 |
| . ... |
... .... |
... .. |
. ..... |
|
.. ... |
. ..... |
.... .. |
. ..... |
To send this message, you would make the number of taps for the
first number, pause, and then tap the second number. Leave a
longer pause between letters. Be sure to send this slow
enough that the other person has time to copy each letter.
After a while, you will have memorized the codes for each letter
and will be able to send and receive much faster, but never send
any faster than you can receive!
To receive this message listen carefully for each pair of taps and
write down the two numbers. When the sender is done, decode
the message by going along the top row to the first number and
then straight down to the second number on the column to
find your letter!
It will take some practice to do this with any speed, but with the
above table, you can begin to use tap code right away. As
you practice, you will begin to recognize the number pairs for
each letter and you won't have to use the chart.
You may find it a little bit tedious to send or receive one letter
at a time, but we'll show you some shortcuts a little later.
More On
Sending And Receiving Tap Code
When you are just starting out, send slowly. You need to
give the person on the other end plenty of time to count the
taps and write them down. If you want them to copy each
letter as you send it, you will also need to give them time to
locate the letter. The more you practice, the faster you
can send and receive, but never never send faster than the
other person can copy!
Be sure to leave short pauses between each number in the
pair. Leave longer taps between number pairs, even longer
gaps between words, and the longest gaps between sentences.
Remember that the tap code for the letter K is the same as for the
letter C, so if the word you receive is first copied
as CNIFE, you should see that the word is really KNIFE.
If you are copying tap code and miss a letter, you can send a
string of taps. You can also do this if you send the wrong
letter.
Other Ways To Send Tap
Code
You are not limited to sending tap code by just tapping.
There are lots of different ways that will work, particularly once
you have memorized the letters. Here are just a few.
Flashing Light - You can send tap
code at night over a long distance using a flashlight or any other
light that you can turn or off easily. If the light won't
turn or off easily, you can put a piece of cardboard over the
light and flash the light by uncovering and covering it. You
can also flash the light by moving it from behind a tree trunk or
other object and back. In the daytime, you can use a mirror
to flash reflected light, although it will take some practice.
Flag or Other Signal - You can
send tap code during the day over a long distance by using a flag
to send the numbers. A piece of cloth tied to a stick will
do fine. Starting with the flag hanging straight down, lift
it up to your side and back down for each tap. Depending on
the size of the flag and its color, this can work over a fairly
long distance. You can also make signals using just a stick,
or a stick with a piece of cardboard attached. Can you think
of other ways?
Your Hand or Hands - Since it
just so happens you have five fingers (or if you insist, four
fingers and and a thumb) on each hand, you can easily send tap
code just by using the fingers on one hand. Instead of taps,
you would simply hold out the number of fingers required for each
number.
Using Tap Code to
Communicate
Now that you know the basics of tap code, you can begin using it
right away. Grab a friend and a couple of note pads, decide
which method you want to use, and begin practicing. You can
use this on camping trips, between rooms at home, or hundreds of
other places. Use your imagination!
A
Simple Telegraph Set
To help you use tap code with sound, you can make this telegraph
set so that you can send and receive with a friend. With a
second set and one or two outdoor extension cords, you can send
and receive a couple of hundred feet or more!
Materials Needed: To
make a single unit you will need one buzzer unit (RadioShack
mini-buzzer, 273-0053 or similar); small piece of wood for the
base; a battery holder that will hold two C or D cells; 5
small sheet metal screws; a disposable aluminum food pan; clip
leads or covered wire. (Clip leads are really good for
connecting the battery and the wires between stations, but you can
make do with insulated wire.)
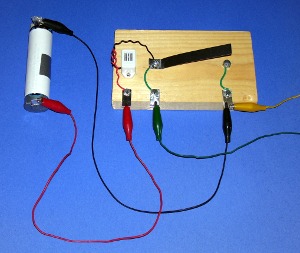
Procedure: The unit
shown above uses a homemade battery holder for two C or D
cells. You can buy a battery holder at RadioShack or online,
but you can make one for almost no cost following the
instructions found
HERE.
If you want to buy your own battery holder, skip the next
couple of paragraphs.
If you don't have clip leads and will be using covered wire, make
the battery holder as instructed. You can get covered wire
for free from an old string of Christmas tree lights. (See more
information on the homemade battery holder instructions found
HERE.)
You
can also use the "zip cord" from a non-working drop cord or
electrical cord from a broken appliance. This cord has two
strands that con easily be split apart. Each side makes a
single length of insulated wire,
If you have clip leads and want to make the homemade
battery holder, instead of putting wires on either end, cut two
small strips of aluminum from the food container. (You should be
able to cut the aluminum easily with a good pair of scissors.)
Each strip should be about 1/4 inch longer than the width of the
cell. Tape one strip to the positive terminal of one cell
and the other strip to the negative end of the other cell.
One end of each strip should stick out about 1/4 inch so
that you can attach the clip leads. Finally, place the rubber
band around the two cells, and make certain it pressed firmly
against the metal strips. This will give you a nice tab on
each end on which to fasten a clip lead.
Most buzzers available today are piezo buzzers that work correctly
when attached to the battery one way only. Notice in the photo
that the red wire coming from the buzzer attaches to the positive
or (+) end of the battery, and the black wire attaches
to the negative or (-) end of the other battery. Black wire
almost always indicates negative and red wire represents positive.
The clip leads attached to the battery in the above picture
follow this code. Of course, the color of the wire you use
is not important, but getting the buzzer hooked to the right
ends of the battery is, and the buzzer wires are color coded so
that you will get it right.
This particular buzzer will operate with a voltage of 1.5 to 3
volts. We are using two cells to give us 3 volts because we are
building this to work with another unit of the same kind and
attaching the units with a long electrical cord, so we want to use
the higher voltage. Touch the (+) end from the battery holder
to the red wire on the buzzer and the (-) end to the black wire.
The buzzer should sound. If not, check all of your
connections and be sure that you have the right wires connected to
each end of the battery.
Next, mount the buzzer on the board. You can mount it using
very small screws, double sided foam tape, glue, etc.
Now cut a small strip from the aluminum pan about 3 1/2 to 4
inches long and 1/2 inch wide. Make a sharp bend in this piece
about 1/2 inch from one end. This will be the telegraph key.
Finally, cut three strips of aluminum 1 1/2 inches long and 1/2
inch wide. Fold each of these strips over the long way to
form a two layer strip about 3/4 inch by 1/2 inch. Also cut
two pieces of insulated wire about 3 inches long and
strip about 3/4 inches of insulation from each end
of both wires.
Mount the key (the long aluminum strip) at the bent end by
screwing it into the wood with a sheet metal screw. Before
you tighten the screw completely, wrap the bare end of one of
the wires around the screw along with the bare end of the
black wire from the buzzer unit. Finish tightening the
screw, making sure that the metal strip, screw and the two wires
all make good contact.
Screw another sheet metal screw underneath the other end of the
metal strip. This will be the contact for the key. Before
you tighten the screw completely, wrap one bare end of the other
wire around the screw and finish tightening. Make sure the contact
between the screw at bare wire is good.
Using screws, fasten the other bare end of each wire and
a 1/2 by 3/4 folded aluminum strip to the edge of the board
as shown in the photo. The folded end of each strip should hang
off the edge of the board enough to make a good surface to fasten
a clip lead. If you don't have clip leads, you can just
fasten the bare wire strips to the board and fasten other
connecting wires later. Some hints for connecting wires may
be found
HERE on
The
Science Notebook Electricity pages.
Finally, mount the red wire to the board using the third folded
strip and a screw.
Now connect the positive end of the battery to the red wire using
a clip lead or one of the other ways of connecting wires on the
Electricity pages (see above). Connect the negative end
of the battery to the wire coming from the screw underneath the
metal strip. For right now, you do not need to attach wires
where the green and yellow clip leads are shown.
Checking It Out: If
everything has been wired correctly, the buzzer should sound when
you press the key. If not, check all your connections
against the picture above, and be sure that the connections are
tight.
Going Further: Once
it is working properly, you have a nice buzzer set you can use to
send or receive either tap code or Morse code. But for real
fun, you or a friend can build another unit and connect the two
together to make two telegraph stations. Let's see how...
Connecting Two Telegraph Sets
Materials Needed:
Two telegraph sets made using the plan above; a disposable
aluminum food container; clip leads or wire; one or two long
outdoor electrical extension cords; tape (optional). NOTE:
The extension cords will not be harmed in any way.
CAUTION! The
extension cord(s) are used to connect the two sets together.
While you are using any cord for this purpose, it
should NEVER EVER be plugged in! Otherwise, you might get
a very nasty electrical shock - or much worse! If you don't
understand this, please go play with something else!
Procedure: You can
use an extension cord with either two or three prongs.
Almost all outdoor cords have three prongs - two flat ones
and a third round one. If you have an extension cord with
three prongs, you will only use the flat prongs.
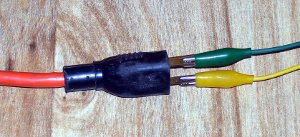
Connect clip leads or wires to each telegraph set where the
green and yellow wires appear in the illustration in the last
activity. Connect the other ends of each of these these
wires (or clip leads) to the blades of the plug on the drop
cord. It is a really good idea to hook up to
the plug end first so that you don't accidentally plug
it in later!
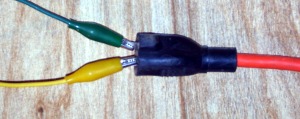
Next, after making absulutely certain that the plug end is
attached to the other set and NOT plugged into the wall, cut two
small strips of aluminum from the aluminum food container about
four inches long and not quite as wide as the slots in the socket
end. Fold each strip over the long way twice so that you
have two strips that are each one inch long. Insert the folded end
of a strip into each of the flat slots in the plug.
If you are using clip leads, fasten a clip lead to each strip,
being sure that the two leads don't touch. If you hear a low
buzz, that means the wires should be reversed.
If you are using wire with the ends stripped, tuck the bare end of
each wire between the fold of each aluminum strip. Again, if
you hear a low buzz, that means the wires should be reversed.
Press one of the keys. If everything is working correctly,
both buzzers should sound. Next, press the other key. Again,
both buzzers should sound. If not, check your connections
carefully and try again. If any of the connections are
loose, you can secure them with tape as necessary.
Using the Stations:
Once you have the two stations working, you can move them
into different rooms, or even different houses. They can
also be used between two tents while you are camping. The
longer your extension cord, the farther you can move them apart.
You can connect two different extension cords for greater
distance. By using batteries on both units, and by using two
cells to produce 3 volts instead of 1 1/2 on each unit, these
units worked well up to 200 feet. They might work over
a much greater distance, but we only had two drop cords!
You can immediately use thse to send and receive tap code, and if
you decide to learn Morse code, two sets connected together will
make learning and practicing a lot more fun!
Tap
Code Shortcuts
OK, now that you know how to send and receive tap code and have
several ways to do so, let's learn some shortcuts!
If you have ever chatted over the Internet or texted over a cell
phone, you already know a lot of shortcuts you can use with tap
code, such as
LOL for "lots of
laughs".
You can also use these shortcuts used by ham radio operators who
send morse code:
Send the letters
BK to say you
are finished for now and waiting for the other person to start
sending.
Send the letters
AR to say you
have finished your message
Send the letter
R to say you
received the last message
Send the letters
CL to say you
clearing (quitting)
Send the letters
AS to tell the
other person to wait or stand by.
Code Book
If you use the tap code a lot, you can really save time by making
a code book. A code book consists of all the shortcuts
you use, such as the texting and ham radio codes mentioned
above. You can also make thousands of three letter codes to
represent words, phrases, or whole sentences. In fact, if
you use all the the letters except K (since it has the same tap
code as C), you can make as many as 13,800 different codes!
MATH BREAK - the total number of
possible combinations is 25 times 24 times 23 which eaquals
13,800.
Let's see how that works.
Start with the lowest combination of three letters you can make
alphabetically and work your way up. We'll do the first ten.
- AAA
- AAB
- AAC
- AAD
- AAE
- AAF
- AAG
- AAH
- AAI
- AAJ
Now decide what each three letter group will mean. You can
pick out words, phrases or sentences that you use a lot. For
example:
- AAA Meet
me
- AAB At my
house
- AAC At
your house
- AAD At
school
- AAE At
the store
- AAF In
camp
- AAG
Tonight
- AAH
Tomorrow
- AAI As
soon as possible
- AAJ In
one hour
You should be able to see that you can send a lot of sentences
with just these ten groups. For example, "Meet me at the
store in one hour" can be sent with just three letter groups - AAA
AAE AAJ. This would be nine pairs of numbers in tap code.
Of course, you can use as many words, phrases or sentences as you
want, but you should list your letters alphabetically so that the
meaning is easy to find. Also, you don't want to have so
many that you spend too much time looking them up. It is
best to use only for long words, phrases or sentences you send
often.
An Example of a Code Book
This is a sample code book that uses only two letter
combinations. As noted above, using three letter code
groups, you can make as many as 13,800 different combinations, but
you would never use anywhere near that many. However, using
only a two letter code, you can have almost 600 (25 x 24 = 600)
different combinations. You can't get qiute that many,
though, because a few of these combinations are actually words
(me, go at, we) or abbreviations used above. Still there are
more combinations left than you would ever use.
Take a look at these and see just how many different messages you
could send.
Abbreviations
| AR |
End of message
(sent only at the end of the message) |
| AS |
When sent by
itself, it means wait or stand by |
| BC |
Because |
| BK |
I am through
sending and waiting for you to respond |
| CD |
Could |
| CL |
Through sending or
receiving, and I am quitting |
| FT |
Foot or feet |
| MI |
Mile or miles |
| N |
In |
| R |
The word "are," or
when sent in response to a message or part of message,
"message received." |
| RP |
Repeat your message |
| SD |
Slow down.
Send slower. |
| SU |
Speed up.
Send faster. |
| U |
You |
| UR |
Your |
| WN |
When |
| WO |
Who |
| WR |
Where |
| WT |
What |
| WY |
Why |
| WD |
Would |
| YD |
Yard or Yards |
Numbers
(since tap code does not include numbers)
| NA |
1 |
| NB |
2 |
| NC |
3 |
| ND |
4 |
| NE |
5 |
| NF |
6 |
| NG |
7 |
| NH |
8 |
| NI |
9 |
| NJ |
0 |
Verbs
| AA |
Come |
| AB |
Find |
| AC |
Go |
| AD |
Have |
| AE |
Help |
| AF |
Look |
| AG |
Meet |
| AH |
Need |
| AI |
See |
| AJ |
Send |
| AK |
Swim |
| AL |
Want |
Verb
Tenses
To make
tenses, add a third letter
Add D for
past tense
AAD
= came
AJD
= sent
Add W for
future tense
AAW
= will come
AJW
= will send
Add G
for perfect tenses
AAG
= coming
AJG
= sending
Nouns
| CA |
Food |
| CB |
House |
| CC |
Lake |
| CD |
Pond |
| CE |
Road |
| CF |
Room |
| CG |
Store |
| CH |
Tent |
| CI |
Trail |
Plurals
To make plurals, add S
CBS
= houses
CIS
= trails
If you want to add others, you can. If you don't think you
would use some of these, leave them off. The idea here is to
make it easier for you to send messages quicker, rather than
harder, so you probably would not want more than 100.
Complete Phrases or
Messages
Part of that hundred could be complete phrases or messages.
In this example, we started with the letter Z because that should
alert the person receiving that if this is a three letter code
group, it is most likely a phrase or sentence code. If you
want to send only two letters, you can still have plenty of
different combination just beginning with the letter Z.
| ZAA |
Can you come over
to my house today? |
| ZAB |
Let's go fishing! |
| ZAC |
Do you have a lot
of homework? |
To make the actual code book, you should list all your codes and
abbreviations twice. The first time, they should be sorted
into alphabetical order by the word, phrase or sentence.
This list will make it easier for the sender to find the right
code or abbreviation. The second list should be alphabetized
by code or abbreviation. This will make it easier for the
receiver to decode the final message.
If this sounds like a lot of work... well, it is. But it
will help you make tap code really useful.
Morse
Code Revisited
Once you have had a chance to use tap code for a while, you will
notice that while it is easy, it does take some time to send and
receive simple messages, even using shortcuts and special
codes. However, if you have found using tap codes to be fun
and useful, you can speed things up a lot by learning Morse
code. Morse code is a little more difficult to learn to
begin with, and it really does have to be memorized to be useful,
but if you take the time to learn it, it will speed things up for
you quite a bit once you do.
Take a look at the International Morse Code chart below.
International
Morse Code
| Character |
Code |
Sound |
|
Character |
Code |
Sound |
| A |
. - |
di dah |
|
U |
..- |
di di dah |
| B |
-... |
dah di di
dit |
|
V |
...- |
di di di
dah |
| C |
-.-. |
dah di
dah dit |
|
W |
.-- |
di dah
dah dah |
| D |
-.. |
dah di
dit |
|
X |
-..- |
dah di di
dah |
| E |
. |
dit |
|
Y |
-.-- |
dah di
dah dah |
| F |
..-. |
di di dah
dit |
|
Z |
--.. |
dah dah
di dit |
| G |
--. |
dah dah
dit |
|
1 |
.---- |
di dah
dah dah dah |
| H |
.... |
di di di
dit |
|
2 |
..--- |
di di dah
dah dah |
| I |
.. |
di dit |
|
3 |
...-- |
di di di
dah dah |
| J |
.--- |
di dah
dah dah |
|
4 |
....- |
di di di
di dah |
| K |
-.- |
dah di
dah |
|
5 |
..... |
di di di
di dit |
| L |
.-.. |
di dah di
dit |
|
6 |
-.... |
dah di di
di dit |
| M |
-- |
dah dah |
|
7 |
--... |
dah dah
di di dit |
| N |
-. |
dah dit |
|
8 |
---.. |
dah dah
dah di dit |
| O |
--- |
dah dah
dah |
|
9 |
----. |
dah dah
dah dah dit |
| P |
.--. |
di dah
dah dit |
|
0 |
----- |
dah dah
dah dah dah |
| Q |
--.- |
dah dah
di dah |
|
Period |
.-.-.- |
di dah di
dah di dah |
| R |
.-. |
di dah
dit |
|
? |
..--.. |
di di dah
dah di dit |
| S |
... |
di di dit |
|
Comma |
--..-- |
dah dah
di di dah dah |
| T |
- |
dah |
|
/ |
-..-. |
dah di di
dah dit |
You'll notice that each letter, number and punctuation mark is
represented on paper by a series of dots and dashes. Morse
code can also be sent using sound or light, but unlike tap code, a
dot is represented by a short sound or flash, and a dash is
represented by a sound or flash that is about three times
longer. There are several good programs and a free podcast
class on the Technology section of the
Useful Downloads
page that will help you to learn code by either sound or flashing
light. No matter which one you use, you should try to learn
every letter as a single sound or flash pattern instead of trying
to count the dots and dashes. You will learn much faster
that way!
Why Is Morse
Better Than Tap Code?
There are several reasons.
First, tap codes take longer to send. Letters in tap code
can require up to ten taps. If you study the tap code table,
you will see that of the 26 letters of the alphabet only 7 can be
sent with four taps or less, and two of those - C and K - share
the same code.
Using Morse code, every character in the alphabet can be sent
using a combination of no more than four dots and dashes, and most
use three or less. Also, in Morse code, every letter of the
alphabet is represented since C and K each have their own unique
code.
In addition, Morse code has codes for each of the numerals, and
each uses no more than five dots and/or dashes. Morse code
also has punctuation marks, and these require no more than six
dots and/or dashes. Tap code does not have either numbers or
punctuation.
The bottom line is that takes less than half the time to send
letters in Morse code than using tap code, so if you want to use
code to communicate, Morse code is much better than tap code, even
though it is a little harder to learn.
For other codes you might
find fun, check out the
Gilbert
Signal Engineering pages. They're old, but the codes
are still useful. And if you want to learn Semaphore, check
out our Semaphore PowerPoints on the
Downloads
page! Finally, you can find a lot more information on Morse
code and amateur radio on the external site located
HERE.
(This external link opens in a new tab or window.)
Here you will find an excellent history of Morse code as well as
many other great links to explore. Check it out!
Also, there's lots more to see and do on our
Experiment Pages or you can
visit
The Science Notebook Home !
 The
Science Notebook
The
Science Notebook