The
Science Notebook
The
Science NotebookSimple Machines - Part 2
The
Science NotebookHome Terms of Use Safety Contact Us Experiment Pages Downloads Supplies Useful Links!
A wheel and axle may be used as a pulley. When two or more pulleys are combined, a mechanical advantage is gained.
In this experiment, and in several that follow, you
will use sewing thread spools as simple pulleys.
Materials Needed: Empty
sewing
thread spool; round pencil; wire or heavy string; 2 meter
strip of wide ribbon (See procedure); 2 paper clips; 100 g
weight; spring scale or force indicator; meter or yard stick; a
friend.
Procedure: If you
don’t have an empty spool, you can borrow a spool with thread
already on it, since the thread will not be damaged. You
should use a small piece of tape to tape the end of the thread
down so that it won’t unwind.
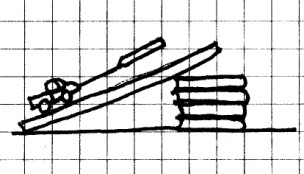
You will need a spool with a hole large enough to allow it to
turn freely when a round pencil is fitted through the
hole. Run the pencil through the hole and tie a piece of
wire or heavy string on each end of the pencil to make a loop
as shown. If you can’t find a pencil small enough to
allow the spool to turn freely, use a large nail.
If you can locate a large used gift bow, carefully remove the
staple or plastic piece from the back. When you unwrap
the bow, you should have a single long piece of wide ribbon.
Two or more may be taped together as needed to make a 2 meter
strip. Otherwise, you can use a piece of new
ribbon. Regardless of which you use, the ribbon should
be at least half as wide as the spool just to keep everything
stable. Place a small piece of tape on both ends to
reinforce the ribbon and keep it from fraying.
Bend two paper clips into an “S” shape. Punch a small
hole in the tape at each end of the ribbon. Hook an “S”
shaped clip in each hole. Hang the weight on one end of
the ribbon by the paper clip, and run the ribbon up over the
spool. Have your friend to hold the pencil and
spool while you attach the spring scale or force indicator to
the other paper clip.
Lift the weight and note how much effort is required to lift
it. How far do you have to pull the string down to
raise the weight 15 cm?
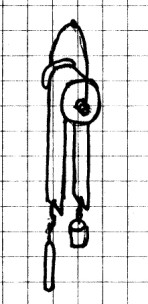
What Happened: The
spool, pencil and string (or wire) combine to make a simple
pulley. When you lifted the weight, you should have seen
that the effort required to lift the weight was about the same
as the weight. There is no mechanical advantage gained by using a
single pulley. You just reversed the direction of the
effort used to lift the weight. To lift the weight 15
cm, you had to pull the string down 15 cm. How far you
have to pull the string becomes important in determining
whether a mechanical advantage is gained, as we will see.
Materials
Needed: Spool; round pencil; ribbon (from the last
experiment); wire or heavy string; paper clip; tape; 100
g weight; force indicator or spring scale; meter
or yard stick; ruler; a friend.
Procedure:
Make a pulley using the spool, pencil, and wire or string,
just as you did in the last experiment. However,
this time, secure the weight to the loop in the pulley by
using a paper clip bent into an “S” shape.
Securely tape one end of the ribbon to the edge of a
table. Place a piece of tape on the other end of the
strip to reinforce it, and punch a small hole through the tape
and ribbon.
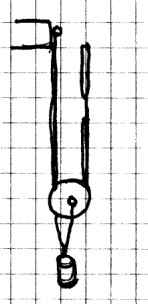
Run the ribbon under the spool pulley and back up as shown.
Then, hook your spring scale or force indicator through the
hole on the free end of the ribbon.
Raise the pulley and weight and notice how much effort is
required to lift them.
Next, move the free end of the ribbon so that it is even with
the tabletop. Have your friend to hold the measuring
stick beside the weight and record the height off the
floor. Lift the weight 15 cm (6 in) above where it
was. When it has been raised, measure how much of the
ribbon is above the tabletop.
What Happened: You saw
that less force was required to lift the weight when the
pulley was set up in this manner than was needed in the last
experiment. If the system were perfect, it would take
exactly half the force. However, the weight of the
pulley has to be taken into account, as does friction, so you
actually may have observed that it took a little more than
half the force of the fixed pulley. A mechanical
advantage of about 2 is gained because the part of the ribbon
on each side of the pulley supports half of the load of the
weight. In the fixed pulley, all the weight was
supported by the side from which the weight was
suspended. The only thing that the ribbon on the other
side did was to change the direction of the force, and no
mechanical advantage was gained.
But there is a trade off. You also observed that to
raise the weight 15 cm, you actually had to move 30 cm of
ribbon through the pulley.
Materials
Needed: 2 spools; 2 round pencils; ribbon strip;
wire or heavy string; paper clip; tape; 100 g weight; force indicator or spring scale; meter
or yard stick; ruler; a friend.
Procedure:
Assemble two pulleys from the spools, pencils and wire or
string, as you did in the previous experiments. Fasten
the weight to the loop of one of the pulleys. Also,
prepare a 2 meter strip of ribbon as you did in the last
experiment.
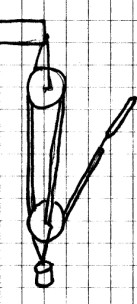
Refer to the illustration. Tape one end of the ribbon to
the pencil of the upper pulley as shown. Next, while
your friend holds this pulley, run the strip under the bottom
pulley with the weight, and back up over the top pulley.
Hook the scale to the free end of the ribbon and pull.
Notice how much force is required to lift the weight.
(NOTE: Using two spool pulleys is harder than it looks, so you
may have to work at this a bit to get it to work just right.)
Move the free end of the ribbon so that it is even with the
top of the top pulley. Have your friend to measure the
height of the weight above the top of the floor. Raise
the weight 15 cm. As you do, measure the length of the
ribbon that is required to be moved to raise the weight 15 cm.
What Happened: Using
these two pulleys to lift the 100 g weight required about 50 g
of force. As before, it was probably a little more, due
to friction and the weight of the pulley. The mechanical
advantage is roughly double that of the fixed pulley, but
about the same as that of the moveable pulley.
You should have also seen that you had to move about 30 cm of
ribbon to lift the weight 15 cm, just as with the single
moveable pulley.
When the pulleys are arranged in this way, there is no
advantage to using two pulleys over one moveable one. If
you examine the setup carefully, you will see that only two of
the three parts of the string are supporting the weight.
The portion taped to the pencil, does not support any of the
weight. In the next experiment we will use all three
strings to support the weight to gain a greater mechanical
advantage.
Materials
Needed: Same as the last experiment.
Procedure: Set up the
two pulleys as shown. This time, you will connect the
ribbon to the bottom pulley instead of the top.
Again, raise the weight and measure the amount of force
required to lift the weight. Also, measure how much
ribbon has to be moved to lift the weight 15 cm.
What Happened: This
time, all three parts of the ribbon are supporting the
weight. It takes about 33 grams of force to lift the
weight, but you must move about 45 cm of ribbon to lift the
weight 15 cm. The mechanical advantage is about 3.
Going Further: Looking
at these experiments, you may have noticed that the mechanical
advantage is related to the number of parts of the ribbon in a
pulley system that actually support the weight. Ignoring
friction and the weight of the pulley attached to the weight,
the mechanical advantage is equal to the number of parts that
bear the load.
You can also determine mechanical advantage for the pulley just
as for a lever, by dividing the weight lifted by the
effort required to lift it.
A third way to determine the mechanical advantage is to divide
the distance the ribbon has to be moved by the distance the
weight moves. In this experiment, the ribbon had to be
moved 45 cm to move the weight 15 cm.
When pulleys are combined to produce a mechanical
advantage, the combination is called a block and tackle.
CAUTION! Always use sharp
objects such as knives or scissors with adult supervision
only! Hold any sharp point away from your body,
particularly your eyes.
Materials Needed: Four
spools; two round pencils; two coat hangers; wire cutters;
ribbon; small pail; spring scale or force indicator.
Procedure:
Place two spools on each pencil. Cut the two coat
hangers, and bend the ends around the pencils as shown.
Secure one end of the ribbon to one of the pencils and run the
ribbon over and under the pulleys as shown. Hang the top
pulley over a low tree limb, and hang a small pail on the
lower one.
Place a heavy object in the pail and lift it using the block
and tackle. Can you tell the difference?
Refer to “Going Further” in the last experiment. Use the
spring scale to determine the mechanical advantage. Also
find the mechanical advantage by the number of load bearing
sections and by the length of cord required to lift the weight
a certain height.
Spool pulleys will help you
understand how pulleys work, but they can be a little
awkward to use, since you have to use a strip of ribbon with
them. If you want better pulleys for your experiments,
there are a couple of ways to make them. Both require
a little extra effort, but either one could be used to
provide pulleys or a block and tackle for a science project.
CAUTION!
Always use sharp objects such as knives or scissors with
adult supervision only! Hold any sharp point away from
your body, particularly your eyes.
Materials Needed:
Heavy corrugated cardboard; compass; scissors; nail; strong
wood or paper glue; small nuts and bolts (see procedure); wire
cutter; pliers; coat hanger.
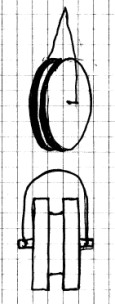
Procedure: For each
pulley you want to make, draw and cut out 2 circles with a 4
cm (1.5 in) radius. Draw and cut a third circle that is
a little smaller than the first two. The sizes are not
critical, but they should be the same for every pulley you
make.
Use the nail to punch a hole through the center of each
circle. Place all three circles on the nail with the
smaller one in the middle. Glue the smaller disk between
the two larger ones. Allow the pulley to dry and remove
from the nail.
Cut a section of clothes hanger wire about 20 cm (8 in) long
and bend it as shown. If you are going to put two or
more pulleys on the same bolt, you will need to cut this a
little longer.
The size of the bolt and nut you
use will depend on how many pulleys you want on each
axle. Select a bolt and nut that is about twice as long
as the total thickness of all the cardboard pulleys.
Push one end of the wire onto the bolt. Push the
cardboard pulley through the bolt as shown. You may need
to work the cardboard pulley a little to get it to spin freely
on the bolt. If you are using more than one pulley, place the
others on the same way. Finally, place the other loop on
the bolt and place the nut on the bolt. Tighten the nut,
but not so much that the pulley cannot spin freely.
Going Further: If you
want to place two or more pulleys on a bolt to make a block
and tackle, you will need to choose a bolt that is long enough
to fit all the pulleys and that has enough extra room for the
wire support. Obviously, the wire support will have to
be longer, too. You may also want to place a metal
washer between each pulley to reduce friction between the
individual pulleys.
Cardboard pulleys are fine for lighter weights, but
heavier weights require stronger pulleys. This
activity shows you how to make pulleys from thin plywood or
fiberboard.
CAUTION! You should get an adult friend to
do the wood cutting. Never use any power tool without the
supervision of an adult who knows how to use it safely.
Materials Needed:
Piece of thin plywood (less than 1/4 inch) or fiberboard
(scraps are fine); electric drill and hole saw set; sandpaper;
nail; wood glue; clamps; an adult friend.
Procedure:
A hole saw set is used with an electric drill to drill holes
to mount door knobs and locks. It is available at most
hardware stores. You should be able to find an adult friend
that has such a hole saw set and a drill who will help you
with this.
For each pulley you want to make, have your friend to cut two
holes in the wood the same size, and a third one that is
slightly smaller. Each time a hole is cut, there will be
a circle of wood inside the bit. Remove and save the
circles.
The pulleys made in the lab of The Science Notebook were
cut with the two largest saws, the 64 mm (2 ½ in) and 54 mm (2
1/8 in) diameter saw bits, but you can use most any size you
want. The circles will probably be rough around the edges, so
you may need to sand the edges smooth.
Each circle will also have a hole in the center. You
should find a nail that fits snugly through this hole.
Place a large circle, a small circle, and the other large
circle on the nail. Glue the three circles together with wood
glue and press the circles firmly together. If you can
borrow a wood clamp, clamp them.
When the glue dries, remove the nail. By selecting the
right size nut and bolt, you can now use this wooden pulley
just like the cardboard pulleys in the previous
experiment.
An inclined plane is a sloping surface that allows
objects to be raised with less effort than would be required
to lift them straight up. Among the uses for the
inclined plane are ramps, stairs and screws.
Materials
Needed: Flat board or piece of thick corrugated
cardboard about 1 meter (3 ft) long; several books; toy car;
force indicator or spring scale; weights (see Procedure);
ruler.
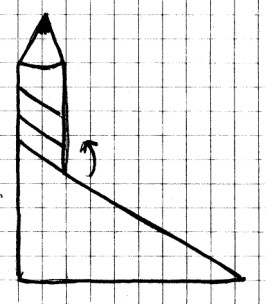
Procedure: Make
an inclined plane by leaning the cardboard or board against a
stack of books about 30 cm (1 ft) high.
Find a small toy car. Try to find one rolls easily and,
if you are using the homemade force indicator, one that weighs
about 100 grams or less. If it weighs less, tape small
nails, coins or other weights, or add modeling clay to it
until it weighs as close to 100 grams as possible.
(HINT: You can use your force indicator to weigh it!) If you
have a laboratory spring scale, use any small car that rolls
easily and that can be weighed accurately.
Measure the length and height of the inclined plane.
Attach the scale to the front of the car and pull the car up
the inclined plane. Note how much effort is required to
pull the car up the plane as indicated by the force indicator
or spring scale.
Lower the inclined plane to 15 cm (6 in) high by taking away
some of the books. Again pull the car up the plane and
measure the effort required to get it to the top.
What Happened: You
should have observed a mechanical advantage, but how much you
observed depends on how long and how steep the plane
was. The mechanical advantage increased even more when
you lowered the plane. In both cases, to lift the car to
the top of the plane, you had to move the car the entire
length of the plane. The trade off that produced the
mechanical advantage was that the total distance you had
to move the car was greater than the height you actually
raised the car.
Going Further: Can
you calculate the mechanical advantage of each inclined
plane? Remember:
We usually think of an inclined plane as being
flat, but this experiment show that many useful inclined
planes are actually spirals.
Materials Needed: Paper;
ruler;
scissors; 2 pencils; tape; large screw.
Procedure: Cut a
rectangular piece of paper about 23 cm (9 in) long and 13 cm
(6 in) wide. Fold the paper diagonally and cut along the
fold to make two triangles. Tape the 13 cm (6 in) side
one of the triangles to the edge of the pencil with the 23 cm
(9 in) side on the bottom and roll the paper on the
pencil. Tape it down when you finish.
Hold up the other triangle so that the 23 cm (9 in) side is on
the bottom. You should immediately recognize this as an
inclined plane. Measure the length of the inclined plane
(the longest side). You should realize that if you were
to move something up this inclined plane, you would have to
move it the length of the plane.
Now take your pencil. You have just wrapped and taped an
inclined plane to the pencil, and it is now spiral
shaped. To prove this, take another pencil and
place the point at the bottom of the paper spiral. Next,
place the point of this pencil on the edge of the
paper at the bottom of the screw and trace your way
around the spiral.
Finally, take the screw and
place the pencil at the bottom in the groove. While
holding the pencil point in the groove, turn the screw.
You should see the point of the pencil make its way up
the screw.
What Happened: The
pencil was moved to the top of the paper along the edge of an
inclined plane. You should have immediately noticed that
the paper spiral looks just like the spiral on the
screw. It is.
It takes a lot of energy to push a 6 inch nail into a piece of
wood using a hammer, but by cutting a spiral inclined plane
into metal to make a screw, much less energy is required to
push it into the board using a screwdriver. As with all
machines, there is a mechanical advantage, but the advantage
is at the expense of the distance that the object has to be
moved. The screw has to be turned a number of times to
get it into the board.
Going Further: With
the screw, the inclined plane (the thread) is being forced
into the board. But in order for the thread to cut into the
board, It also depends on another simple machine that we will
study next - the wedge. After doing the next experiment, try
screwing a wood screw into a board and watch how this
works.
A bolt, which is another inclined plane, works by moving a nut
along the inclined plane. Observe what happens as you
spin a nut up a bolt.
The last of the simple machines is the wedge.
A wedge is an object that has a sharp edge or point.
Wedges are used to cut or to split. Examples of wedges
are axes, scissors, knives, pins and nails.
CAUTION!
Always use sharp objects such as knives or scissors with
adult supervision only! Hold any sharp point away from
your body, particularly your eyes.
Materials Needed: Vegetable
knife;
apple.
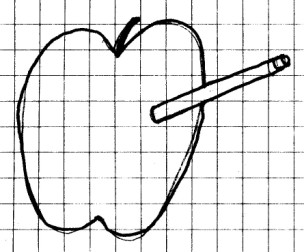
Procedure:
Carefully examine the knife blade. Notice that the
cutting edge is narrow and sharp, but that the opposite side
is wider.
Using the blunt side of the blade, CAREFULLY try to cut into
the apple. Now use the sharp side to cut the apple.
What Happened: You
were not surprised to see that the thick side of the knife
didn’t cut the apple, or if it did, it required a lot of
effort. However, the sharp side cut the apple much
easier. Why?