The
Science Notebook
The
Science NotebookCurrent Electricity and Simple Circuits - Pt. 2
The
Science NotebookHome Terms of Use Safety Contact Us Experiment Pages Downloads Supplies Useful Links!
Sometimes you want to add something to a circuit
to limit the amount of electricity moving through a
circuit without blocking it completely. A device
that does this is called a “resistor”. Let's see how
one works.
Materials Needed:
A
mechanical pencil lead or lead from a regular pencil;
homemade battery holder with two batteries; light bulb
holder and light; wire; connectors of your choice (See
this experiment in Part 1).
(Clothespin
clamps work well for this experiment.)
CAUTION!
Always
use sharp objects such as knives or scissors with adult
supervision only! Hold any sharp point away from
your body, particularly your eyes.
Procedure:
If
you don't have a lead from a mechanical pencil get an adult
to help you split a wooden pencil to expose the lead.
You will first need to pull the eraser and metal holder from
the pencil using a pair of pliers. The lead is
sandwiched in between two layers of wood. If you look
carefully at the trimmed end of the pencil, you can see the
two layers. Carefully split the pencil and separate
the two pieces of wood. The lead may then be removed,
but care must be taken not to break it, or better still, it
may be left in the wood on one side of the pencil.
Note: Some less expensive pencils do not have
the lead sandwiched in between two layers of wood, so you
need to look for one that has two clear layers.
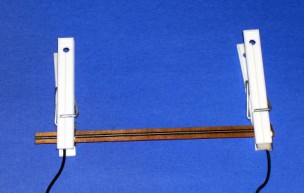
Next, assemble the following circuit.
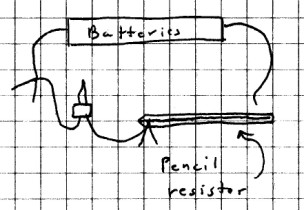
One end of the pencil lead
should be clipped to the bulb holder wire using foil and a
clothespin or other connector. Be careful not to break
the lead! Now firmly press the wire from the other end
of the battery holder on the lead near - but not
touching - the bulb holder wire. The bulb should
light. How bright is it? Now move the wire
farther down the lead and again firmly press down. Is
there any change?
What To Look For:
You should notice a difference in the brightness of the
light as you move the wire along the pencil lead.
What Happened:
The pencil lead allows electricity to move through the
circuit, but some of the electrical energy is being lost to
the pencil lead in the form of heat. Thus, the bulb is
not able to burn as brightly when the electricity moves
through the pencil lead. In fact, the more lead the
electricity has to flow through, the dimmer the bulb gets.
You probably already know that a "lead" pencil is not really
made of lead. Instead, it is made from graphite, a
form of carbon. Carbon is one of a class of substances
that will conduct some electricity, like a conductor, but
will also block some of the current. Any substance
that restricts the flow of electricity is called a resistor.
Resistors are used in almost all electronic circuits, and
you have just made a model of one such circuit. A
dimmer switch is actually a combination of a switch and a
variable resistor (a resistor that may be
adjusted). By moving your wire along the pencil lead,
you actually used the pencil lead as a variable resistor in
a dimmer circuit.
The volume on many radios, televisions and other similar devices is also controlled by a resistor.
Many electronic circuits use devices called
capacitors. These devices perform a number of useful
functions. While a study of how they work is beyond the
scope of this site, we can make a capacitor and study at
least one feature of these devices.
Materials Needed:
Two 15 cm (6 in) square pieces of aluminum foil; paper
towel, plate; water; 9 volt battery; old speaker; voltmeter
(optional).
Procedure:
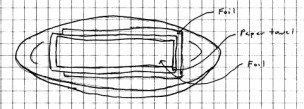
Place
one square of aluminum foil inside of a folded paper towel
with one end of the foil sticking out as shown in the
illustration. Now place the other piece of foil on top
of the folded paper towel. It is very important that
the two pieces of foil are completely separated by the
towel, and that they do not touch. However, one edge of the
top layer of foil should be near the edge of the paper towel
and about 1 cm (1/4 in) from the bottom piece of foil.
Place the foil sheets and folded towel into the plate.
Soak the paper towel by pouring just enough water onto the
towel in the plate. Pour off any excess water.
Press the sheets of foil and paper towel together and again
pour off any excess water.
Next, press the two terminals of the 9 volt battery onto the
two sheets of foil. One terminal should touch one
piece of foil, and the other terminal should touch the other
sheet of foil, but the two pieces of foil should not touch
each other. Hold the battery in place for a few seconds and
then remove it. This will "charge" the capacitor
with electricity, and you should hear a slight sizzle as
your capacitor charges.
Touch one of the speaker wires to one of the foil sheets
and, at the same time, touch the other wire to the other
sheet. Do you hear anything? You should be able
to hear a distinct crackle or static in the speaker or
earphones. This indicates the presence of electric
current. To prove that it does, touch the two speaker
wires to the ends of a battery. The static will
probably be much louder, since there is far more energy
stored in the battery than in this capacitor.
If you have a voltmeter, have an adult to help you measure
the voltage between the two pieces of foil. You should be
able to measure about a volt between the two pieces of foil.
If you hold the probes in place for a while, you will see
the voltage begin to drop as the capacitor loses its charge,
or discharges.
What Happened:
When you placed the battery terminals against the foil, some
of the electricity generated by the battery charged the
capacitor. By placing the meter on the capacitor, you
were not only able to see that it was charged, but you could
also see it slowly discharging as the voltage dropped.
Going Further:
All capacitors consist of two or more metal "plates"
separated by an insulator called a "dielectric". In
your capacitor, the sheets of aluminum foil were the plates,
and the paper towel soaked in water was the
“dielectric”. Under ordinary circumstances, clean
water does not conduct electricity and is an
insulator. However, it can be made to conduct
electricity if the voltage or current is high. It will
also conduct electricity if it contains any
impurities. The water is not a conductor here, but it
is used to hold the towel paper close to the two layers of
foil.
In capacitors used in electronic circuits, the plates are
usually metal. The dielectric may be air, paper, mica,
or some type of plastic. There are many different
kinds of capacitors, but all will hold a charge in much the
same way as yours did.
Materials Needed: Homemade
battery holder with two AA, AAA, C or D batteries; bulb and
holder; connectors of your choice; foil; 9
volt battery.
Procedure:
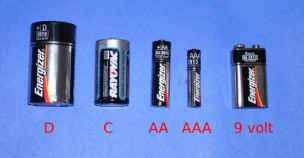
First
examine one of your AA, AAA, C or D batteries
carefully. You will notice that it has a "+" at the
top end and a "-" at the bottom.
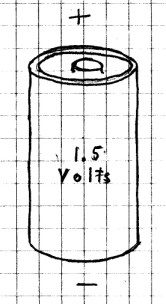
Strictly speaking, this is not
a battery. Instead, it should be called a cell.
AA, AAA, C and D cells are all 1.5 volt cells. The
difference between each is obviously the size.
Generally, the larger sizes will last longer in any given
circuit, but the voltage in all is the same - 1 1/2 volts.
When you place the two cells in the battery holder,
you make a "battery". A battery is made of two or
more cells connected together. In your homemade
battery holder, two cells are connected “+” end to “-“
end in
series to make a 3 volt battery. With a wider
strip of paper, you could combine three cells end to end to
make a 4.5 volt battery.
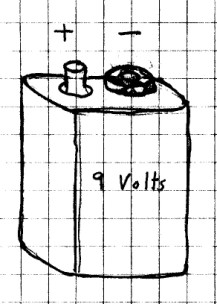
On the other hand, the 9 volt battery really is a
battery. If you could see inside of it, you would see
that it is made of 6 very small 1.5 volt cells connected in
series. (6 x 1.5 = 9) Each terminal of the
9 volt battery is also marked "+" or "_".
What To Look For: We say that the "+"
side of the battery or cell is the positive terminal, while
the "-" side or end is the negative terminal. You'll
see why this is important in the next experiment. As you
have you have already seen, there is a difference between a
cell and a battery. However, most people will call it
a battery, regardless of whether it really is a battery
(made of two or more cells), or just a single cell.
But now you know better.
Materials Needed: Homemade
battery holder with two AA, AAA, C or D cells; light
bulb with holder; 9 volt battery; connectors of your choice.
Procedure:
Touch
the end of one of the cells to one of the wires from the
lamp holder, and the other wire to the other end of the
cell. Observe the brightness of the light. Next,
place two cells together in the homemade battery holder so
that the “+” end of one cell touches the “-“ of the other
cell and hook up the light. Is there any change in the
brightness? Finally, touch the ends of the bulb holder
to the terminals of the 9 volt battery. Now what do you see?
What Happened:
When you hooked up the light to a single 1.5 volt cell, the
light lit. When you combined the two cells 1.5 volt
cells, you created a 3 volt battery and the light was
brighter. Finally, the light was brightest with the 9
volt battery.
Electric current is actually a stream of negative electric
charges called electrons moving through the parts of a
circuit. A cell or battery uses chemicals to generate
a concentration of electrons at it's negative
terminal. When you make a circuit by connecting the
ends with wire, electrons begin moving through the wire and
bulb, and they end up at the positive terminal, which has a
shortage of electrons. We say that electricity flows
through the circuit. When all of the excess electrons
have moved from the negative terminal through the wire to
the positive terminal, the cell or battery is said to be
discharged. When this happens, we commonly say the
battery is dead.
Voltage is actually a measure of the pressure with
which the electrons are being "pushed" through the
circuit. The greater the pressure (voltage), harder
the electrons are being pushed, and the brighter the light
will burn.
Going Further: Can
you use several AA, AAA, C or D cells to make a 4.5, 6 or
7.5 volt battery?
Materials Needed: AA, AAA, C or
D cell; 9 volt battery; a 15 cm (6 in) piece of wire with 1
cm (1/4 in) stripped from each end.
Procedure:
Touch
the two ends of the wire to the two cell terminals.
Feel the wire as you do. Do you notice anything?
Repeat with the 9 volt battery. CAUTION! Do not
hold the wire in place for more than a couple of seconds, or
you will run the cell or battery down.
What To Look For:
The
wire should very quickly begin to feel warm.
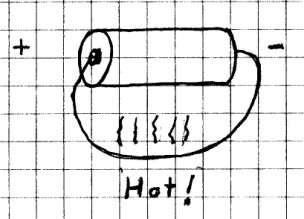
What Happened:
You just created a circuit with nothing but a wire
path. There was nothing such as a light bulb or
resistor, to offer any resistance to the flow of electric
current. A large number of electrons moving through the wire
with little or no resistance created heat. Because the
voltage was greater with the 9 volt battery, you may have
noticed that it heated up more quickly.
If you were to leave the wire in place for long, the
wire would get very hot, and quickly run the battery
down. A short circuit can be very dangerous because
the heat generated may be enough to start a fire. In
your home, electric circuits are protected from "shorts" by
fuses or circuit breakers.
CAUTION!
Always
use sharp objects such as knives or scissors with adult
supervision only! Hold any sharp point away from
your body, particularly your eyes.
Materials Needed:
Fresh
lemon; knife; small piece of copper; small piece of zinc (A
piece of copper wire or brass hardware such as a screw may
be used for the copper, and any galvanized hardware such as
a nail may be used for the zinc); speaker from an old radio;
voltmeter (optional) connector of your choice.
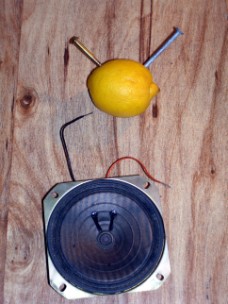
Procedure:
With a sharp knife, carefully cut two slits into the
lemon. Stick the piece of zinc into one of the slits
and the piece of copper into the other slit. Make sure
the slits do not cross each other and that the two metal
pieces do not touch. Connect one of the speaker wires
to one of the pieces of metal using a connector of your
choice. (One of the clothespin connectors works well.)
Touch the other wire from the speaker to the
other piece of metal. Rub the bare end of the wire
against the metal as you listen to the speaker. Do you
hear anything?
If you have a voltmeter, see whether you can read a voltage
between the two pieces of metal.
What To Look For:
What
do you hear when you touch the wires to the metal? How
much voltage do you read using the voltmeter?
What Happened: Sound
is created in a speaker by an electric current. The static
you heard when you touched the wires to the lemon cell
was caused by a weak electric current. (Remember the
capacitor?) If you had a voltmeter, you should have been
able to read a little less than 1 volt.
You have just made a very simple, but very weak, cell.
Although a voltmeter will measure about 1 volt, the amount
of moving electrons, or current, this cell can produce is
very small. It is not enough to do any useful work - to
light up a light bulb, for example.
All electric cells consist of two different kinds of metal,
or metal and a carbon rod, separated by some chemical.
The chemical is usually an acid. If the chemical is a
liquid, the cell is known as a wet cell, but if it is in the
form of a chemical paste (usually a liquid mixed with a dry
material), it is known as a dry cell. The cells you
have been using in the previous experiments are dry
cells.
By connecting several of these lemon cells together, it is
possible to make a battery that will produce enough
electricity to do some useful work, but even to light your
small Christmas light would require quite a few lemons!
CAUTION!
Always
use sharp objects such as knives or scissors with adult
supervision only! Hold any sharp point away from
your body, particularly your eyes.
Materials Needed:
Very
low current light emitting diode (LED). (These are
available from Radio Shack®. One that definitely works
is part number 276-310, but most any small LED will probably
be OK.); 3 lemons; 3 small pieces of copper; 3 small pieces
of zinc (You can use brass screws for the copper and
galvanized nails for the zinc.); several connectors of your choice.
(Clothespin connectors with foil work well to connect
the lemon cells, and alligator clips or leads work well to
connect the diode.); 4 15 cm (6 in) pieces of insulated wire
with 1 cm (1/4 in) insulation removed from each end.
Procedure:
A
light emitting diode is an electronic component that
produces light when an electric current passes through it in
one direction. Although it looks like a small light
bulb when lit, it does not work the same as a light
bulb. For one thing, it requires far less energy to
light up, and for another, it will light up only when hooked
up one way.
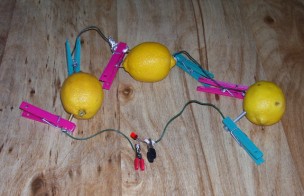
Prepare 3 lemon cells as you did in the last experiment and
line them up so that the copper from one lemon is lined up
with the zinc in the lemon next to it. Connect the three
cells together with the wire, and clothespins (or other
connectors). Because the clothes pins are so large, you
may want to use small alligator clips if you have them in
your school science lab. If not, you can get them from Radio
Shack® (Part Number 270-374). They can be used
wherever clothes pins are called for.
The wire should be connected so that the copper from one
lemon is connected to the zinc from the next. There will be
a free wire coming from the copper from the lemon at one end
and from the zinc from the lemon on the other end. You
have connected three lemon cells in series to form a lemon
battery.
Most LED’s have one wire that is longer than the
other. Many also have a flat edge close to one of the
leads. The side with the shorter wire and/or flat side
is the negative side, and is known as the cathode. The
other side is the positive side and is called the anode.
Carefully bend the wire leads of the LED away from each
other. Connect the free wire coming from the zinc
piece of the lemon on one end to the cathode side of the
LED, and connect the free end of the wire from the
copper side of the lemon on the other end to the anode side
of the LED. The LED should light faintly. You
may need to darken the room or cup your hands around the LED
to see this.
If it does not light, make sure that all of your connections
are tight. If it still doesn’t light, try reversing
the leads on the LED.
Now, reverse the two leads on the LED. What
happens?
What Happened:
The
three cells were combined together in series to make a
battery. When cells are combined together with the “+” of
one cell connected to the “-“ side of the next cell, they
are said to be wired in series, and the total voltage is the
sum of the voltages of each cell. This combination of
lemon cells is a battery. Since each lemon cell has a
voltage of about 1 volt, the total voltage of the three
lemon cells is about 3 volts, and this is just enough to
light this LED, even with the weak current the lemon cells
produce.
When these leads are reversed, the LED will not light.
This is because current will flow through an LED in one
direction only.
Some books will tell you that you can hook up a small bulb
to a lemon cell and it will glow faintly, but this simply is
not the case.
Going Further: There
are several investigations you can try. First, see if
you can observe any light from the LED with just two lemons,
and then with one. You may need to do this in a dark
room. If you have a voltmeter, you may want to measure
the voltage of each cell and the total voltage. You
may need an adult to help you do this. Many voltmeters
will also measure current, and you might want to get an
adult to show you how to do this as well.
Also, try making cells using oranges, grapefruit, or other
citrus fruit. You may also want to try making cells
using small cups filled with vinegar, soft drink mix, or
carbonated beverages. If you do, make sure that the
copper and zinc pieces in each cup are not allowed to touch
each other.
You may want to learn how voltage, current and resistance
are related. This is explained by a principle known as
“Ohm’s Law”. By learning to understand Ohm's Law, and
using what you have already learned about electricity, you
should be able to design one or more experiments for a
science project that will increase your understanding of
electricity.
You may also want to learn more about how an LED produces
light.
CAUTION!
Always
use sharp objects such as knives or scissors with adult
supervision only! Hold any sharp point away from
your body, particularly your eyes.
Materials Needed:
Homemade
battery holder with two AA, AAA, C or D cells; a raw potato.
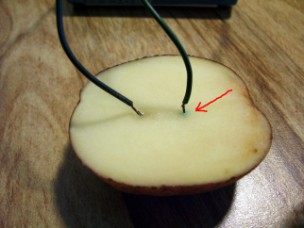
Procedure:
Cut the potato into halves. Make two slits in one of
the potato halves about 2 cm (½ in) apart and stick the two
wires from the battery into the two slits. Wait a few
minutes.
What To Look For:
Do you see any change in the potato at either of the
wires? If so, which terminal is the wire connected to?