 The
Science Notebook
The
Science NotebookLionel Chem-Lab - Chapter 1
The
Science NotebookHome Terms of Use Safety Contact Us Experiment Pages Downloads Supplies Useful Links!
Lionel Chem-Lab sets are intended to instruct and entertain children. They do not include dangerously poisonous chemicals. Where it has been necessary to use a questionable chemical in the larger sets in order to perform particularly interesting experiments, the strength of the chemical has been so reduced as to render it entirely harmless in the quantities supplied. This does not mean, however, that any chemical can be eaten or swallowed without causing illness. We desire, therefore, to make it clear that Lionel Chem-Lab is intended only for boys and girls old enough to read and understand this book and to observe common household and rules of caution. It is only prudent to state that, under any other circumstances, all experiments should be conducted under a parent's supervision.
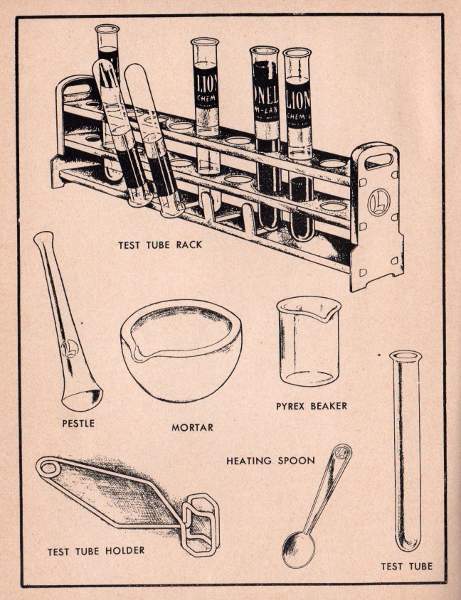
Test Tube Rack. The test tube rack is one of the most useful pieces of laboratory equipment. It is designed for supporting test tubes while performing experiments. Washed test tubes may be dried by placing them inverted on the prongs projecting from the lower platform.
Mortar And Pestle. These implements are used for grinding and mixing chemicals. They are the age old symbols of pharmacy and are a familiar sight at any druggist's.
Beaker. The beaker is a handy piece of Pyrex glassware made especially for the heating of liquids in a chemical laboratory.
Test tube holder. Never hold a test to tube over a flame with your fingers. Always hold it with the wire test tube holder.
Heating Spoon. This spoon is used for heating solids. It should not be confused with the smaller measuring spoon.
Test Tube. Test tubes are the chemist's stock in trade. They are used in all his experiments. Made of special glass to withstand heat, a test tube is used when heating substances or making solutions in the laboratory.
Test Tube Brush. Never use dirty test tubes. Be sure to wash and rinse them thoroughly after each experiment. The test tube brush is designed especially to scour the bottom and sides of the test tube to clean it completely.
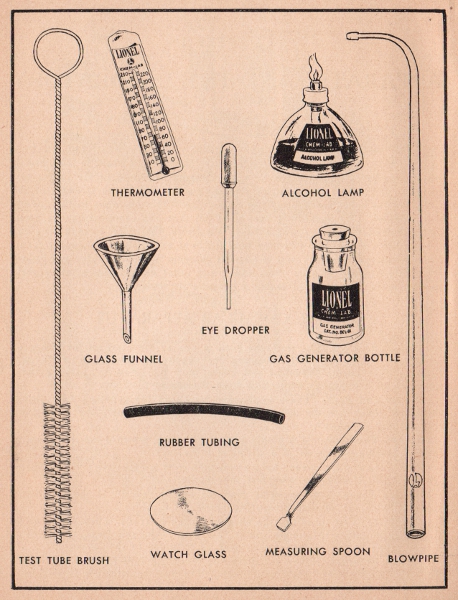
Thermometer. The Lionel glass enclosed thermometer is used for measuring the temperatures of solutions. It has a Fahrenheit scale ranging from 20° below 230° above zero.
Alcohol Lamp. Use denatured alcohol obtainable at your druggist's as a fuel. Never fill the lamp more than three-fourths full and be careful to dry the glass and wick holder before lighting the lamp. One filling of alcohol will keep the lamp burning for about one hour and a half. When the lamp is not in use, the alcohol will quite readily evaporate through the wick.
Blowpipe. The blowpipe is used in conjunction with either the alcohol lamp or the candle to perform experiments on oxidation and reduction where an extremely hot flame is desired. Full instructions for its use are given on the following page.
Glass Funnel. The glass funnel is for use in pouring liquids into small mouth containers. When filter paper is properly placed in the mouth of the funnel, liquids containing suspended matter can be filtered.
When an experiment requires a funnel with a long stem, simply make an extension by using a short length of rubber tubing coupled with a short piece of glass tubing.
Eye Dropper. Whenever the directions in experiment call for one or more drops of a certain liquid, the eye dropper may be used to measure out the exact quantity.
Gas Generator. The gas generator supplied in the larger sets, may be used when making any gas for delivery into another container or solution. Complete instructions on setting up the generator are given in the experiments.
Rubber Tubing. Various lengths of rubber tubing are supplied for connecting sections of glass tubing.
Watch Glass. A watch glass or crystal is used for evaporating solutions when a residue is required.
Measuring Spoon. Whenever an experiment specifies a measure of a certain chemical, or a fraction thereof, be sure to use this small measuring spoon.
Gas Delivery Tube. This consists of bent glass tubing and a small cork stopper with a hole in it. When properly attached to a test tube, it can be used in place of the Gas Generator.
Stirring rod. The stirring rod is used to make solutions and to hasten the dissolving of a substance.
Erlenmeyer Flask. This is a special laboratory flask with the large bottom and a narrow neck. It is used to heat liquids which would boil over in a beaker or other container.
Candle. Included in every outfit and used as a source of heat when the alcohol lamp is not available.
Balance. The Lionel Balance is a carefully designed instrument, similar to scales used by chemists and pharmacists. With the one-gram weights
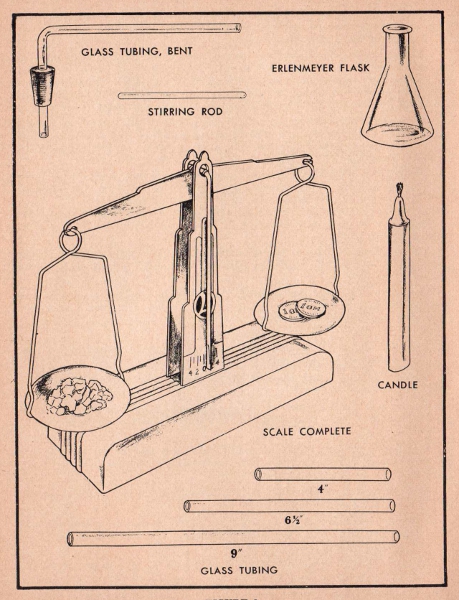
supplied, the proper amount of chemical to be used in the various experiments can be weighed out accurately. It is thoroughly reliable for use with Lionel Chem-Lab.
Glass Tubing. Various lengths are supplied for use in making simple laboratory apparatus.
Place a Sheet of Heavy Cardboard or plywood on top of the table or desk on which experiments are being conducted in order to protect the surface.
Read and Study Instructions Carefully before starting to mix chemicals or set up apparatus. Be sure to follow the procedure exactly and particularly note quantities of chemicals specified. Good results require accurate work.
Apparatus And Chemicals required for each experiment are listed at the beginning of the experiment. Place all the necessary materials in front of you before starting. Always replace the same caps and stoppers on the bottles to avoid spilling contents and contaminating the chemicals. Make sure caps and corks to fit tightly so that chemicals do not lose their strength.
Use Clean, Dry Test Tubes. Carefully rinse them after each experiment. Avoid heating dry test tubes or thermometer, then suddenly wetting them, as this will crack or break the glass. If a test tube cannot be cleaned with a test tube brush and ordinary soap and water, fill it with a soapy solution and let it remain for a few hours or overnight.
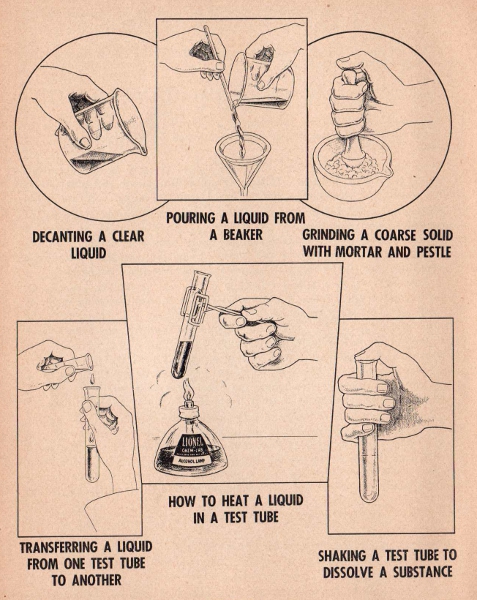
When Smelling a Gas from a test tube, always turn the mouth of the tube away from your face and waft the gas toward your nose by the movement of your hand. Occasionally an experiment calls for the making of a gas which may irritate the nostrils if inhaled in too large quantities.
When Heating a Test Tube, keep it moving over the flame in a circular motion to allow the tube and contents to heat uniformly and gradually.
Never Expose Your Eyes or Face to the mouth of a test tube or beaker in which chemicals are being heated. Keep mouth of the test tube away from you. It is not always necessary to heat materials in order to dissolve them - close the mouth of the test tube with your thumb and shake vigorously.
It is very important to know how to use the
blowpipe properly. We suggest that you read the following
instructions very carefully in order to obtain the best results.
The hottest part of a flame is the tip. This is known as the
oxidizing portion, indicated at - A - in the figure. The
reducing flame is the tip of the luminous column indicated at - B
-. Many metallic oxides, such as a lead

oxide, when heated in the reducing flame are very easily reduced to metals.
You can use either the candle or the alcohol lamp as a source of heat. Actually, in some cases the candle is better. As to the position of the nozzle of the blowpipe with relation to the flame, refer to the illustrations which show the correct position for either oxidizing or reducing processes. A steady stream of air is necessary. Practice blowing through the tube with an even, steady pressure, inhaling through the nose, in order to get the desired results. After practice you will be able to take a steady stream of air through the tube for quite a long period. Take the utmost care when using the blowpipe for with such a searing flame there is some danger of being burned.
Practice in using the blowpipe and in locating the substance in the proper come or position of the flame will enable you to perform the blowpipe experiments with the best results.
Cut two small pieces of white paper approximately two inches square, creased diagonally placing one piece in each weighing pan. This is to protect the surface of the pans from the chemicals and weights. Any white, glazed paper is suitable for this purpose. Always use clean scale paper otherwise small particles of the chemical previously used which may have adhered to the paper will spoil your experiments.
Before weighing a substance, first make sure that the empty scales balance perfectly and that the needle points to zero.
Always place the weights in the right hand pan, the substance to be weighed in the left.
Use the small measuring spoon for measuring the proper amount of chemical.
After the proper whites have been placed in the right hand pan, care-
fully add small quantities of chemical to the left and pan until the two pans exactly balance. (The needle stops at approximately zero when the balance is at rest.)
There are times when suitable weighing units
are not readily available. For such occasions of the
following approximate equivalents will be found it useful:
| U.S. Silver Dollar Half - Dollar Quarter - Dollar Dime Nickel Cent |
400 grains 200 grains 100 grains 40 grains 80 grains 50 grains |
26 grams 13 grams 6 1/2 grams 2 1/2 grams 5 grams 3 1/4 grams |