The
Science Notebook
The
Science NotebookSolids
The
Science NotebookHome Terms of Use Safety Contact Us Experiment Pages Downloads Supplies Useful Links!
On this page, we will investigate solids, one of the three states of matter. (There are investigations on the other two states - liquids and gases - elsewhere on this site.)
A solid object has a definite volume and a definite
shape.
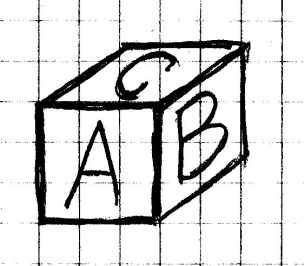
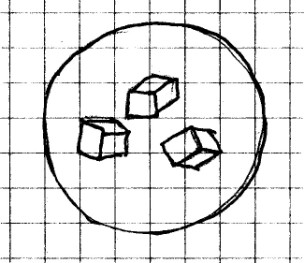
Materials
Needed: A small wooden block such as a baby block;
ruler.
Procedure: Look at the
block. You immediately see that it has a definite shape
that does not change unless you do something to change it,
such as carving a piece off of it.
Measure the length, width and height of the block. You
can calculate the volume of this block by multiplying it’s
length times it’s width times it’s height. Depending on
the units you used, your answer will be in cubic inches or
cubic centimeters. Calculate the volume of your wooden
block. (For more information, go here on the
Mesuring Volume page.
What Happened: Like a
liquid, a solid has a definite volume. But unlike a
liquid, the shape of a solid will not change depending on what
kind of container it is in. In fact, a solid does not
need a container to hold it’s shape.
By now you know that matter exists in three states
or forms on earth - solid, liquid and gas. (There is a
fourth state of matter, called “plasma”, but this state only
exists at very high temperatures, and it is usually
associated with stars.) Many substances can exist in
all three states, but usually are found in only one in
nature. For example, most metals are found as solids in
nature, but metals can be melted by heating. If you
get them hot enough, they can even become gases. But
not all metals are solid at room temperature. One
metal, mercury, is a liquid at room temperature. It is
a silver colored and is often used in thermometers.
The air we breathe is a
mixture of oxygen, nitrogen, and carbon dioxide gases.
All three of these gases may be cooled down to form other
states. Oxygen may be cooled to a very
cold -183 ºC to form liquid oxygen.
Nitrogen becomes a liquid at -196 ºC. And if you cool
carbon dioxide to about -79 ºC, it will form a solid.
We know this solid carbon dioxide as “dry ice”.
There is one substance,
however, that can exist in all three states at a fairly
narrow range of temperatures. That substance is water,
and it will allow us observe changes in state without having
to produce extreme temperatures.
CAUTION!
Always be careful to follow all safety precautions when
using a stove, and use with adult supervision only!
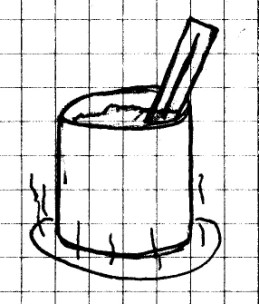
Materials Needed:
Stove; small pot; ice; small room thermometer; candy
thermometer. (A single lab thermometer that will measure at
least from 0 ºC (32 ºF) to 100 ºC (212 ºF) may be substituted
for both.)
Procedure: Fill a
small pot about half full of ice. Place the room or lab
thermometer in the ice and measure the temperature.
Place the candy or lab thermometer in the ice and slowly begin
to heat the ice on the stove until it melts and begins to
boil. Notice the temperature at which the water boils.
What Happened: You
have just observed one of the most common compounds on the
surface of the earth change from solid to liquid to gas.
As a substance goes from one state to another, we say that it
“changes state”.
Water has a definite temperature at which the solid form - ice
- will melt. This is called the “melting point”.
This is the same temperature at which liquid water will
freeze. This point is called the “freezing point”. For
water, the freezing and melting point are 0 ºC (32 ºF).
Water also has a definite point at which it will begin to boil
and change to it’s gas form - water vapor. This is
called the “boiling point” and is 100 ºC (212 ºF).
When you measured the temperature of the ice, it was probably
very near 0 ºC (32 ºF), and when you measured the temperature
of the boiling water; it was probably very close to 100 ºC
(212 ºF). However, the temperatures you measured might
not have been exactly those, for a couple of reasons.
First, you thermometer may not be calibrated exactly.
Second, these points, particularly the boiling point, are also
affected by air pressure. These temperatures for
freezing/melting and boiling are for sea level. If you
live in an area that is high above sea level, the temperature
at which water boils will be several degrees lower. If
you live in one of these areas, you have to cook many foods
for a longer time because the water isn’t as hot when it boils
at a lower temperature.
Not all substances go from the solid state to the
liquid state. Some go from the solid state directly to a
gas. This process is called “sublimation”.
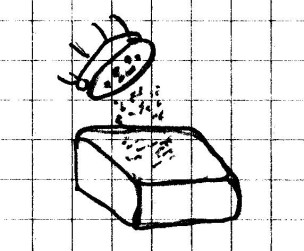
CAUTION! Mothballs or moth flakes are
poisonous if eaten. Keep them away from younger children or
pets!
Materials Needed:
Mothballs or moth flakes; small bowl or other open container;
thin cloth.
Procedure: Place a
couple of mothballs or a spoonful of moth flakes in a small
open container. Place this container in a dry open area
such as a garage and observe it over couple of days.
Mothballs have a very strong smell that most people find
unpleasant, so you probably should not leave these out in the
open on the inside. Tape a piece of thin cloth over the
container so that animals can’t get to them and be sure to
keep them out of the reach of younger children. (See
caution.)
What Happened: Over a
period of time, you saw the mothballs get smaller. If
you were using moth flakes, you probably saw the amount of
solid flakes appear to decrease.
Many mothballs and moth flakes are made of a chemical called
“naphthalene”. Naphthalene does not melt unless it is
heated. When it is exposed to air, it will sublimate
directly from a solid to a gas. If you are anywhere near
the mothballs, you can easily smell this gas because of its
unique odor.
Going Further: Snow
will often sublimate directly to water vapor when the
atmosphere is dry, even if the temperature is less than the
freezing point of water, 0 ºC (32 ºF). If you live in an
area where the weather is cold and dry, you may see several
inches of snow a day appear to vanish without melting. Try
placing a pan of ice cubes out on a sunny day when the
temperature is below freezing and there is a breeze. Place the
pan in the shade, and observe the pan from time to time for a
few hours. Do the ice cubes decrease in size? Do you see
any liquid water?
Materials
Needed: Ice cube; salt.
Procedure:
Pour a little salt onto the ice cube and observe what happens.
What Happened: The
ice began to melt. Salt lowers the melting point of
water, so although the temperature of the ice is 0 ºC (32 ºF),
it begins to melt. This principle is used when salt is
sprinkled on an icy bridge to melt ice. It is also used
when making homemade ice cream. When salt is added to
the ice, it begins to melt, but in the process, the
temperature of the ice and salt water mixture decreases and is
actually less than 0 ºC (32 ºF). This helps the ice
cream mix freeze faster.
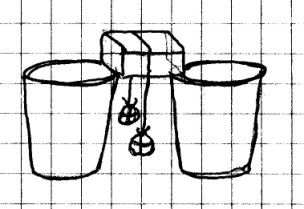
Materials
Needed: Ice cube; string; two large rocks or other
weights; two cold glasses.
Procedure: Tie the
two rocks to either end of a 15 cm (6 in) piece of
string. Place two glasses in a freezer for about 15
minutes to chill them. Place the ice cube between the
two glasses on the edge of each. Place the string across
the ice cube so that the weights hang down freely.
Observe the ice cube for a few minutes.
What Happened: The ice
under the string began to melt. This was due to the
pressure from the string created by gravity pulling the two
rocks. As the melted water flowed back over the string,
it refroze. If you waited long enough, the string passed
completely through the ice cube. You may also have
noticed that the cube melted some where it came in contact
with the edge of the glasses. If so, this was also due to the
pressure on the ice due to its wn weight and the weight
of therocks and string. You had to chill
the glasses to keep that melting to a minimum.
Solids may be classified as either amorphous or crystalline. An amorphous solid does not have as definite a melting point as does a crystalline one. Instead, as it reaches it’s melting point, it begins to soften and then finally becomes a liquid. Metals are usually amorphous, and so is glass. Paraffin, or wax, as we will see in this experiment, is also amorphous.
Materials
Needed: A small piece of paraffin or candle wax; lid
from a food tin; candle or alcohol burner with safety pan;
pliers or tongs; tooth pick.
Procedure:
Place a small piece of the paraffin or wax on a food tin
lid. Press this lump with the tooth pick. How much
does it “give”?
Using the pliers or tongs, hold the wax and tin over the flame
for just a second or two. Remove from the heat source
and press with the tooth pick again. Is there any
difference? Return the wax and tin to the flame and hold it a
little longer. Again press with the tooth pick. Is
there any difference now?
Repeat this process holding the wax over the heat a bit longer
each time until the wax melts.
What Happened: Since
the paraffin or candle wax is an amorphous solid, it gradually
softens as it approaches it’s melting point.
Materials
Needed: Salt; a good magnifying glass or a
microscope.
Procedure: Observe
several grains of salt under a magnifying glass or
microscope. What shape are the grains?
What Happened: The
grains of salt were all box shaped. Ordinary table salt
is a chemical compound called “sodium chloride”. In it’s
solid form, it is “crystalline”. In other words,
it forms crystals. Crystals of different solids may take
different shapes, but every substance that forms crystals has
it’s own unique shape.
Going Further: Try
this experiment with sugar crystals. Do they look the
same as the salt? Also, look up “crystals” in an
encyclopedia or online to see pictures of some other crystal
solids.
You may have seen crystal
growing kits in a toy store. These next three
experiment will show you how to grow crystals of salt, sugar
and Epsom salts for next to nothing, and the crystals you
grow can be every bit as impressive as the ones in the
expensive kits.
This experiment will allow you to grow some large
crystals of salt that you can observe without a microscope.
CAUTION!
Always be careful to follow all safety precautions when
using a stove, and use with adult supervision only!
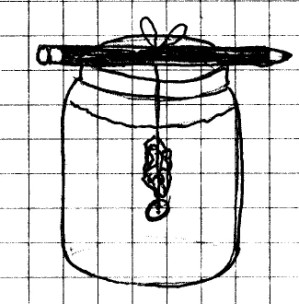
Materials
Needed: Salt; water; pencil; string; button; small
pot; stove; small glass jar or bottle, such as a ½ liter (1
pint) container.
Procedure: Add ½
liter (2 cups) of water to a small pot. Dissolve as much
salt into the water as possible. Slowly heat the water
to boiling and continue to add salt until no more will
dissolve. You should be able to add more than ½ liter of
salt to the water.
When you can add no more salt, allow the water to cool enough
so that it will not crack the glass container. Fill the
container almost full.
Pick a button that will not
float. Also, try to avoid a metal button. Tie the
button onto one end of a piece of string. Tie the other
end of the string to a pencil. The string should be just
long enough so that the button will almost reach the bottom
when you place the pencil over the jar as shown.
This next step involves a lot of patience! Place the
container and string in a place where it will not be disturbed
for several days. Check your container every few hours
the first day, and then once a day for several days.
What do you see?
After there is a good growth of salt crystals on the string,
carefully remove the string and place it on a paper towel to
dry. Observe the crystals you have grown. Do the
shapes look similar to the ones you saw under the microscope?
What Happened: The
salt water solution you made was a “supersaturated”
solution. By heating the water, you were able to
dissolve more salt in the water. When the water cooled,
the salt stayed in solution. Then, the string gave the
dissolved salt a surface to attach to, and individual crystals
began to come out of the solution. As more crystals came
out of solution, they attached themselves to the crystals
which were already there, and stacked themselves together,
something like building blocks, to make the larger crystals.
If you are patient, the crystals you grow from this experiment
can be quite large. It is important to let the crystals
form slowly and not disturb them as they are forming.
In this experiment, you will be growing crystals of sugar. You know this better as “rock candy”. If you use clean utensils and a food jar or glass that nothing harmful has ever been stored in, you can eat the sugar crystals after you are through studying them.
CAUTION!
Always be careful to follow all safety precautions when
using a stove, and use with adult supervision only!
Materials Needed: Same
as the last experiment, except substitute sugar for the salt.
Procedure: Follow the
same procedure as the last experiment, except use sugar
instead of salt.
What Happened: The
crystals of sugar were formed in much the same was as the
salt, but the shape was different.